 |
Making
your table easy to read and interesting to look at is what formatting is
all about. You can color the table background. You can color the table's
lines and set the line style and width. Of course, you can format the text
in the table in all the normal ways, too.
The steps below will give you some practice in applying formatting.
More importantly the steps will show you the consequences of formatting
too soon.
When creating your own tables, take care that your formatting choices
do not make your table's content too hard to read. The choices used below
are not particularly good for reading! They were chosen to make it clear
what happens when you move things around in a table, not for beauty or
readability.
Getting your table to work well often means combining cells together, called merging. The steps below will show that splitting cells is not the same
as reversing a merge.
|
 |

Where you are:
JegsWorks > Lessons > Word97-2003
Before you start...
Project 1: Word Basics
Project 2: Auto Tools
Project 3: Brochure
Project 4:
Report
MLA Guidelines
Create Report
Tables 
Tables & Borders bar
Table Tasks
 Table- Button Table- Button
 Table- Draw Table- Draw
 Table- Format Table- Format
Finish
Report
Summary
Quiz
Exercises
Search
Glossary |
|
 |
Step-by-Step: Format a Table |
 |
|
What you will learn: |
to format table text
to change
table background
to move rows and columns
to merge
cells
to split
cells |
Start with:   ,
table2.doc from
preceding lesson ,
table2.doc from
preceding lesson
Format Table Text
-
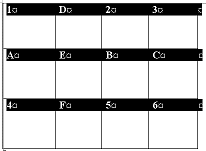 Select the whole table using the menu. Select the whole table using the menu.
 | |
   | |
or click on the
 Move Table
handle. Move Table
handle.
- Change the font to Size = 16 pt.
and Bold using the Formatting bar buttons.
Center Table & Text
You want to center the table horizontally on the page and also to center the text in each cell both horizontally and vertically inside the cell. That's three
different kinds of centering!
- Center table on page:
While the whole
table is selected, click
 the Center button on the Formatting toolbar.
The whole table is centered horizontally on the
page. the Center button on the Formatting toolbar.
The whole table is centered horizontally on the
page.
 In earlier
versions of Word this action would center the text inside each
cell. In earlier
versions of Word this action would center the text inside each
cell.
- Center text in
cell:
 Click the Align
Center button on the Tables and Borders bar. The cell text is centered both horizontally and vertically inside each cell. Click the Align
Center button on the Tables and Borders bar. The cell text is centered both horizontally and vertically inside each cell.
  This
action is not as easy in Word 97. You must do the horizontal and
vertical centering separately. This
action is not as easy in Word 97. You must do the horizontal and
vertical centering separately.
Format Cells
You will now format the table cells with background color and you
will change the color of the text. When you start moving rows and
columns around later, you will be able to tell better what is going
on because of the colors. We aren't after beauty here!
-
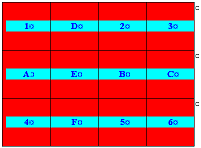 While all cells are selected, use the Tables and Border bar and the Formatting toolbar to format: While all cells are selected, use the Tables and Border bar and the Formatting toolbar to format:
Shading = Red
Font Color =
Yellow.
While the cells are selected, the text is highlighted in the reverse color.
-
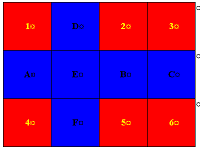 Reformat all the cells that have letters with: Reformat all the cells that have letters with:
Shading = Blue
Font Color = Black.
(You
can't select all the lettered cells at once.)
-
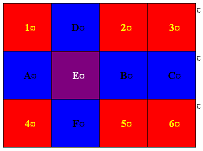 Select the second cell in the middle row,
which contain the letter E. Be
careful to select the whole cell and not just the letter E. Select the second cell in the middle row,
which contain the letter E. Be
careful to select the whole cell and not just the letter E.
- Reformat cell E with:
Shading = Violet
Font Color = White.
Move Row
It is better to do any moving before you start changing the formatting. Sometimes the formatting will go along with the cell, but sometimes it doesn't. You can make yourself a lot of work by doing things in the wrong order.
- Select the middle row. (Be sure to
catch the end of row mark, too.)
-
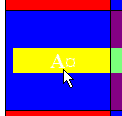 Move the
pointer over the first cell in the selected row, which contains the letter A, until the pointer changes to Move the
pointer over the first cell in the selected row, which contains the letter A, until the pointer changes to
 . Yes, the direction of the arrow
changes! . Yes, the direction of the arrow
changes!
-
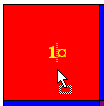 Drag up until
the cursor shows in the first cell in the table (which contains a 1), then drop. Drag up until
the cursor shows in the first cell in the table (which contains a 1), then drop.
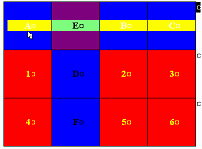 The middle row
(blue and violet backgrounds) moves up and becomes the first row. The
formatting stayed with all the cells this time. The middle row
(blue and violet backgrounds) moves up and becomes the first row. The
formatting stayed with all the cells this time.
Move Column
-
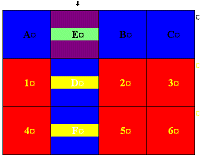 Select the second column, which now has E in the top cell. Select the second column, which now has E in the top cell.
-
Move the pointer over the cell containing an E until it changes to
 the selection shape. the selection shape.
-
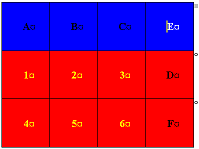  Drag to the right until the cursor shows beside the end-of-row mark for the first row and drop. The whole column moves to the right
side of the table. Drag to the right until the cursor shows beside the end-of-row mark for the first row and drop. The whole column moves to the right
side of the table.
The shading in the column changed to
match the row. This is an example of why you should wait to format
a table until all the rows and columns are set.
Unexpected things can happen!
 You lost the vertical
centering. Very strange! You lost the vertical
centering. Very strange!
Restore the centering by clicking
 the Center
Vertically button.
Merge Cells
-
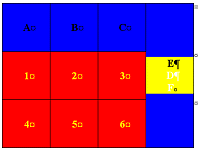 Select the last column. Select the last column.
- Click on
 the Merge Cells
button in the Tables and Borders bar. the Merge Cells
button in the Tables and Borders bar.
The contents of all three cells become
separate paragraphs in the combined cell. The cell background is
the same as the top cell in the column, but the paragraphs kept their own text formatting. Is this getting complicated??
Split Cells
- While the column is still
selected, click on
 the Split Cells button on the Tables and Borders bar.
-
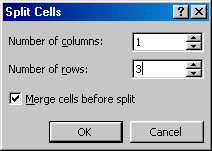 In the Cells Split dialog, set: In the Cells Split dialog, set:
columns =
1
rows =
3
Merge cells before
split: checked
-
Click on OK
to close the dialog.
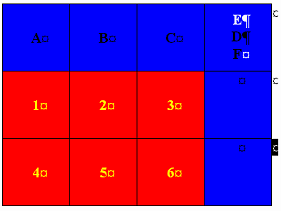 You are back to three
cells in the last column. But the text stayed in the top
cell. So, Split Cells is not the same as Undoing the merge. You are back to three
cells in the last column. But the text stayed in the top
cell. So, Split Cells is not the same as Undoing the merge.
 If you create more than one column with
your Split, the cell contents are divided between the columns. Why
not with rows??? I don't have a clue! If you create more than one column with
your Split, the cell contents are divided between the columns. Why
not with rows??? I don't have a clue!
Final Edit
-
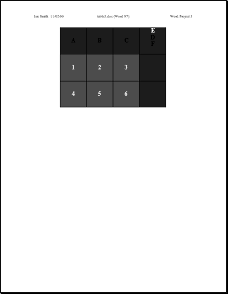 Open the Header and type your name, 2 spaces, the date, TAB, from the
menu | | , TAB, Word Project
4. Open the Header and type your name, 2 spaces, the date, TAB, from the
menu | | , TAB, Word Project
4.
- Check Print Preview. Make corrections if needed.
-
 Save on your Class disk as table3.doc . Save on your Class disk as table3.doc .
 How to handle a full disk
 Print in black and
white. How did your red and blue come out?
How about the text? This illustrates the problem of
colored illustrations printed in black and
white. Print in black and
white. How did your red and blue come out?
How about the text? This illustrates the problem of
colored illustrations printed in black and
white.
|
|

