 |
You can
draw your table instead of using the
Insert Table button when you need a complicated table or just a small
one. You won't have to do as much resizing and merging of rows and columns.
The tools on the Tables and Borders bar take just
a little bit of practice. Once you know what they can do, you'll be
looking for excuses to create tables!
|
|
Where you are:
JegsWorks > Lessons > Word97-2003
Before you start...
Project 1: Word Basics
Project 2: Auto Tools
Project 3: Brochure
Project 4:
Report
MLA Guidelines
Create Report
Tables 
Tables & Borders bar
Table Tasks
 Table- Button Table- Button
Table- Draw
Table- Format
Finish
Report
Summary
Quiz
Exercises
Search
Glossary |
|
 |
Step-by-Step: Draw a Table |
|
|
What you will learn: |
to draw the outside of a table
to draw lines in a table
to TAB between table
cells
to move text between cells
to add a row inside a table
to add a column inside a
table |
Start with:   , blank
document , blank
document
Draw a Table
- If necessary, open a new blank document.
- If necessary, open the Tables and Borders bar by
clicking
 the Tables
and Borders button on the Formatting toolbar. the Tables
and Borders button on the Formatting toolbar.
- Show both rulers in the Word window.
- Click on
 the Draw Table button. Your pointer changes to the Draw Table button. Your pointer changes to
 the pencil shape. the pencil shape.
-
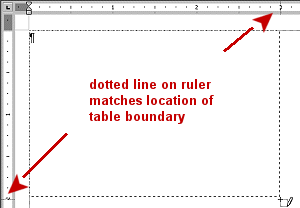 Drag the pencil to draw a rectangle about 3" wide and 2" high. Look
at the rulers as you draw. You will set the dimensions exactly
later. Drag the pencil to draw a rectangle about 3" wide and 2" high. Look
at the rulers as you draw. You will set the dimensions exactly
later.
A dotted line
on the ruler shows where the table edge will fall.
 For Word 97 there is no line on the ruler. You
will just have to watch carefully.
For Word 97 there is no line on the ruler. You
will just have to watch carefully.
-
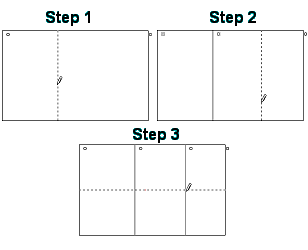 Drag with the pencil to draw vertical lines in the rectangle at 1" and 2"
on
the ruler. Drag with the pencil to draw vertical lines in the rectangle at 1" and 2"
on
the ruler.
- Use the pencil to draw a horizontal line in the rectangle at 1" on the
vertical ruler.
- Click on
the Draw Table button again to turn it off.
-
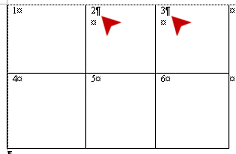
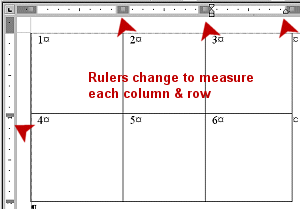 Click in the top left cell and type a 1 . Click in the top left cell and type a 1 .
- Press TAB to move to the next cell to the right. Type a 2 .
- Continue
numbering each cell and using TAB to change cells. Did you
notice that the rulers changed to measure each column and
row?
 New
row appears: You used TAB one time too many. Just use Undo to get rid of it. New
row appears: You used TAB one time too many. Just use Undo to get rid of it.
Erase & Redraw
Erasing and drawing lines is actually rather fun. After you have
text in your cells, however, things don't go back the way they
were.
- Click on
 the Eraser toggle button. The pointer changes to the Eraser toggle button. The pointer changes to
 the eraser shape. the eraser shape.
-
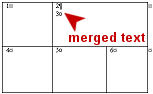  Click on the dividing line between cell 2 and cell 3. When it is highlighted, release the mouse button and the line is erased. The contents of the two cells now show as two paragraphs in a single cell. Click on the dividing line between cell 2 and cell 3. When it is highlighted, release the mouse button and the line is erased. The contents of the two cells now show as two paragraphs in a single cell.
You have to drag to erase lines across more than one cell.
With Word 97
you must drag down the line to highlight it in all cases.
 Click on
the Draw Table button again, and draw a line to split the merged cell into two cells again. Word easily connects your line to the existing
line, but the cell contents remain in cell 2. Click on
the Draw Table button again, and draw a line to split the merged cell into two cells again. Word easily connects your line to the existing
line, but the cell contents remain in cell 2.
Select and Move Text in Cell
You need to move the text back
into cell C1. The text is so short that it would be easy to just
retype, but you need some practice. Selecting just what you want
and getting it to a new location can be a bit tricky in a
table.
-
 Toggle
Draw Table off by clicking
it again. Toggle
Draw Table off by clicking
it again.
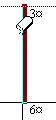
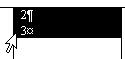
- Move the pointer to the left of the line with the number 3 in it. Click and the
whole cell is selected. The
highlighted part includes the padding at the left and all the
blank space to the right of the actual text.
This is not what you
want! You just need the one line.
- Undo.
-
 Put the
cursor to the left of the 3 , hold the
SHIFT key down, and press the Right Arrow
key once. Now the number 3 is selected. You could drag
to select. It is very easy, however, to select the whole cell
while dragging. Put the
cursor to the left of the 3 , hold the
SHIFT key down, and press the Right Arrow
key once. Now the number 3 is selected. You could drag
to select. It is very easy, however, to select the whole cell
while dragging.
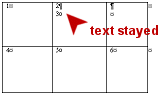
-
 Drag the 3 over to the
cell C1 on the right. You are back to where you started except for
a paragraph mark or Drag the 3 over to the
cell C1 on the right. You are back to where you started except for
a paragraph mark or
   two.
two.
Extra paragraph marks can change the height of
your rows.
- Delete all paragraph marks so that all you
have is the numbers and the end-of-cell symbols.
Insert Row
-
 Put the cursor in
the cell in the bottom right corner. Put the cursor in
the cell in the bottom right corner.
-
From the menu select | |
Click on
 the Insert Rows button on
the Standard toolbar. The new row appears above the current one. the Insert Rows button on
the Standard toolbar. The new row appears above the current one.
- Label the cells in the new row with the letters A, B, C.
Size: Cell Height and Width
-
 Drag from the cell A1 across to cell C3, selecting all
the cells. Drag from the cell A1 across to cell C3, selecting all
the cells.
- From the menu select
|.
On the Column tab set the width to 1".
On the Row tab set the height to exactly 1".
You must type in the unit of measure if it doesn't match what is showing.
From the menu select |
Set the Column width = 1" and the Row Height to exactly 1".
If you drew your table accurately to start with, you won't see much
change.
Insert Column
-
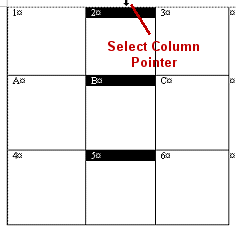 Put the cursor into cell B1. Put the cursor into cell B1.
- From the menu select
| |
Select column B by moving the pointer above the column until the pointer changes to
 ,
then click. Click on ,
then click. Click on
 the Insert Columns button. A new column
appears to the left of what was column B. the Insert Columns button. A new column
appears to the left of what was column B.
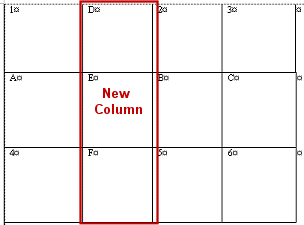 Click in the top cell of the new column and type a D. Click in the top cell of the new column and type a D.
- Press the down arrow key to move to the next blank cell. Type in E.
- Repeat with F for the last blank
cell.
-
Save as table2.doc on your Class disk
in the folder word project4.
 How to handle a full disk
|
|
