 |
Once you have the records that
you want in your report, you can decide if you want to sort or
group them.
What is a group?
A
group is a set of sorted records that match a value
or interval, like having the same postal code or having a purchase
date in the same month.
Each group can show a Group Header section,
a Group
Footer section, both sections, or neither section in the report. In these sections you
could put a label for the
group or calculate totals with an aggregate function, like Count, Sum, Avg, Max, or Min.
This feature is what makes grouping different from just sorting.
You can group on a field from the source of the report or
on an expression.
For example, you could group campers by their unit or
grade or age or postal code or alphabetically by first letter of their
last name. You could group products by price or category or manufacturer
or sales for the month.
 |
|
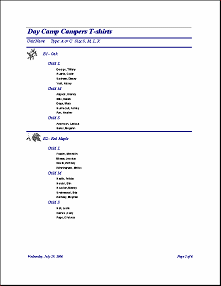
Report lists campers,
grouped by camp unit and
by T-shirt size within the unit |
|
|

Where you are:
JegsWorks >
Lessons >
Databases
Before you start...
Project 1: Intro
Project 2: Access Basics
Project 3: Tables & Queries
Project 4: Forms & Reports

Import/Export/Link
Designing Forms
Designing Reports
 Report
Wizard Report
Wizard
Printing Reports
Create
Report Manually
Groups
Totals
- Simple
Totals - Calculated
Sharing Reports
Special Forms & Reports
Summary
Quiz
Exercises
Search
Glossary
Appendix
|
|
Sorting and Grouping
 Sorting and Grouping
are controlled from a dialog that is available only for reports. This dialog
is opened by the Sorting and Grouping button on the toolbar Sorting and Grouping
are controlled from a dialog that is available only for reports. This dialog
is opened by the Sorting and Grouping button on the toolbar
 in Report Design View.
How many groups? The dialog allows you to sort and group using fields from the
report's source or using expressions. You can choose up to
10 fields or expressions to sort or
group on.
Order of sorting/grouping? The sorting/grouping is done in the order
of the rows in the dialog, starting with the top of
the list. The order is VERY IMPORTANT!
 Calculated Controls: Calculated Controls:
You won't see any of your calculated controls from the report
in Sorting/Grouping list, only fields from the report's source. You
can copy an expression from a control to the Sorting/Grouping dialog to sort
or group on it.
Or, you can change the Control Source for
the report to a query that includes the calculation as a column. Then it
will show as a choice in the dialog.
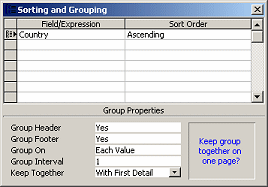
Group Properties
In the Group Properties at the bottom of the dialog, you can select the way the selected group will
behave.
- Group Header or Footer:
- Yes = Show the section.
Selector button in
upper section will show the symbol for grouping:

- No = Don't show the section.
If you just want to sort, do not show the group header or footer.
- Group On: Group on Each Value (default) or on
Prefix Characters (for text
fields) or other choices, depending on the field's data type. For example, Date/Time
fields can group by Year,
Quarter, Month, etc.
- Group Interval: 1 for each whole value (default) or
first letter for text
fields, or another number of prefix characters...
- Keep Together:
- No (default value)
- Whole Group: Forces a new page if the group
won't fit on the current page. Group will flow onto more pages if
necessary, but the next group will start on a new page.
- With First Detail: Keeps the group header with the first detail, so
that the header
does not get stranded at the bottom of a page by itself.
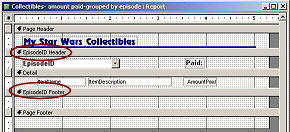
Example: Single Group
In
the Star Wars Collectibles database, a
report based on a table groups the items in the collection on the
EpisodeID field.
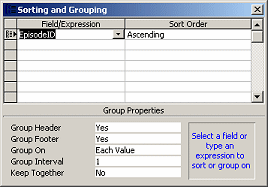
 In
the Sorting and Grouping dialog, there is a single grouping which is set
to show both a group header and a group footer. In
the Sorting and Grouping dialog, there is a single grouping which is set
to show both a group header and a group footer.
In Report Design View, the group header includes a control for a title for the
group and a label for a column in the Detail section. The group footer
only has blank space. This section did not really need to be shown at all
this time.
Inside each group, the items are listed in the order that they were entered in the
underlying table. To order them differently, you could add another field to
the Sorting and Grouping table.
By the way, the table's design defines EpisodeID field as
a Lookup
field. That is why its control is a combo box. What you actually see in the
report's Group Header is the
EpisodeName value, instead of the ID number.
We discussed this helpful but confusing feature earlier in the lesson
Project 2: Access Basics: Lookup
Wizard.
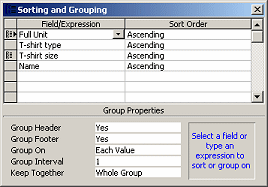
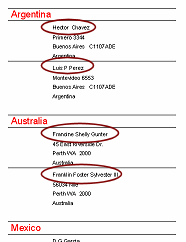
Example: Two Groups
In
the Day Camp database, a report on T-shirts groups the records
by camp unit (Full Unit) and then by
T-shirt size within each unit. The
Sorting and Grouping dialog also sorts on two other fields. The order in
the Sorting and Grouping dialog is VERY important.

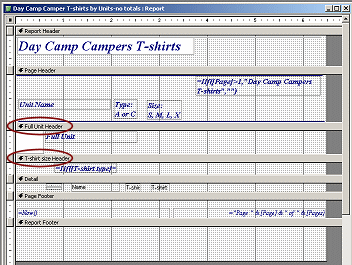
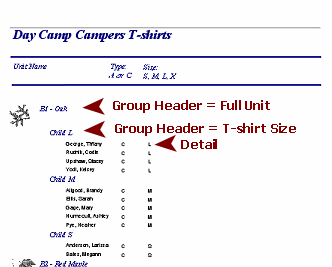 This report shows group headers but not group footers for the two
grouping levels, Full Unit and T-shirt size. It is common to indent the
group headers slightly and use a different font or font size or font
color. This helps you to spot the change in the report
groupings. This report shows group headers but not group footers for the two
grouping levels, Full Unit and T-shirt size. It is common to indent the
group headers slightly and use a different font or font size or font
color. This helps you to spot the change in the report
groupings.
To use this report to find out how many t-shirts to pick up for the campers, the leader must
count them on the page herself. Not such a good plan! Later you will
learn how to make a report create totals or to count items.
 |
Step-by-Step: Groups |
|
|
What you will learn: |
to create group
to format controls
to move and align controls
to add controls to headers/footers
to add page numbers and total number of pages
to use 2 groups with headers |
Start with:
 ,
resource files,
worldtravel.mdb, Clients Report from the previous lesson ,
resource files,
worldtravel.mdb, Clients Report from the previous lesson
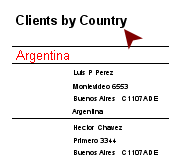
World Travel Inc. wants your Clients Report
to show how many clients are in each country. You need to add some
groupings and totals to your report. Group by Country
Currently the Clients Report is not
sorting the records at all. The report shows the records in the order
in which they show in the underlying table. That could be exactly what
you want for some reports. For this one, however, you want to see how many
clients are from each country. You could sort them on Country and then
count by hand. A better way is to group the records
so that, after another lesson or two, you can create totals.
If necessary, open the Clients Report
from the previous lesson in Report Design View.
 Save
the report as Clients - by country. Save
the report as Clients - by country.
 If necessary, open the Sorting and
Grouping dialog. If necessary, open the Sorting and
Grouping dialog.
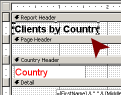
In the top row of the dialog, select the
field Country and leave the sorting as
Ascending.
Make the following choices in the bottom section:
 The Design View changes to include the two new sections. No controls
are added automatically. The Design View changes to include the two new sections. No controls
are added automatically.
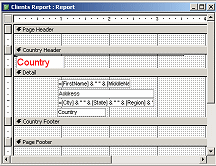 Drag
the field Country from the Field List and drop it in the Country
Header. Drag
the field Country from the Field List and drop it in the Country
Header.
Delete the label for the new control.
Format the Country
control as Arial, Red, 14.
Move the control to the left edge of the
section.
Save
the report. (Clients - by country)
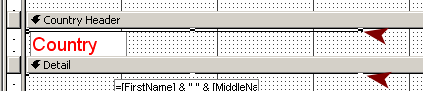
Add Divider Lines
Headers and footers often benefit from using different
fonts, font color, and font size than the Detail section. Divider lines
can be helpful, too. You just have to be sure that your divider lines
are lined up neatly with each other.
Resizing
lines: Use the Properties dialog to set a line's width or height.
It is difficult to drag a line to resize it without making it slant.
Click the Line tool
 on the Toolbox
and then click in the Country Header section, just
above the Country text box. on the Toolbox
and then click in the Country Header section, just
above the Country text box.
Use the Properties dialog for the line to
make it
3.5" wide.
Leave the Border Width as Hairline.
Copy the line.
Click at the top of the
Detail section, above the FullName
control.
Paste.
With the second line still selected, hold
the SHIFT key down and click on the first line.
Now both are selected.
It can be hard to click in just the right spot to select a thin line.
It is hard to see whether or not you have selected a line when it is
right next to the section bar as in the illustration. Look for the
handles in reverse color.
Selecting hard-to-see
controls, like lines:
Be sure that Access is set to select with partial enclosure. (Tools
| Options | Forms and Reports) Drag across the area where you
think the control is. Look for handles to appear. If you wind up
selecting too many controls, hold SHIFT down and click on the ones you
don't want to
deselect them.
From the menu select ||.
The two lines line up.
If the lines are not all the way to the left edge of the design window,
while they are still selected,
drag them left until they are at the edge.
 Switch
to Print Preview. Switch
to Print Preview.
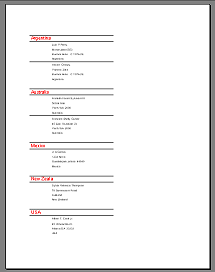
The clients for each country are clearly separated by the group header
- the Country name and dividing line.
The clients within each Country group are separated by a dividing line,
but they are NOT in alphabetical order within each
country. We will fix that shortly.
Inspect your report. Is the Country control wide enough for all
of the country names? Are the names and addresses lined up? Are the two
divider lines the same width? Are they lined up at the left edge of the
report?
If you made no errors, you still have one correction to make. The
default width for the Country header cuts off the name "New Zealand".
Switch to Report Design View and make the Country control
at least 1.5" wide. Make any other needed corrections and then switch
back to Print Preview and inspect again.
When the
report is in good order, save
the report. (Clients - by country)
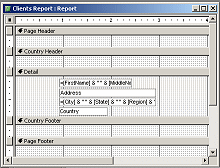
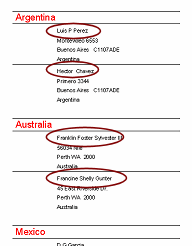
Sorting Within Groups
The clients should be sorted alphabetically within each
Country group. The control FullName on the
report holds the client's name. It is not in the Field List since it is
a calculated field. (Since FullName starts
with the first name instead of the last name, it is not suitable for
sorting anyway!)
So how can you sort the names? Use the original fields
from the report's source.
Switch back to Report Design View.
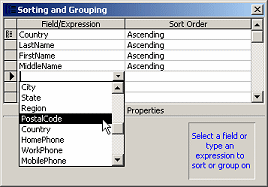
 In
the Sorting and Grouping dialog, in the second row select the
field LastName from the drop list. In
the Sorting and Grouping dialog, in the second row select the
field LastName from the drop list.
Leave the Sort Order as Ascending.
You don't want a header or footer, just the sorting.
Add FirstName
and MiddleName to the next two rows down.
Also sort them Ascending.
Switch to Print Preview.
Now the clients are sorted alphabetically within each country.
Save
the report. (Clients -by country)
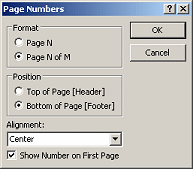
Page Numbers
If your report is longer than one page, you would be wise
to include page numbers and the total number of pages in the report.
Access makes this very easy!
-
Switch to Report Design View.
-
 From
the menu select | From
the menu select |
The Page Numbers dialog appears.
-
Select Page N of M
-
Select Bottom of Page [Footer].
-
Select Center
-
Check the box for Show Number on First Page.
-
Click on OK.
Report Design View now shows a calculated control in the Page Footer
section that uses literal text and two special fields,
Page and Pages. The
control is not wide enough to show the whole expression, but it is plenty
wide enough for the text that results from the expression:
="Page " & [Page] & " of " & [Pages]

-
Switch to Print Preview and inspect the two
pages of the report.
The first page shows "Page 1 of 2". Showing the total number of
pages on the first page can be a big help when a report has many pages.
The Print Preview window does not show the total number of pages anywhere
and it can take a long time to format the whole report just so you can
show the last page.
-
Save
the report. (Clients -by country)
 Problem:
Page numbers are not centered on the paper Problem:
Page numbers are not centered on the paper
This control is not centered on the paper even though you
choose Center alignment in the Page Numbers dialog!
Why:
The default width for the report was 5" but the paper is 8.5" wide
with 1" margins. The control IS centered but only within
the 5" width defined in Report Design View!
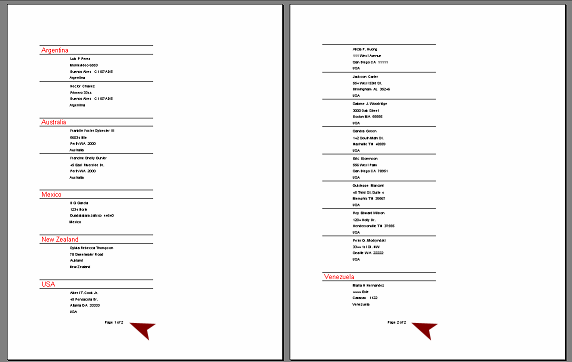
Report Header
Looking at both pages of this small report, do you notice that
something is missing?? There is no title. You may remember for a few days
what this report was all about. But what about after a few months? A
title that clearly identifies what this report is about is always a good
idea!
 Unexpected white
space Unexpected white
space
Adding new sections to a report can
change the way the groups and records fall on the pages. If you chose for
a group to Keep Together as a Whole Group, you
may wind up with a lot more white space than you expected!
Even choosing With First Detail can result in
a noticeable blank spot if the group header or Detail section are fairly
tall.
- From the menu select |.
Two new sections appear.
- Use the Label tool
 from the Toolbox bar
to create a new control at the left of the Report Header section. from the Toolbox bar
to create a new control at the left of the Report Header section.
- Type Clients by Country as the
text for the label.
- Click out to get out of Edit mode.
- Click on the new control to select it again.
- Format the control with font size 14, Bold.
- Double click the edge of the control to resize it to fit
the text.
The control appears to be a bit short, cutting off the last letter.
Not to worry!
-
 Switch
to Print Preview. Switch
to Print Preview.
The text in the label all shows! Another bit of confusion to make
your learning experience "interesting".

What changed: The report title shows only on the first page. Adding
this section changed the way the report falls on pages. You had set the
Country
group to keep the group header with the first detail. After adding the
report title, there was not enough space on the first page for both the USA group header and first record,
so both moved over to the
second page, which forced the group for Venezuela to a third page.
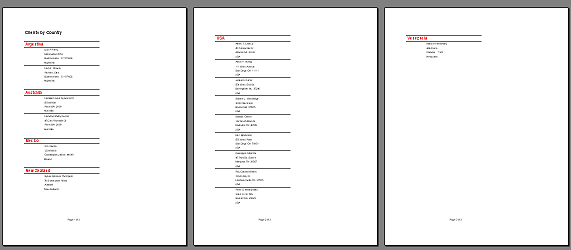
There are several adjustments you could make to reduce the number of
pages. The simplest is to play around with the margins.
-
 Click on the Setup... button on the Print Preview toolbar. Click on the Setup... button on the Print Preview toolbar.
The Page Setup dialog appears.
- Change the bottom margin to 0.5" and click on
OK.
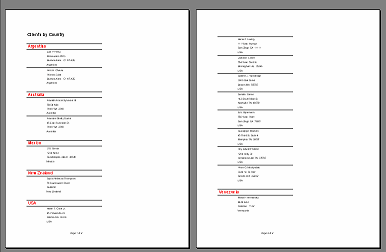
The report is back to 2 pages.
- Save
the report. (Clients -by country)
Two Groups
Now that your report is looking good, let's get a bit deeper into the
groupings. What will change if you have more than one group? Usually you will
want to show a header for the new group and include a label in the Group
Header.
You will add a group for the PostalCode field.
Usually you should have your groups first and then the fields that are
just sorted.
-
 Switch
to Report Design View. Switch
to Report Design View.
- In the Sorting and Grouping dialog, add a group for
PostalCode
- Ascending
- Group Header = Yes
- Group Footer = No
- Keep Together = Whole Group
-
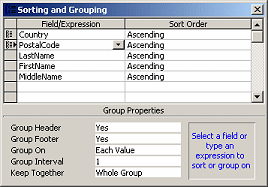 Drag
the new group up so that it follows the Country
group. Drag
the new group up so that it follows the Country
group.
- From the Field List, drag the PostalCode field and
drop it in the new group header section.
- Delete the control's label.
- Format the control as 12 points, Bold, and Green.
- Resize the control to fit the new font size.
-
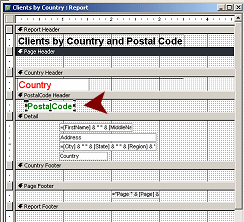 Position
the new control a bit indented from the Country control. Position
the new control a bit indented from the Country control.
- Edit the Report title to read Clients by
Country and Postal Code.
The control should automatically resize to fit.
-
 Switch
to Print Preview. Switch
to Print Preview.
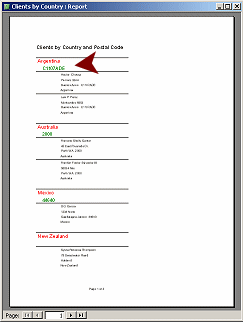
The report is 3 pages again because of the new group header section.
On the first page it is hard to tell if the new grouping level is
working correctly. The first two countries have two records each, but
they have the same postal code.
-
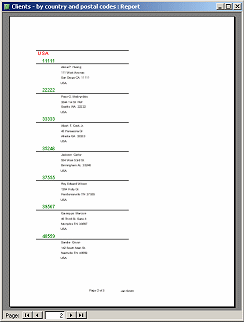 Navigate
to page 2. Navigate
to page 2.
There is a separate grouping for each of the postal codes for the USA
addresses so the new grouping is working.
- Switch to Report Design view.
- Add a text label to the center of the Page Footer with your name.
 Print all pages.
- Save
the report as Clients-by country and
postal code
|
