Forms & Reports:
Sharing

Title: Jan's Illustrated Computer Literacy 101
Did you want: Working with Databases: Access 2007, 2010, 2013, 2016


Now that you have created a number of Access objects, you will likely need to share your data and reports with others.

Printing is still a great way to share, but there are several other methods.

Since a database object exists only as part of the database, you must convert the object to a different format or else export it to another database.

The same methods will work for tables, query datasheets, forms, and reports, but the formats available are a bit different for each type of object.


Where you are:
JegsWorks > Lessons > Databases

Before you start...

Project 1: Intro

Project 2: Access Basics

Project 3: Tables & Queries

Project 4: Forms & Reports Arrow: subtopic open
    Import/Export/LinkTo subtopics
    Designing FormsTo subtopics
    Designing Reports Arrow: subtopic open
    Icon: StepReport Wizard
         Printing Reports
    Icon: StepCreate Report Manually
    Icon: StepGroups
    Icon: StepTotals - Simple
    Icon: StepTotals - Calculated
    Icon: StepSharing Reports
    Special Forms & ReportsTo subtopics
    Summary
    Quiz
    ExercisesTo subtopics


Search  
Glossary
  
Appendix


Formats for Exporting Access Objects

The formats that you can choose from vary, depending on the type of object you are trying to export. The most commonly used export formats are probably Text (as comma- or tab-delimited), Excel, and dBase.

The exported file may not contain everything that you had in the Access object. For example, OLE objects like photos and embedded spreadsheets are not exported except in Snapshot Reports and possibly some database formats. The formatting you have applied may not be exported. Calculated fields do not export as calculations but as values in most formats.

To verify that your object was exported correctly, you must have software that can open the file! There are many opportunities for problems here!!

Export formats for a table

Export formats for forms Export formats for reports
Formats for tables & queries Formats for forms Formats for reports

TipAsk about the software: If you are sending the exported file to someone else, ask what software and what version of that software they will be opening the file with. It is worth some trouble to figure out the best format if you are trying to share with someone who does not have Access installed or who does not have the same version you do.


Icon: Snapshot Snapshot Report

What you export may look a lot different from the original. The Snapshot Report is a special format just for reports. The exported file looks exactly like the report that you designed!

WarningViewer Software Required: The user must open the file with the Snapshot Viewer. The viewer shows the exported report exactly as you see it in Access, even if the viewing computer does not have Access installed. The Snapshot format is the only export format that can include OLE objects, such as photos.

You create a snapshot by Exporting the report in Snapshot Format. The exported file will have the extension .snp. So if the report in Access is named My Report, then the snapshot will be named My Report.snp.

The Snapshot Viewer is a free downloadIcon: Off site from Microsoft.

Snapshot Viewer Snapshot Viewer's Print dialog

The first time you create a snapshot, Access will install the viewer for you. You may be prompted for your installation CD.

Your user can print directly from the Snapshot Viewer and even choose to print just certain pages. You can also send the file by email from Snapshot Viewer's File menu, using your default email client. From the Snapshot Viewer, you do NOT have to have a MAPI client like Outlook.


Sharing Database Objects with Others

There are several ways to share your tables, queries, forms, and reports with others who do not have access - print, email as an attachment, export to a file, Analyze It with Excel, Publish It with Word, export/import into a different database, display as a web page or data access page,  or ordinary copy-and-paste.

Method 1: Print

Dialog: PrintReports are the preferred way to print data since you have more control on exactly what is printed and how. You printed objects earlier in Access Basics: Print Objects. The lesson Printable Form had more details about printing form records. The lesson Printing Reports discussed the details about printing reports.

  • Select an object in the Database Window or open it.
  • From the menu select  File | Print.... 
  • Choose to print All or just certain pages (in sequence) or Selected Record(s) (for datasheets and forms).
     
    For a report, you cannot select the records after the report is created. You have to change the report's source to select the records that you want.
     

Method 2: Email as Attachment

You can quickly send an Access object as an attachment with the Send To command. You must choose an export format for your data from 3 different Excel formats and 3 text formats (HTML, plain text, Rich Text Format). For reports, the Snapshot Format is also available.

Warning Which Email Program: To use the Send To command from inside Access, you must have an email program that supports Messaging Application Programming Interface (MAPI), such as Outlook, Microsoft Exchange, or Microsoft Mail. These are often used by corporate networks for internal and external email. If you use another email client, like Outlook Express, or a web-based email account like HotMail or Yahoo, you cannot email directly from Access.

  • Menu: File | Send To | Mail Recipient (as Attachment)Select an object in the Database Window or open the object inside Access.
  •  File | Send To | Mail Recipient (as Attachment)
  • Dialog: Send To- snapshotSelect a format (an Excel format, text format, or Snapshot)
  • If the object was open and you selected some records, choose whether to send All or Selection.
  • Click on OK.
  • For a report, a message box appears and says that it is Printing. For other formats, the Status bar shows the progress in exporting the object as a file.
  • Complete the email message, fill in the recipient's address, and then Send.
     

WarningFile Size: Many email accounts cannot accept a large attachment, often anything larger than 2 MB. If your attached file is large, consider whether you need to send the whole object. Perhaps you could restrict the number of records by filtering first. Otherwise, you may need to use a different delivery method.

Alternative for large files: Use the Export method below to create the file and then upload the file to a web server. (If you do not have access to your own web space or it is not large enough for the large file, there are a number of free file storage web sites.) Then you can email the link to the file instead of sending the whole file.

Method 3: Export as file

Dialog: Export report in snapshot formatTo save your data or a report as a separate file, you can use the  File | Export  command. Your choices for a format vary, depending on the type of object you are exporting.

For a report, a message box appears and says that it is Printing!
Button: Analyze It With ExcelAnalyze It with Excel:
A shortcut to export to Excel-
Select the object in the Database Window or select part of a datasheet. From the menu select Tools |  Office Links | Analyze It with Microsoft Excel  or use the Analyze toolbar button.

Excel opens with a file already saved to your My Documents folder with the same name as the object that you selected. You can save again using Excel's own Save As dialog and choose a different format, if you wish.

Compare the original report at the leftbelow with the Excel version at the right and then with a revised version below.
You lose a lot of formatting, including the watermark image from the original report.
  Original report in Access Report after Analyze It with Excel Excel version after resizing rows and columns

Publish It With Word:
Button: Publish It with WordA shortcut to export an object to Word-
Select the object in the Database Window or select part of a datasheet. From the menu select Tools |  Office Links | Publish It with Microsoft Word  or use the Analyze toolbar button. You must have Word installed on the computer.

The file opens in Word. It was already saved to your My Documents folder with the same name as the object that you selected. This file is in RTF format (Rich Text Format) instead of a Word format. You may save again and choose a different format from Word's own Save As dialog.

Compare the original at the left with the Word version at the right below. Only the watermark image and some divider lines are missing. Reports often export to Word better than to Excel, but datasheets work better in Excel.
Original report in Access Exported report as RTF format in Word

Method 4: Export to new (smaller) Access database

If your recipient has Access installed, you can create a special, smaller database and put into it all of the objects that are needed to show what you want them to see. The best procedure is to create a new blank database and import the objects that you need. You can import all the objects at once but you can export only one object at a time.

You can even send the database as an email attachment, if the file is small enough.

WarningExport all needed parts: If the new database contains a query, form or report, it must also contain the tables and queries that are part of the source for these objects.

Method 5: Static web page

You can export your objects as web pages (HTML). Tables, queries, and forms are exported as datasheets. Each report page will be a separate web page with text navigation links between the pages. Any OLE objects, such as photos or embedded spreadsheets, will not be exported. You can then upload your web pages to a shared network folder or to a web server and let your users know the path to put in their browser's address bar.

The data will be fixed as of the time that you created the HTML page.

Exported form in HTML format Exported report in HTML format

Exported form (single page) and report (multiple pages)

Method 6: Data Access Page

You can save database objects as data access pages, without any OLE objects such as photos or spreadsheets. For tables and forms, you can choose to allow the user to add and edit records. The data shown uses the current values from the database. Data Access Pages have some special controls that you may need to use to handle totals. See the Help article 'Calculate a total or other aggregate values' and open the directions under 'Calculate a total or other aggregate values on a data access page'. It is not easy to edit an data access page in Design View!

Dialog: Save As - Data Access Page File | Save As | choose Data Access Page
 

Exported report - Data Access Page - first screen Exported report - Data Access Page - last screen

Report as Data Access Page
First and last screens of the first page of records

Method 7: Copy and Paste:
It's low-tech but for some objects (but not reports!) pasting into Excel or another spreadsheet or into Word or even a plain text editor like Notepad can work well.

Select data in a datasheet. Copy. Switch to your destination file and paste.


Icon: Step-by-Step 

Step-by-Step: Sharing Reports

 Icon: Step-by-Step

What you will learn:

to email a report as an attachment
to export a report as a file in various formats:
    Excel format
    RTF format
    HTML format
    Text format
    Snapshot format
to save a report as a data access page

Start with:  Class diskresource files, worldtravel.mdb, reports from previous lessons

Now that you have several reports saved, you can practice the various ways besides printing that you can share them the people who cannot view the database themselves. These same methods work for other database objects.

You will not try out every variation of every method! The key is to remember to think about what software your user has. Pick a method that produces a document that they can open! You should also consider what the data will look like in the new format. Access tries to preserve the look of reports, but some formats make that easier than others.

Email As Attachment

You need three things in order to use the Sent To command to email an Access object directly from Access:

  • Computer which is attached to the Internet or network

  • Email account correctly set up on that computer in an email client which handles MAPI messaging, such as Outlook or Microsoft Exchange or Microsoft Mail, but not Outlook Express

  • Email address of someone to whom to send the message

You can skip this section if you do not have such an email account set up on the computer that you are using.

Icon: TroubleProblem: Message was not sent
You may or may not see an error message if your email account exists but is not configured correctly.  The message will be saved in the Outbox.

If you do not have an email account set up in an appropriate email program, you will not be able to send the message, but you will be able to save it. That's not much help unless you can create an email account later to send it with!
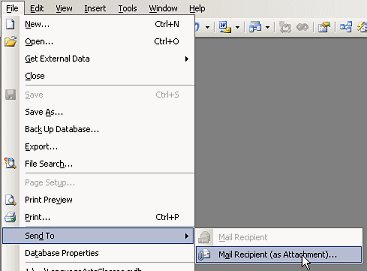
  1. Menu: File | Send To | Mail Recipient (as Attachment)In the Database Window, select the report Trips by Agent - Cumulative Total.
     

  2. From the menu select  File | Send To | Mail Recipient (as Attachment)
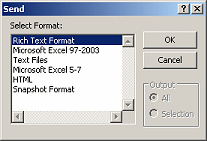
    The Send dialog opens with a list of formats.
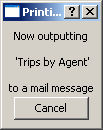
     

  3. Dialog: Send To - window title is 'Printing'Dialog: Send - RTF formatSelect Rich Text Format and click on OK.
    A box appears briefly that says Printing in the title bar and in the message "Now outputting 'Trips by Agent' to a mail message'.

    Outlook will open a new message window, ready for you to enter an address, subject, and message.
    WarningOutlook is required or another email program that can handle MAPI, even if Outlook is not your usual email client.
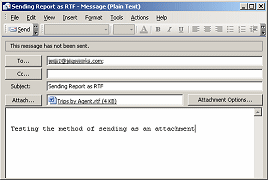


  4. Outlook Message with attachment, in RTF formatEnter your own email address in the To... box.
    Yes, you can email yourself from your own account!
     

    (Please do not email your attachments to me! That would overwhelm my email account.)
     

  5. In the subject line type Sending Report as RTF.
     

  6. In the Message area, type a short note to yourself.
     

  7. Click the Send button.
     

  8. Check your email until you get the message.
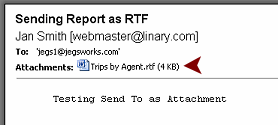
     

  9. Outlook: Received message with attachmentOpen the attachment by double-clicking the name of the attachment.
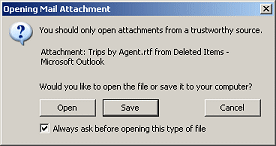
    Message: Opening Mail Attachment
    A message will probably ask you to confirm that you want to open the attachment. You may see other security warnings, depending on your settings and security software.
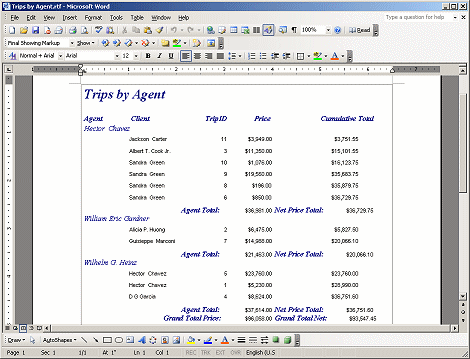


    Sent document opened in Word
    The file opens in Word or whatever word processing program is associated with the file type Rich Text Format (*.rtf).
     
    This format keeps the text formatting of the original. Sometimes some formatting is lost but usually you get a good result with RTF.
     
    No photos or other OLE objects are exported when you choose RTF format. Happily, this report did not have any, so nothing was lost.
     

  10. Icon: Save Save the RTF file to your Class disk in the folder databases project4.


Export As a File

You will export a report using several different file formats to see what the differences are.

Excel Format:

  1. In the Database Window, select the report Trips by Agent - Cumulative Total.
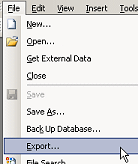
     

  2. Menu: File | ExportFrom the menu select  File | Export...
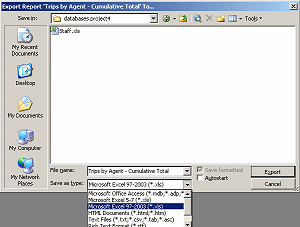
    The Export dialog appears.
     

  3. Dialog: Export - Excel formatNavigate to your Class disk to the folder databases project4.
     

  4. Choose as the file type, Microsoft Excel 97-2003 (*.xls)
     

  5. Click on the Export button.
    A message box appears titled Printing, which tells you that Access is outputting a file.
    Message: Now outputting file
    When the process is finished, the message vanishes but the file does not automatically open.
     
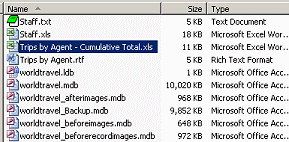
  6. My Computer window with exported file showingOpen a My Computer window to the folder databases project4 on your Class disk.
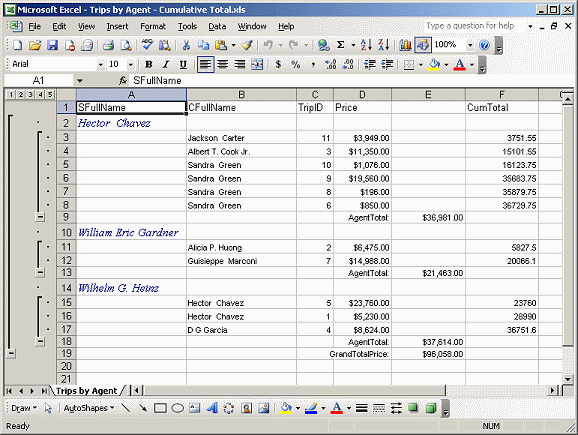
     
  7. Double-click the file Trips by Agent- Cumulative Total.xls.
    The export file opens in Excel, if you have Excel installed on this computer.
     

    Report exported to Excel

    Report exported in Excel format

RTF Format:

  1. If you were unable to complete the Email as Attachment section above, export the report in RTF format and Icon: Save Save it to the folder databases project4 on your Class disk.
     
  2. Double-click the file Trips by Agent- Cumulative Total.rtf in the My Computer window. It opens in Microsoft Word.

    Exported document opened in Word

    Report exported in RTF format

HTML Format:

Do not confuse an exported HTML document with a data access page. Both are web pages in HTML format, but a data access page reaches into the database to use the current data every time it is opened. Exporting an object in HTML format produces a page that is frozen in time. It will not change if the data in the database changes. That may be just what you want!
  1. Export the report using HTML format to the folder databases project4 on your Class disk.
    The Export dialog shows the last folder that you used, which is the correct one in this instance!

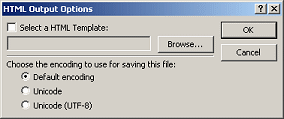
    Dialog: HTML Output OptionsA dialog appears for you to choose a template or encoding.
     
  2. Keep the Default encoding and click on OK.
     
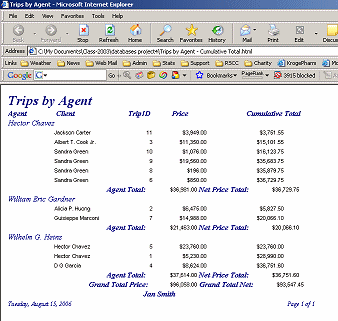
  3. Double-click the file Trips by Agent- Cumulative Total.html in the My Computer window. It opens in your default browser.
     

    Report exported to HTML

    Report exported as HTML

Text Format:

  1. Export the report in Text File format to the folder databases project4 on your Class disk.
    Dialog: EncodeA dialog appears for you to choose an encoding.
     
  2. Leave the choice as Windows (default) and click on OK.
     
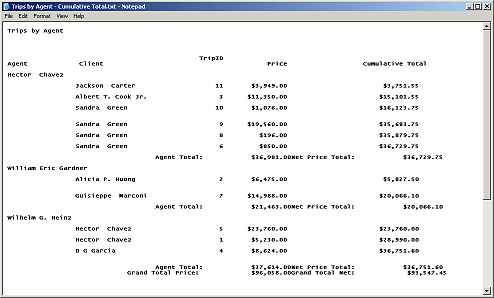
  3. Double-click the file Trips by Agent- Cumulative Total.txt in the My Computer window. It opens in Notepad or whatever program is associated with the extension txt.
     
    Unlike when you exported a table in the earlier lesson, you were not asked about how you wanted the report exported. It is clearly not a comma-delimited or tab-delimited file.

    Exported document as text

    Report exported as Text

Snapshot Format:
  1. Export the report in Snapshot Format to the folder databases project4 on your Class disk.
     
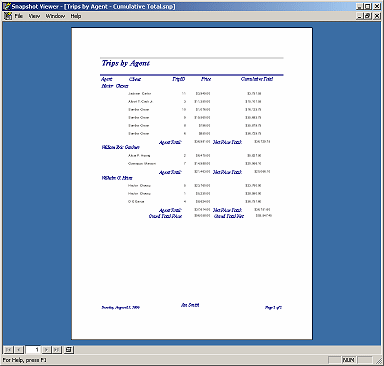
  2. Double-click the file Trips by Agent- Cumulative Total.snp in the My Computer window.
    It opens in the Snapshot Viewer. This is exactly the same as the original report in Access.
     
    If the Snapshot Viewer has never been used before on this computer, you will be prompted to install it. You may need your installation CD. You can also download the SnapShot ViewerIcon: Off site free from Microsoft. 

Report exported as a snapshot

Report exported in Snapshot format


Save As Data Access Page

A data access page is a web page that links directly to the database for its data. Users can be allowed to edit the data themselves. Of course, for a report, there would be no editing. But the report does reflect the most recent data changes and would change the next time it was viewed if the data had changed in the meantime! That could be quite useful.
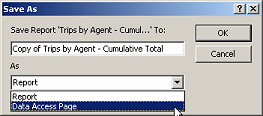
  1. Dialog: Save AsSelect the report Trips by Agent- Cumulative Total in the Database Window.
     

  2. From the menu select  File | Save As .
    The Save As dialog appears with the name Copy of Trips by Agent - Cumulative Total filled in and the As box shows Report be default. (That is why the default name starts with 'Copy of'.)
    Since you already have a page named Trips by Agent- Cumulative total.html from your export above, leave name as suggested by Access.
     

  3. Change the As text box to Data Access Page.
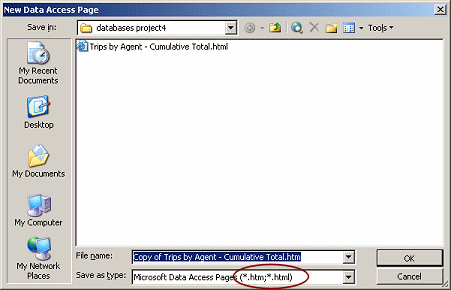
     

  4. Dialog: New Data Access PageClick on OK.
    The New Data Access Page dialog appears, looking remarkably like a Save As dialog. Your Class disk folder for this project is already in view.
     
    Only 1 file is showing. The file type is set to HTML files and there is only one of those in the folder already.

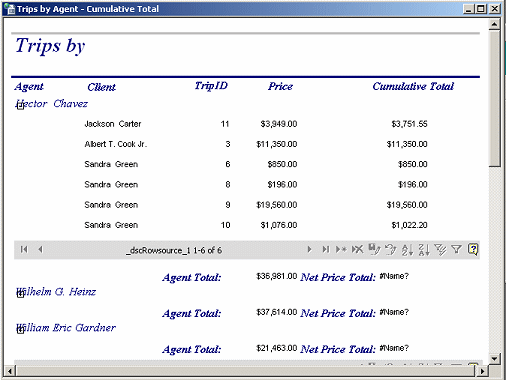
    The report is saved as Copy of Trips by Agent - Cumulative Total.htm and automatically opens in a window inside Access. That's a change!!
     

  5. Expand each of the Agent groups on this page by clicking the + buttons for each agent, partially hidden by the agent's name.
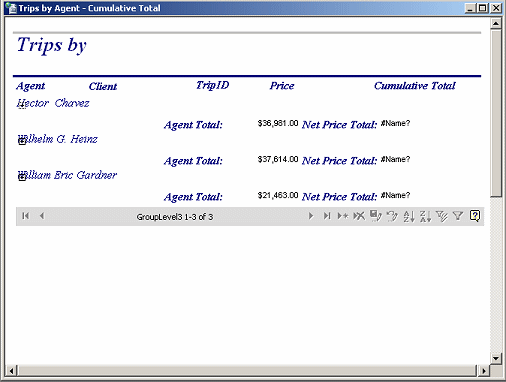
     

Exported document as Data Access Page

Data Access Page: Hector Chave expanded

This looks nice, until you look carefully! The Cumulative Total column is not accumulating. It is showing just the Net Price for the particular trip. The Net Price Total shows an error, #Name? Scroll to the bottom of the page and you will see that the Grand Total and Grand Total Net are both blank.

Recall that the Cumulative Total column is supposed to show the Net Price values, with Running Sum set to Yes, making the values accumulate. The Net Price for each trip is calculated with the expression =[Price]-([Price]*0.01*[Discount %]). Apparently a data access page has a problem with running sums and sums of calculated fields. Sad Smiley There is a way around the total issue using a bound span control, which special to data access pages but not the running sum. If you are interested, see the Help article 'Calculate a total or other aggregate values' and open the directions under 'Calculate a total or other aggregate values on a data access page'.

TipShortcut to Data Access Page: The Database Window's Pages section will not show a shortcut to your new data access page until after you close the page.


Inspect the Exported Files

  1. Inspect each of the files that you just exported in the various formats.
     
    How are they different from the original? How are they different from each other? Under what circumstances would you choose each format?