 |
What works well on the screen
may not fit onto paper for printing.
Most forms are not designed for printing. You should be aware of
how they will print anyway! You never know when someone might want to
print.
Small problems with print layout can often be fixed in the Page
Setup dialog by changing the margins or switching to Landscape
orientation. Unlike
with a table or query, your Page Setup choices are saved with the
form. You only have to get that part right once!
Bigger problems may require you to rearrange the controls on the
form itself or to make changes to properties. Common issues with printing forms:
- Form Width/Height:
A record runs over onto a second sheet with little or no data on it.
Solution: Adjust margins or resize controls and form to fit on
paper. The default margins are 1" on all sides.
- Background for Form and Controls:
Uses too much ink and makes the form slow to print
Solution: Don't use a background or create a form without
backgrounds just for printing.
- Black and white printing:
Hard to read in black-and-white
Solution: Don't use colors for text or background in controls or
labels without checking how it prints on a black-only printer.
- Data hidden:
If a control does not show all of the data on the screen, it won't print
either unless you make a change.
Solution: Set the Can Grow property for the control and for
the Detail section to Yes.
- Page and Form Headers and Footers:
Confusion over which prints where.
|
|

Where you are:
JegsWorks >
Lessons >
Databases
Before you start...
Project 1: Intro
Project 2: Access Basics
Project 3: Tables & Queries
Project 4: Forms & Reports

Import/Export/Link
Designing Forms
 Form
Wizard Form
Wizard
Controls
Create
Form Manually
Format
Form
Tab
Control
Form View
Images in Forms & Reports
Form Images
Record
Images
Printable
Form
Designing Reports
Special Forms & Reports
Summary
Quiz
Exercises
Search
Glossary
Appendix
|
|
Page Header/Footer vs. Form Header/Footer in Printing
It is rather confusing how headers and footers print with a form. It
depends on which ones they are! You might expect to see the page header
and footer within the top and bottom margins, like they are in Word and Excel.
Not so!
In the example below, the page header contains the current date, at the
right. The page footer contains the page number and the total number of
pages, like "Page 3 of 5". The form header contains the title of the
form, "Day Camp Campers & Staff". The form footer contains the year (just
so there would be something there for this example).
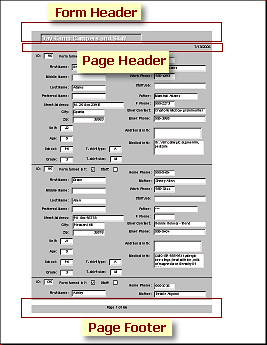
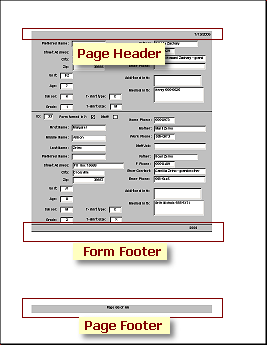
First and last pages of printed form records Margins set in Page
Setup will not have anything printed in them at all. The form header
prints on the first page only above everything else.
The form footer prints on the last page only, below the
last record, but not necessarily at the bottom of the page. The page
header will print on each page above the record(s). On the
first page it is below the form header. The page footer prints
on each page at the bottom of the page. Unexpectedly, you cannot
configure a page header or footer for a printed form from the Page Setup
Dialog. You must be in the Form Design View. From the View menu, you can
show a Page Header/Footer. Then you can add controls to it, just like for
the Details section.
 |
Step-by-Step: Printable Form |
|
|
What you will learn: |
to use Print Preview and Page Setup
to use the Properties dialog
to find Help about properties |
Start with:
 ,
resource files,
worldtravel.mdb from the previous lesson ,
resource files,
worldtravel.mdb from the previous lesson
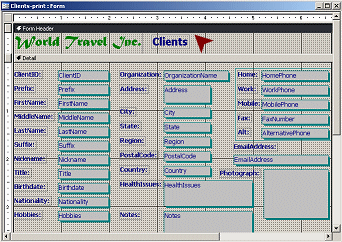
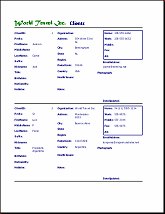
You are going to create a form just for printing. We will take the easy
way and make it very similar to the onscreen version.
Print Preview and Page Setup
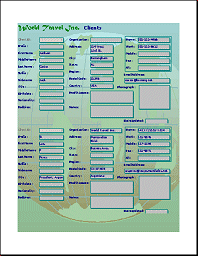
- Open the form Clients.
- Click on the Print Preview button
 . .
The preview looks pretty good on page 1. But... the controls in the
third column are cutoff just a little bit, which creates a weird
looking second page.
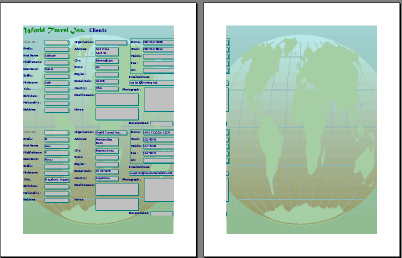
Pages 1 and 2 of 16 in Print Preview
-
 On
the toolbar, click the Setup button. On
the toolbar, click the Setup button.
The Page Setup dialog appears.
-
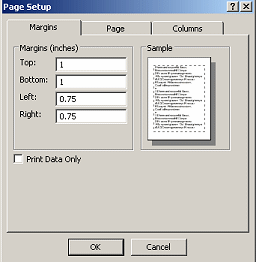 Change
the left and right margins to 0.75". Change
the left and right margins to 0.75".
-
 Click
on Close, to close the dialog. Click
on Close, to close the dialog.
You are back in Print Preview. This is better! Now there are only 8
pages and there are none of those pages with just little bits of a
form.
- Navigate through each page in the print preview.
The Form Header shows up only on the first page.
- Close Print Preview.
-
 Save
the form as Clients-print. Save
the form as Clients-print.
Managing Backgrounds
The backgrounds are going to take a lot of ink and a
lot of time to print. This is the kind of situation that make it useful
to create a form especially for printing.
A form that is suitable for printing does not have a
background picture. None of the sections should have a background color. The
controls should not have a colored background either. The controls should not
have a special effect.
All of these features can be managed from the
Properties dialog.
-
Switch to Form Design View.
-
 If
necessary, open the the Properties dialog. If
necessary, open the the Properties dialog.
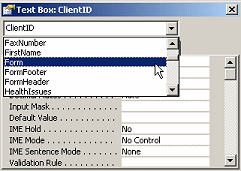
The dialog shows the properties for whatever is selected. In this case
it is probably the ClientID control because
you were changing its properties earlier in this lesson.
-
Open the drop list at the top of the
dialog.
It lists every control and every section of the form.
-
Scroll the list and see just how many
choices there are.
-
 Click
on Form in the list. Click
on Form in the list.
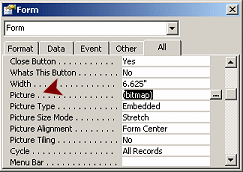
The Properties dialog now shows the properties available for the Form
as a whole.
-
Scroll the list and see what you can change
about the form.
The Picture property shows (bitmap). This is a reference to the image
that the AutoFormat placed as the form's background. Note the other
Picture properties.
-
 Delete
the text (bitmap) for the Picture property. Delete
the text (bitmap) for the Picture property.
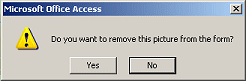
You may or may not get a message that asks if you really want to remove the
picture.
If you do,
click
on Yes.
The image background vanishes. There was apparently a background color
also. Back to the Properties dialog! The background color must be
changed for each section.
-
Click on the selection bar for the Form
Header section.
 The
Properties dialog changes to show properties for this section. The
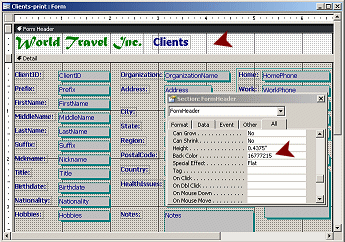
Properties dialog changes to show properties for this section.
-
Scroll the properties to find the property Back Color.
The value -214783633 is for the gray background.
-
 Click
in the value for Back Color. Click
in the value for Back Color.
The 3 dots button
 appears, which tells you that there is a dialog available.
-
 Click
the 3 dots button
. Click
the 3 dots button
.
The color dialog appears.
-
Click on the White rectangle and then on OK.
The Color dialog closes, but nothing else changes yet.
 You
can use colors that are not in the grid by clicking the Define Custom
Colors button. You
can use colors that are not in the grid by clicking the Define Custom
Colors button.
-
Click on another property in the list.
Only after leaving the
property does Access accept your change.
 The
background color of the section changes to white. The Properties dialog
shows a new number for Back Color, 16777215. The
background color of the section changes to white. The Properties dialog
shows a new number for Back Color, 16777215.
Where do they get these weird numbers??
-
 Repeat
for the Detail section and the Form Footer section. Repeat
for the Detail section and the Form Footer section.
-
Switch to Print Preview.
Hmmm. This will print a lot faster and will use a lot less ink, but those gray
boxes will slow things down, too.
-
Switch back to Form Design View.
-
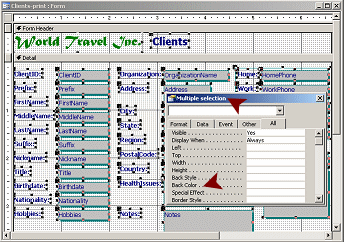 Select all of the controls. Select all of the controls.
The Properties dialog changes to "Multiple Selection".
The properties will be blank except where all controls have the same
value for the property.
-
Help: Open Help articles about Back Color, Special
Effect, and Border Style and read them.
-
 Change
the Back Color property to White. Change
the Back Color property to White.
-
Change the Special Effect property to Flat.
-
Change the Border Style to Transparent.
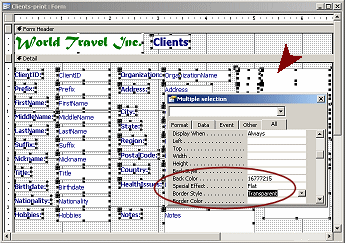
Whoops. Look at the phone number controls. They are hidden! Changing the
Back Color for the rectangle made the rectangle into a solid box, hiding
all the controls under it!
-
Click on an empty area of the form to deselect the
controls.
-
Click on the rectangle to select it.
-
 From
the menu select |. From
the menu select |.
The rectangle moves underneath the phone numbers.
-
In the Properties dialog for the rectangle, change the border style to
Solid.
All is well again.
The color of the rectangle was chosen originally to match the shadow
color. There aren't any shadows in this revised form so this color looks
a bit out of place.
-
Change the Border Color property to match the labels, the dark
blue that is 16777215.
-
 Switch
to Print Preview. Switch
to Print Preview.
Much better for printing!
-
Save
the form. (Clients-print)
Can Grow Property
In a printed form you want to be SURE that all of the data actually prints. If
the control is not large enough, your data is just cut off UNLESS you
take advantage of the Can Grow property.
Thinking: Which controls on this form cut data off now? Which are most likely to cutoff
the data in the future?
Answer: The memo type controls HealthIssues and
Notes, plus Address,
Title (which is already two characters too
short in record #2), and Email
Address.
-
Switch to Form Design View.
-
Hold the SHIFT key down and click on the controls
Address, Title,
HealthIssues, Notes,
and EmailAddress to select them.
The Properties dialog changes to Multiple
Selection.
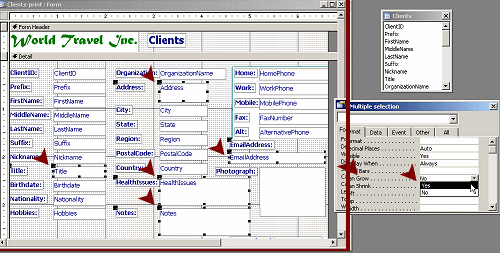
-
Click on the Format tab and then in the box for Can Grow.
-
Change the value to Yes.
-
Click out to apply your changes.
-
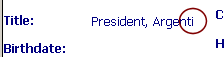 Switch
to Form View and look at the second record. Switch
to Form View and look at the second record.
The control is not quite wide enough for the full title to show.
-
 Switch
to Print Preview and look at the second record. Switch
to Print Preview and look at the second record.
The control grew to hold all of the data. Super!
Zoom: You can enlarge the view with
the Zoom button or the Zoom drop list.
- While in Print Preview, view all of the pages.
Do all pages look right?
When you allow controls to grow as needed, the form may have to enlarge
to hold the new sizes. That can be an unpleasant surprise at times!
-
Save
the form. (Clients-print)
-
 Print
the first page and the last page. Print
the first page and the last page.
|
