|
Window Size Confusion
Did you notice? When you open a form from the Database Window, Access sizes the form's window to
show all of one record,
by default. That is usually
a very good idea!
If you open the form from the Database Window in Form Design View, Access
sizes the design window to show the whole form. This is also a good idea.
This
window is larger than the window needed in Form View because Form Design
View needs space
for rulers and section bars and scrollbars.
When you switch back and forth between Form Design View and Form View,
the window size stays the same. If the window was sized for designing
automatically by Access or by you manually, when you switch to Form View,
the window is not be the size your users will see when opening the form
directly! Confusing!
 Click on the image to see what the other view looks like in that size
window.
Click on the image to see what the other view looks like in that size
window.
|
 |
 |
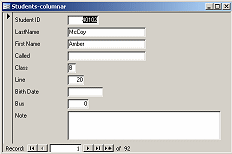
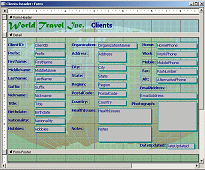
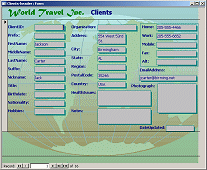
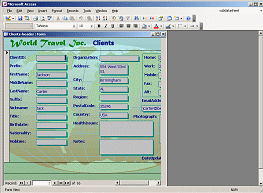
| Form View - opened directlyDesign
View - Too small to see all controls. |
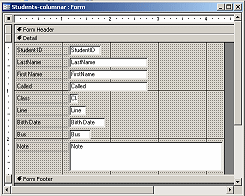
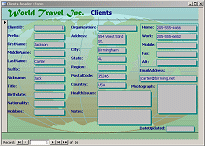
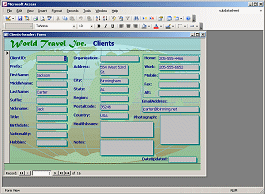
Form Design View - opened directlyForm
View - Larger than needed for form |
Tab Order
You can use the TAB key to move the focus from control to control in
both Form and Form Design Views, but there are differences in the
order. It is important that data entry forms have a logical tab order!
It is best if the tab order matches the order in which the user will
naturally try to enter data.
Tab order is set in Form Design View in the Tab Order dialog,
but surprisingly it only applies to Form View. You set the tab
order separately for each section. Of course you do not usually have many
data controls in the headers or footers. The Detail section holds all of
the controls for a record.
In Form Design View:
- Use TAB key only to move the focus from control to
control. (Arrow keys move the selected control!)
- The tab order is always the order that the controls
were put onto the form.
- All controls are part of the TAB order, including labels,
lines, rectangles, and pictures.
- Set the tab order for Form View using the Tab Order dialog.
|
In Form View:
- TAB and arrow keys both work to move the focus from control
to control.
- The tab order is the order in the Tab Order dialog, which you can
open only in Form Design View.
- The default tab order is the order in which the controls were added
to the form.
- Only data controls are part of the tab order, not labels,
lines, rectangles, or pictures.
It is important that the tab order be logical! If you moved fields
around or inserted them without considering the order, you will need to
change the tab order.
Setting Tab Order
 Forms
that are not arranged with a single column of controls may need a
different tab order. Forms
that are not arranged with a single column of controls may need a
different tab order.
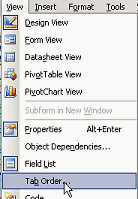
You can open
the Tab Order dialog while in Form Design View from the View menu.
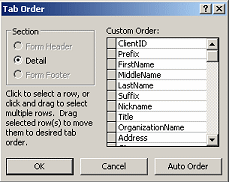
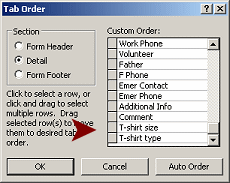 The
Tab Order dialog at the right shows that tabbing through the controls in
the example form, the tab order will move from
Comment (which is Medical Info) to T-shirt
size, then to T-shirt type, which is
the last control in the list. The
Tab Order dialog at the right shows that tabbing through the controls in
the example form, the tab order will move from
Comment (which is Medical Info) to T-shirt
size, then to T-shirt type, which is
the last control in the list.
But, the way the controls are arranged on the form, the focus should
move down the left column to Grade and then to
T-shirt type, then T-shirt
size, and then to the top of the next
column, Home Phone.
To change the order, you move the mouse pointer over the left side of
the list until it turns to the Select Row shape
 .
Click on a name or click and drag across several names to select them.
Then move the mouse pointer over the square at the left until it turns to
the Select shape .
Click on a name or click and drag across several names to select them.
Then move the mouse pointer over the square at the left until it turns to
the Select shape
 .
Then you can drag the selected items to a new position. A thick black
line shows where the selection will be dropped when you release the mouse
button. .
Then you can drag the selected items to a new position. A thick black
line shows where the selection will be dropped when you release the mouse
button.
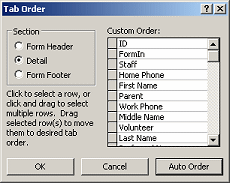 The
Auto Order button on the dialog sets the order as left-to-right and then
top-to-bottom. The tab order at the right shows the Auto Order. Compare
this to the example form. Tabbing in Auto Order will move you across the form first and
then drop down and go across again. Sometimes that is just what you want,
but not for the example form. The
Auto Order button on the dialog sets the order as left-to-right and then
top-to-bottom. The tab order at the right shows the Auto Order. Compare
this to the example form. Tabbing in Auto Order will move you across the form first and
then drop down and go across again. Sometimes that is just what you want,
but not for the example form.
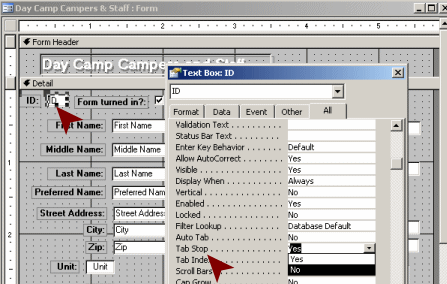
Remove from Tab Order
Calculated controls and AutoNumber controls should not be in the tab
order. You don't want your users trying to enter data in them! Plus, it
is annoying to users to have to tab extra times to get past controls that
they cannot edit.
Surprisingly, the Tab Order dialog does not let you delete items from the list. In
the Properties Dialog for the control you want to delete, however, the
Tab Stop property is just what you need for this situation. Just select
the control, open the Properties dialog, set the Tab Stop property to No.
The control is still clickable, so a user can select it. But the TAB and
arrow keys
will skip the control.
Disable a Control
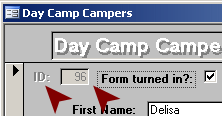 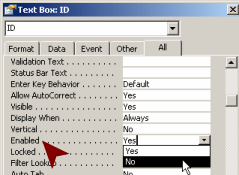 If
you want to be sure that a user does not try to type in the field,
you can also set the Enabled property to No. Controls that are disabled
have a different color background and grayed out text. The label text is
also grayed out. If
you want to be sure that a user does not try to type in the field,
you can also set the Enabled property to No. Controls that are disabled
have a different color background and grayed out text. The label text is
also grayed out.
Warning:
The user cannot copy the value from the control either. Is that important
for your form??
 |
Step-by-Step: Form Views |
|
|
What you will learn: |
to observe how Access sizes windows
to use Properties to control window position/size
to change the tab order for Form View
to remove a control from the tab order
to disable a control
to make the form read-only
to create a data entry form |
Start with:
 ,
resource files,
worldtravel.mdb from the previous lesson ,
resource files,
worldtravel.mdb from the previous lesson
Window Size
-
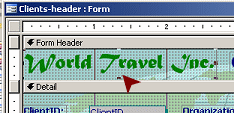
 Open
the form
Clients-header from the Database Window directly to Form
Design View. Open
the form
Clients-header from the Database Window directly to Form
Design View.
The window is automatically sized to show all of the controls and
sections.
-
 Switch
to Form View. Switch
to Form View.
The window is far larger than is needed.
-
Close the form.
-
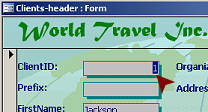
 Open
the form
Clients-header from the Database Window directly into Form
View. Open
the form
Clients-header from the Database Window directly into Form
View.
The form is automatically sized to show the entire record,
leaving space for scrollbars.
 Form Scrollbars: The
form view will allow space for scroll bars, even if you don't need
actually need any scrollbars at the current window size. Access is
trying to help you out. The size of a record in the form can change if
controls are allowed to Grow! You would need scrollbars to get to the
controls that got pushed out of sight at the bottom of the form. Form Scrollbars: The
form view will allow space for scroll bars, even if you don't need
actually need any scrollbars at the current window size. Access is
trying to help you out. The size of a record in the form can change if
controls are allowed to Grow! You would need scrollbars to get to the
controls that got pushed out of sight at the bottom of the form.
-
  Switch to
Form Design View and inspect the window.
Switch to
Form Design View and inspect the window.
The window size stayed the same. The bottom part of the form is out of
sight. <sigh>
This is not a problem once you have finished designing a form. Just
remember: If you enlarge the window in design view, it will be
enlarged in form view also while you work.
Form View: Window Position
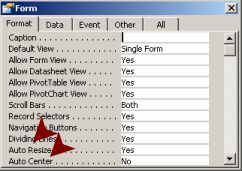
When you save from Form View, the window's size and position are saved.
But... there are some properties that may override your choices: Auto
Resize and Auto Center.
By default AutoResize is set to Yes and Auto Center is set to No.
-
Switch to Form View.
-
 Resize
the window narrower and taller by dragging its edges. Resize
the window narrower and taller by dragging its edges.
-
Move the form window to the far left of the Access window.
-
 Save
the form and close it. Save
the form and close it.
-
 Reopen
the form directly into Form View. Reopen
the form directly into Form View.
The position was saved but the size was not.
 Experiment: Play around with the size and positions. Can you find a
combination where the width is saved?
Experiment: Play around with the size and positions. Can you find a
combination where the width is saved?
Hint: try the far right.
- Open the Properties dialog, if it is not already open,
by clicking the Properties button
 . .
The dialog shows the properties of whatever is selected. It is probably
the first control on the form.
-
  Click
on the record selector bar at the left of the record. Click
on the record selector bar at the left of the record.
The Properties dialog changes to show properties for the whole Form.
- Change Auto Resize to No and Auto Center
to Yes.
- Size the window so that it is NOT at the default size and
move it.
-
Save
the form and close it.
- Reopen the form in Form View.
It should have remembered the size but not the position. It should be
centered in the window.
Tab Order
First you should experience the existing tab order, then you can
change it to work better.
-
Switch
to
Form Design View.
-
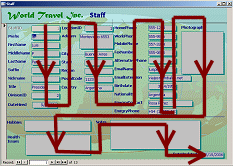
 Click
on the unbound control World Travel Inc. in the header. Click
on the unbound control World Travel Inc. in the header.
-
Press the TAB key on your keyboard move to other controls,
observing carefully how the focus is moving through the form, until you
cycle back to where you started.
In this view ALL controls are part of the tab sequence, including
labels, lines, rectangles, and pictures.
The rectangle was selected last before starting over. It was the last
object added to the form.
In Form View with the default
properties, using the TAB or arrow keys will eventually move you to the
next record.
-
Press the right arrow key.
Whoops! The selected object moved! Clearly you cannot use the arrow keys
in Form Design View to change the focus.
If you experiment with the arrow keys, be sure to use Undo to get the
controls back in position.
 Problem: Moved controls and Undo does not get them back in position
Why: Only 20 actions are remembered for the Undo list. Happily, you
just saved the form.
Solution: Close the form without saving changes and reopen
it.
-
 Switch
to Form View. Switch
to Form View.
The data control that has the focus has its data selected. It is
normally the first control at the top of the form.
-
Press the TAB key repeatedly until you have moved through
all of the data controls and the insertion point is in the Date Updated
control. The labels and rectangle were not in the tab order in this view.
If there is data in the control, it will be selected. Any
typing would
replace that data. If there is no data, the insertion point
will show at either the left or right edge of the control, depending on
how the data is aligned in that control. This can be hard to see when
there are no characters in the control!


Text data type aligns left. Number or Date data type aligns right.
-
Press TAB once more.
The form changes to the next record.
 Problem:
Pressing TAB did not change record Problem:
Pressing TAB did not change record
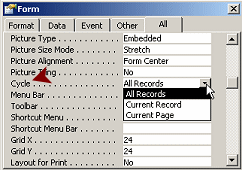
What happens when you leave the last control in the tab order is
controlled by the Cycle property in the Properties dialog for the
Form. The default is All Records, which will move the focus to the next record. Other choice
are to go to the top of the current record or to the top of the current
page (used for tabbed forms).
-
Switch
to
Form Design View.
-
 From
the menu select | From
the menu select |
The Tab Order dialog appears.
The AutoOrder button sets the tab order as from left-to-right and
top-to-bottom. So TAB would move you across first and then drop down a
row. That is NOT what we want for this form.
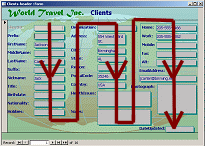
The logical tab order for this form would be down the first
column, then down the second column, and finally down the third column.
You will change the order by selecting a control's name in the Custom
Order list and dragging it to a new position.
-
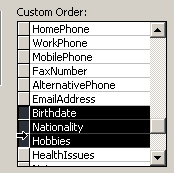 Scroll
the list of controls in the dialog until you see
Birthdate. Scroll
the list of controls in the dialog until you see
Birthdate.
- Move the mouse pointer over Birthdate
until it turns into the Select Row shape
,
a black arrow that points to the right.
- Drag to select Birthdate, Nationality,
and Hobbies.
You added those fields to the form at the same time, though they
were not neighbors on the Field List.
-
 Move
the mouse pointer over the selection squares to the left of the selected
items, until it turns into the Select shape
. Move
the mouse pointer over the selection squares to the left of the selected
items, until it turns into the Select shape
.
- Drag the selected names up. A black line shows where they
will drop.
-
 When
the black line is below
Title, drop. When
the black line is below
Title, drop.
The selected items move.
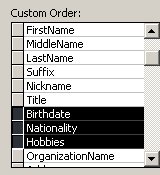
- Similarly, move HealthIssues and
Notes upwards until they are below
Country in the list.
- Click on OK to close the dialog and accept the
changes.
- Switch to Form View.
The first control has its data selected, which shows that it has the
focus.
- Press the TAB key to move from one control to the next
to verify that the order is now correct.
- If necessary, make any corrections with the Tab Order dialog.
-
Switch
to
Form Design View.
- Click on the label at the top left of the form.
- Press the TAB key to move from one control to the next again.
The tab order that you just set did not apply! You always move
through the controls in the order that they were created in Form Design
View. This can be quite a pain!

Remove from Tab Order
The Properties dialog includes properties that keep a user from
being able to TAB into a control and also to disable the control
entirely. This is useful for calculated or AutoNumber fields.
-
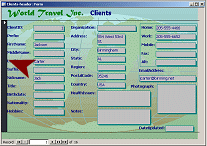
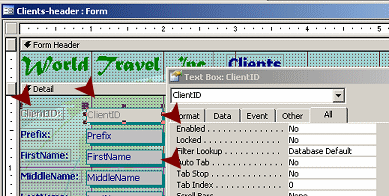 In
Form Design View, double-click on the
ClientID control to select it and to open the Properties
dialog at the same time. In
Form Design View, double-click on the
ClientID control to select it and to open the Properties
dialog at the same time.
If the Properties dialog is already open, it will not close
when you double-click a control. It will close if you click the Properties button
when the dialog is already open.
- Change the Enabled property to No.
- Change the Tab Stop property to No.
- Click on another property to save the last change.
-
 Switch
to Form View. Switch
to Form View.
The ClientID control is now grayed out
and the next control has the insertion point in it. The user cannot edit
ClientID .
-
Save
the form. (Clients-header)
Apply Your Skills: Revise Staff-formated Form
Use the skills you have learned to create a logical tab order for the
form Staff-formatted.
- If necessary, open the form
Staff-formatted in Form Design View.
- Change the Tab Order to go down the columns and then
the Photograph control and then the controls
below the line.
- Disable the StaffID field.
-
Save
the form. (Staff-formatted)
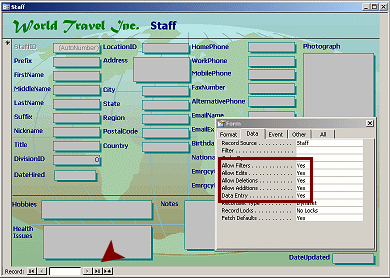
Create a Read-Only Form
Sometimes there are users who need to see data, but they don't
need to edit the records.
The Properties dialog for the form is your friend for this task. Just a
few changes and the whole form becomes read-only. In fact, you could
create a database that links to your tables but which only has forms that
are read-only. That would certainly keep "accidents" from happening to
your records. Keep in mind that a user can still copy data and paste it
to a different document.
-
While
in Form Design View for the form
Staff-formatted, save the form as
Staff-Read Only.
-
 If
necesssary, open the Properties dialog for the
whole form. If
necesssary, open the Properties dialog for the
whole form.
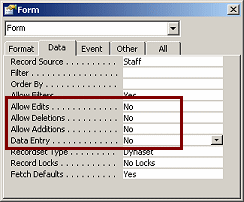
- Click on the Data tab.
- Open and read the Access Help article for the
following properties:
Allow Edits
Allow Deletions
Allow Additions
Data Entry
The first three properties act as expected. "No" means that the action is
not allowed.
But Data Entry is not really about entering data on a form. It is about
whether the form will show existing records or will it open with a blank
form ready for you to enter new records. The default choice is No, which
is what you want for a Read-Only form, for sure!
- Set the value to No for all four properties.
- Switch to Form View.
- Try to make a change in a value.
If you made the changes above, you can select data but you cannot make
any changes.
-
Save
the form. (Staff-Read Only)
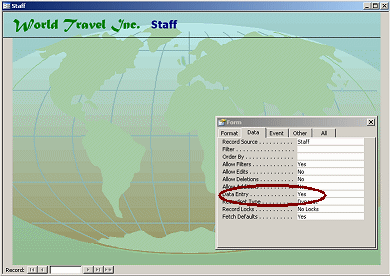
Create a Data Entry Form
A data entry form is a form that is
specifically designed for entering new records. Sometimes you need a
special form to keep things simple for the person entering the data.
The order that data for new records comes in is not the order that you
want for viewing it later. Two different logics may be at work. Using two
different forms is the solution!
Besides having a different order for the controls, a data entry form
should open directly to a blank record. That is what the form's Data Entry
property is for!
- Switch to Form Design View.
- In the Properties dialog for the form, change the property
Data Entry to Yes.
-
Save
the form as Staff-Data Entry
-
 Switch
to Form View. Switch
to Form View.
Whoops. The form has no controls for entering data. That would be
because we left the Allow... properties at No!
The Properties dialog should still be open. You do not have to switch
views to fix this problem!
-
 Change
the properties Allow Edits, Allow Deletions, Allow Additions to Yes. Change
the properties Allow Edits, Allow Deletions, Allow Additions to Yes.
When the last change is made, all of the controls pop into view!
Now you can use this form to enter new records.
Notice the navigation buttons at the bottom of the form. There are no
other records available! This form will only show the records entered in the current
session.
-
Save
the form. (Staff-Data Entry)
|
