|
About the Tab Control
 Create: Create:
Use the Tab Control button
 from the Toolbox bar to create a new control. The background can be
transparent or Normal (that is, gray).
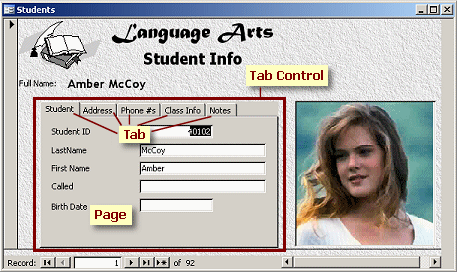
Parts of a tab control:
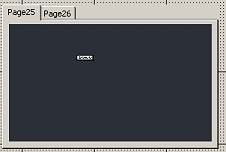
The default tab control has two tabs. The
area that holds the controls is called a page.
The tab for the current page appears raised.

  Selecting
a tab control: Selecting
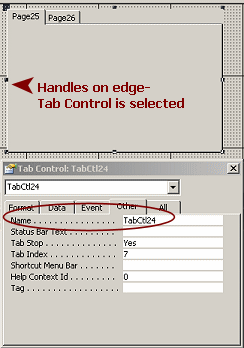
a tab control:
Click the edge of the control. The handles show at the
corners and middle of each edge.
If you miss the edge, either nothing will be selected or perhaps the tab
page will be selected (if you click in just the right spot).
The Move handle of the control at the upper left will move the whole control.
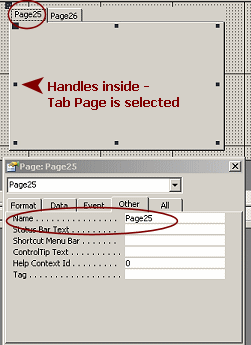
Selecting a tab page:
Click the tab. Handles appear inside the tab control
and the tab gets a dotted box around the text.
If you click on the page itself, nothing happens unless you happen to
click where a page handle would appear. This selects the page but it
takes a good eye since you cannot see what you need to click on!
 Also,
if there is a control underneath the tab control, its handles will show
if you click in the page area over the control. Of course you do not
normally want to have controls that are hidden by a tab control. This
situation can occur while you are revising your form. Also,
if there is a control underneath the tab control, its handles will show
if you click in the page area over the control. Of course you do not
normally want to have controls that are hidden by a tab control. This
situation can occur while you are revising your form.
Name Property:
The tab control will be named something like TabCtl24,
where the number depends on how many other controls have already been
created.
The default labels for the tabs are page numbers. If the tab control
itself is named TabCtl24, then the two tabs
will be named Page25 and
Page26.
Change page name
(what shows on the tab itself):
Use the Properties
dialog. Surprisingly, you cannot edit the label on the tab itself.
 Tab
icons: Tab
icons:
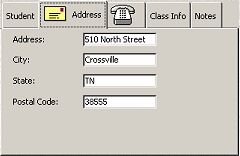
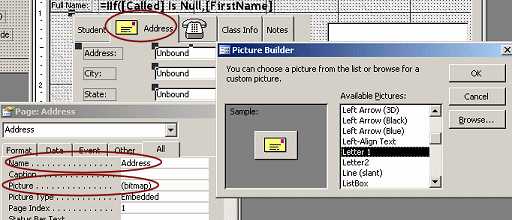
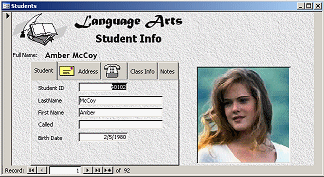
In the tab page's Picture property, you can click the ellipsis button
 to open a wizard, Picture Builder,
and choose an image for the tab. If you do not want any text along with
the image, put a space in the Caption property.
 Tab
Control Background: Tab
Control Background:
You can make the page part of the tab control transparent but you
cannot change its color or use an image background. The tabs themselves
remain in the default gray.
 Tabs
in Rows: Tabs
in Rows:
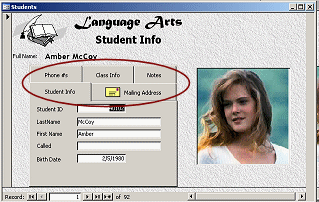
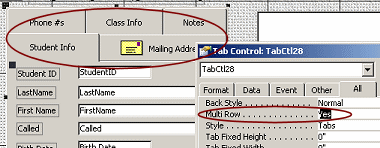
Your tabs can be in more than one row. This is handy if the label
text is long or if you have a large number of tabs. The tab control has a
property called Multi Row, which you set to Yes
to get this effect.
Form Design View: Adding Controls to a Tab Page
 New controls: New controls:
Select the tab page and use the normal tools to
create a new control. If you are dragging from the Field List, be sure
that the page area is highlighted when you drop. If it is not, you are
dropping onto the form instead of onto the tab page.
Move existing controls to a tab page:
You must use
copy-and-paste to move existing controls to a tab page. Select the controls and copy or cut them. Select the
tab page (not the tab control!) and paste. If you copied, go back to the
form and delete the controls.
 No drag-and-drop to
move existing controls. No drag-and-drop to
move existing controls.
If you drag and drop an existing control onto a tab page, the control goes onto the form,
underneath the tab control instead of onto the tab page.
Form Design View: Managing Tab Pages
  Add
a tab page to a tab control: Add
a tab page to a tab control:
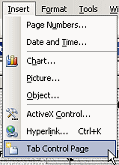
- Right click on the tab control and select
OR
- From the menu, select | to add a new page
Remove a tab page from a tab control:
- In Form Design View, right click on the tab control and select
.
OR
- Select the page and press the Delete key.
 Change
order of pages in the tab control: Change
order of pages in the tab control:
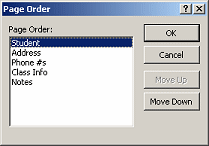
Right click on the control and choose Page Order from the menu. The Page
Order dialog appears. Select a page name and use the Move Up and Move
Down buttons to change the order of the pages.
You cannot drag the tabs to reorder them.
Form View: Navigating Between Pages in a Tab Control
- Mouse: Click on the tab of the page that you want.
- Keyboard:
CTRL + TAB moves to the next tab page to the right.
CTRL + SHIFT + TAB moves to the next tab page to the left.
Left and right arrow keys move focus to the next tab page IF the
focus is on the tab label - dotted box around the label for the tab
 . .
Form View: Navigating Controls on Tab Pages
To move through all of the controls on a form by using the TAB key
can be a bit tricky when the form has a tab control. Only the controls on the first tab page
are in the tab order!
What happens:
- Pressing the TAB key moves you from control to control on the form
until you get to the tab control.
- Once you the focus is on the tab control, the TAB key takes you through each control
on the first page.
- But... from the last control on the first tab page, the TAB key
takes you out to the next control on the form or to the next record. The
TAB key alone will not get you to another tab page.
Solution: You must use CTRL + TAB to change to the next tab
page. Confusing for sure!!
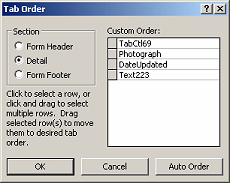
Tab order for a tab page: Each tab page has its own tab order
which you can see in Form Design View when the tab page is selected.
(View | Tab Order)
 |
Step-by-Step: Tab Control |
 |
|
What you will learn: |
to create a tab control
to rename tabs
to format tab text
to add new tab pages
to create multiple rows of tabs
to change order of tab pages
to create controls on pages in a tab control |
Start with:
 ,
resource files,
worldtravel.mdb from the previous lesson ,
resource files,
worldtravel.mdb from the previous lesson
Create Tab Control
You have so many controls on the Staff form that even with a logical arrangement it is
rather hard to read the data. Plus, if the photo control were larger,
then you could use Clip instead of Zoom and all of the photos would
show without getting jagged. It's worth revising!
-
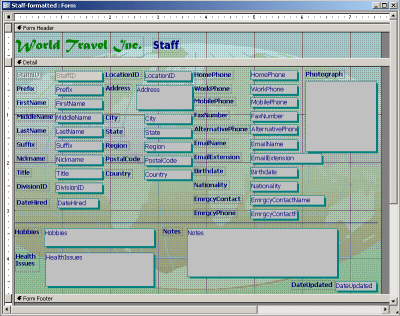 Open
the form Staff-formatted from the
previous lesson in Form Design View. Open
the form Staff-formatted from the
previous lesson in Form Design View.
How could you group these controls onto several tab pages? Are there
natural groupings? There are many "right" answers to this question!
Because there are already controls on the form, it will be a bit messy
to change to a tab control.
- Click on the Tab Control button
 on the Toolbox.
-
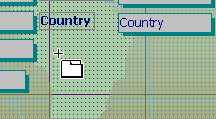 Click
in the blank area below the Country control to create a tab control
with the default properties. The page numbers on your tabs may be
different from the illustration. Click
in the blank area below the Country control to create a tab control
with the default properties. The page numbers on your tabs may be
different from the illustration.
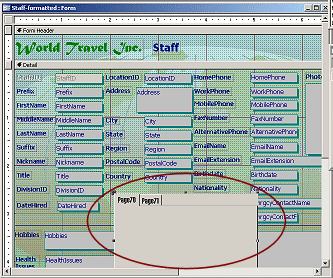
 Problem:
Tab Control background is transparent. Problem:
Tab Control background is transparent.
The Background Style property for the control remembers the last
change you made to this type of control. Change the property value from
Transparent to Normal.
Rename Tabs
Like many other controls, tab pages have both a Name property and a
Caption property. These are not the same! Captions can be duplicated, but
a value for a Name property cannot.
For example, if a form contains controls for a mailing address and a
physical address, you might have two labels that show "City". But the
controls must be named differently, like MCity and PCity.
-
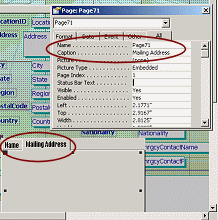 Click
on the first tab to select it. Click
on the first tab to select it.
(Handles are inside the control.)
- In the Properties dialog, change the Caption property to
Name.
(Be sure that the dialog shows a page name and not the tab control
itself.)
- Similarly, change the second tab to read
Mailing Address.
Format Tab Captions
The font used in the underlying style is not particularly attractive or
readable! You can change it.
-
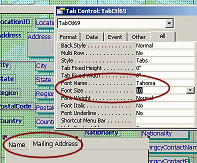 Click
on the edge of the tab control to select the whole control. Click
on the edge of the tab control to select the whole control.
(Handles are on the edge of the control.)
- In the Properties dialog, change the following properties:
Font Name = Tahoma
Font Size = 10
Add and Configure Tab Pages
-
 Right
click on the tab control and select from the menu that appears. Right
click on the tab control and select from the menu that appears.
A new tab appears with a boring default caption.
- Change the caption to read Phone #'s.
-
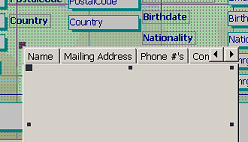 Similarly,
create tabs that have the following captions: Similarly,
create tabs that have the following captions:
Company Info
Personal Info
Emergency
Notes
When the tab control runs out of space for the tabs, scroll arrows
appear. That's nice, but will be quite awkward to use.
 Problem: Error when naming
tabs Problem: Error when naming
tabs
You cannot use the same name for a tab page and another
control. You have a control named Notes, so the tab name cannot
be Notes. The tab's Caption property, however, can be Notes! That
is what you are supposed to change.
- Multi Row:
-
 Select
the whole tab control. Select
the whole tab control.
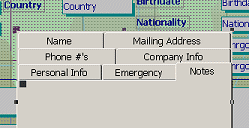
- In the Properties dialog, change the property Multi Row
to Yes.
The tabs arrange themselves onto as many rows as needed to show the
caption text.
-
 Reorder
tabs: Reorder
tabs:
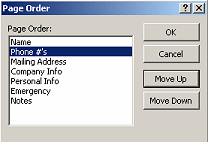
- Right click on the tab control.
- From the menu that appears, select The Page Order dialog appears.
- Click on Phone #'s to select it.
- Click on the button Move Up.
The Phone #'s entry shifts up one line.
-
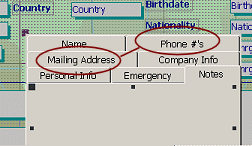 Click on OK. Click on OK.
The dialog closes and the design shows the new order for the tab
pages.
 Experiment by clicking on the various tabs. They show the same
behavior as tabs in other programs. The current row moves to the bottom.
Move Controls to Tab Pages
Now comes the trickiest part. To move the existing controls onto tab
pages, you must use Copy and Paste. You cannot drag the controls and drop
them onto a tab page. They drop onto the form underneath the tab control
instead.
First you will try drag and drop anyway, just to see what it looks
like. It's quite confusing when this happens to you unexpectedly!
Drag-and-Drop fails:
-
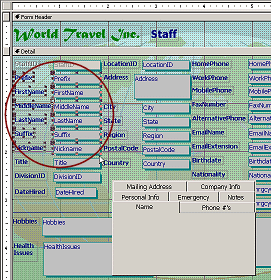 Drag
on the form to select the controls for the staff member's name, from
Prefix down the column through Nickname. Drag
on the form to select the controls for the staff member's name, from
Prefix down the column through Nickname.
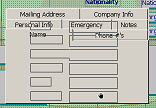
- Drag the selection to the tab control
Outlines show the controls that you are dragging so you can see where
they will drop.
-
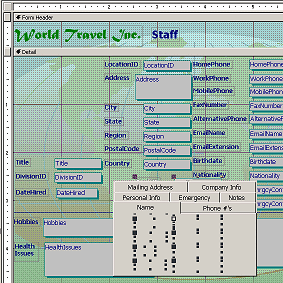 Drop. Drop.
Hmmm. No controls are showing on the tab page, Name.
The handles that you do see show us that the controls are underneath the
tab control.
Copy-and-Paste works:
-
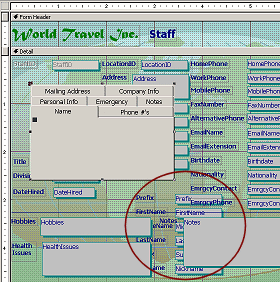 Click
on the edge of the tab control to select it. Click
on the edge of the tab control to select it.
- Move it up and to the left.
Now you can see where those controls went. Not onto the tab page, but
onto the form itself.
- Undo the move.
- Undo the paste.
- Select the controls again.
- Copy.
-
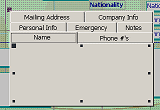 Click on the Name tab to select that tab page. Click on the Name tab to select that tab page.
-
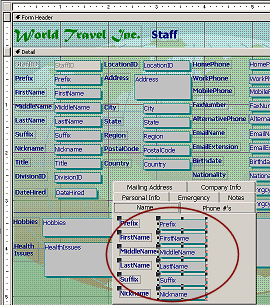 Paste. Paste.
The tab control automatically resizes to hold the pasted controls.
- Delete the original controls from the form.
- Similarly, cut and paste the following controls to specified tab page:
Phone #'s: all 5 phone number controls
Mailing Address: 6 controls in second column, from
Address through Country
Company Info: 4 controls - StaffID, Title,
DivisionID, DateHired, Location ID
Personal Info: 4 controls - EmailName,
EmailExtension, Nationality, Hobbies
Emergency: EmrgcyContact, EmrgcyPhone, Health
Issues
Notes: Notes
- Position and resize the controls as needed to match the illustrations:
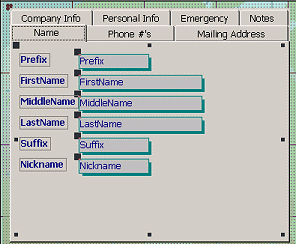
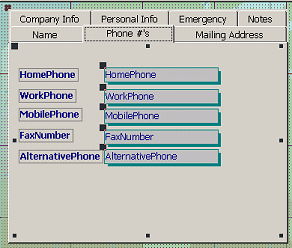
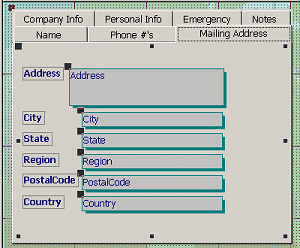
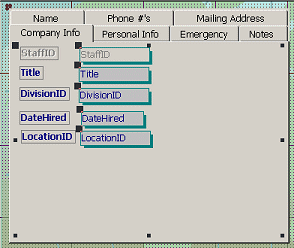
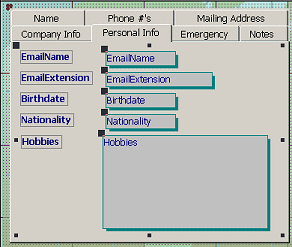
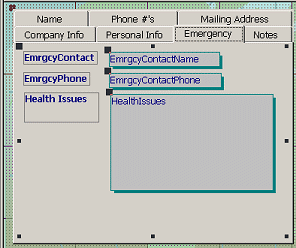
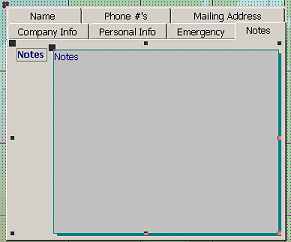
Rearrange Form
Now that nearly all of the controls are on the tab control, you need to
clean up the form layout. You will wind up with a smaller form.
-
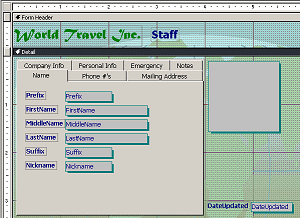 Drag
the tab control to the upper left of the Detail section. Drag
the tab control to the upper left of the Detail section.
- Delete the label for the
Photograph control and move it over next to the tab
control.
- Move the Date Updated control up
to be level with the bottom of the tab control.
Format Photo Control
Now that there is more space, you can change the Photo control to show
the pictures better.
-
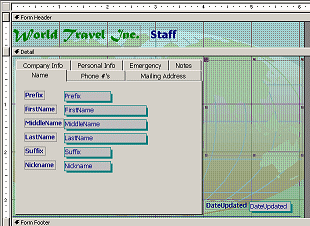 Change
the Size Mode property for the Photograph
control to Clip. Change
the Size Mode property for the Photograph
control to Clip.
- Resize the Photo control to about
2" square.
- Change Back Style to Transparent.
- Change Special Effect to Flat.
- Change Border Style to Transparent.
- Select the thin blue line at the bottom of the Detail section and
drag it up to just under the tab control.
- Resize the line to 6" wide.
- Resize the form by dragging the edges until it is just large
enough for the controls.
- Add a calculated control, named FullName,
underneath the photo, to display the staff member's name so it will be
visible no matter which tab page is showing. Use the expression:
=[FirstName] & " " & [MiddleName] & " " & [LastName]
& " " & [Suffix]
-
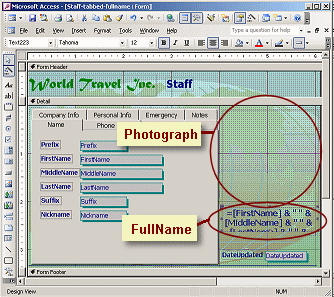 Resize
the new control to be as wide as the Photograph
control and 0.5" in height. Resize
the new control to be as wide as the Photograph
control and 0.5" in height.
- Set the following properties for the new control,
FullName:
Can Grow: Yes
Special Effect: Flat
Border Style: Transparent
Font: Tahoma
Font Size: 14
Font Weight: Bold
Text Align: Center
Tab Stop: No
-
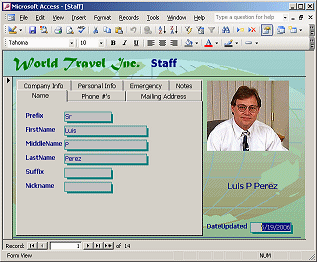 Switch
to Form View. Switch
to Form View.
The border of the Photograph control and its background are now
transparent. The actual photos show as different sizes so the gap
between the photo and the name below varies from record to record.
- Resize the window to just hold the form.
- Navigate through the records and the tab pages.
Remember that you need to use the key combo CTRL + TAB to switch tab
pages, or else use the mouse to click on the page you want to see.
- Make any corrections needed, such as to alignments,
control size, or
tab order. The controls you moved should have kept the same tab order
that you set earlier. Is that what you want? Check it out!
 Save
the form as Staff-tabbed. Save
the form as Staff-tabbed.
|


![]() ,
resource files,
worldtravel.mdb from the previous lesson
,
resource files,
worldtravel.mdb from the previous lesson Open
the form Staff-formatted from the
previous lesson in Form Design View.
 Click
in the blank area below the Country control to create a tab control
with the default properties. The page numbers on your tabs may be
different from the illustration.
![]() Problem:
Tab Control background is transparent.
Problem:
Tab Control background is transparent. Click
on the first tab to select it.
 Click
on the edge of the tab control to select the whole control.
 Right
click on the tab control and select from the menu that appears.
 Similarly,
create tabs that have the following captions:
 Select
the whole tab control.
 Reorder
tabs:
 Click on OK.
 Drag
on the form to select the controls for the staff member's name, from
Prefix down the column through Nickname.
 Drop.
Drop. Click
on the edge of the tab control to select it.
  Click on the Name tab to select that tab page.
 Paste.


 Drag
the tab control to the upper left of the Detail section.
  Change
the Size Mode property for the Photograph
control to Clip.
 Resize
the new control to be as wide as the Photograph
control and 0.5" in height.
 Switch
to Form View.