
Jan's Working with Numbers
Format: Cells: Apply Formatting
In Excel your formatting choices are on the ribbon but also are grouped neatly in a single dialog with six tabs. There are so many choices! It will take you a while to become familiar with all of them.
In this section you will apply text formatting. Later you will work with number formats, alignment, borders, and fills.

Default settings for Format Cells - Font tab
'Normal font'
resets the dialog to the default font settings.
| |
Step-by-Step: Apply Formatting |
|
| What you will learn: | to edit an existing header in Page Layout View to apply text formatting with dialog to apply text formatting with ribbon to merge cells and center cells to unmerge cell |
Start with: ![]() trips9-Lastname-Firstname.xlsx (saved in previous lesson)
trips9-Lastname-Firstname.xlsx (saved in previous lesson)
Edit Header: Page Layout View
-
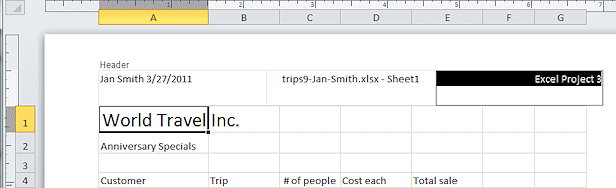
Open trips9-Lastname-Firstname.xlsx from your Class disk in the excel project2 folder to Sheet1.
- Switch to Page Layout view.
(Button is on the Status bar) - Edit the Right section to read Excel Project 3 .
-
 Use Save As to save the file to a new folder, excel project3 , on your Class disk as trips9-titleformatted-Lastname-Firstname.xlsx .
Format Cell: Dialog
- Switch to Normal view.

- Select cell A1 = World Travel Inc.
- From the ribbon on the Home tab in the Cells tab group, click the button Format and then Format Cells....
The Format Cells dialog appears. It has 6 tabs for formatting options. -
 Experiment: Format Cells dialog
Click on each tab to see what you can use it for.
Open the drop lists to see what the choices are.
Especially notice the choices on the tabs Number and Alignment.
Altogether there are a LOT of choices!When you have inspected all of the choices on all of the tabs...
-
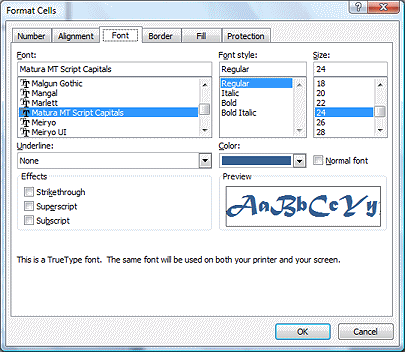 Return to the Font tab.
Cell A1 is still selected. Make the following choices:
Font = Matura MT Script Capitals
Font Size = 24
Font Color = Blue, Accent 1, Darker 25%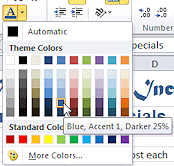
- Click on OK to close the dialog and apply your choices.
Format Cell: Ribbon
Some of the most common formatting choices are also available on the ribbon. Handy!
-
 Select cell A2 = Anniversary
Specials
Select cell A2 = Anniversary
Specials - On the Home tab in the Font tab group, use the buttons to format this cell as:
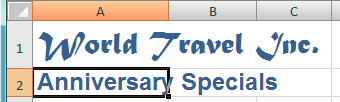 Font = Arial;
Font Size = 18;
Font style = Bold;
Font Color = Blue, Accent 1, Darker 25%
Format Cell: Merge and Center
-
 Select the range
A1:E2, which is the first two rows across the width of your data.
 On
the Home tab click the Merge and Center button
On
the Home tab click the Merge and Center button 
 .
.
You get a warning!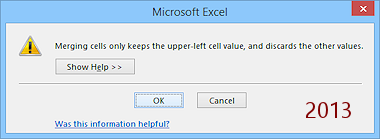
 Merging can lose data!
Only the data in the upper left cell is kept when cells are merged. This is very different from the way Word handles merged table cells. In Word each cell's contents becomes a separate paragraph in the merged cell.At least Excel will warn you that you are about to lose data.
-
Click Cancel.
 Problem:
Text in A2 vanishes
Problem:
Text in A2 vanishes
If you clicked on OK in the message box, then all of the selected cells merge into a single cell but only the text from the first cell is kept.
Solution: Undo immediately.
-
 Select just A1:E1 this time - all on the same row.
 - Click on the Merge and
Center button again.
The text in A1 is centered across the selection.
-
 Select range A2:E2.
 - Click the Merge and Center button.
The text in A2 is centered over the selected range. - Save.
[trips9-titleformatted-Lastname-Firstname.xlsx]
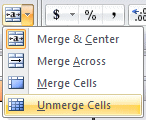
Unmerge Cells: Ribbon and Dialog
If you change your mind or have not selected the right cells to merge, you can unmerge in two ways, using the ribbon or the Format Cells dialog. This section is just practice with no changes to save.
Unmerge with Ribbon:
-
 Click on the title, World Travel Inc., in the merged cell on row 1.
The merged cell is selected. - Click the arrow beside the Merge and Center button.
The menu opens.
-
 Click on Unmerge Cells.
The text moves back to A1 but it is still centered in that single cell. That makes part of the title hang out of view to the left.
- Click in cell A3 to deselect.
- Undo.
Unmerge with Dialog:
-
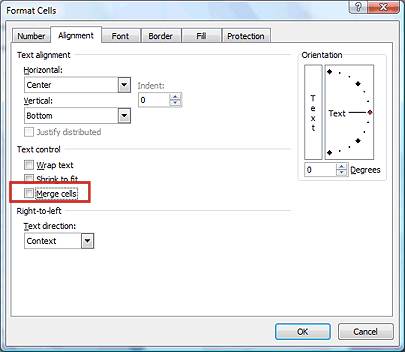 Click on the subtitle in row 2.
- On the Home tab, click the dialog box launcher
 for the Alignment tab group.
The Format Cells dialog opens to the Alignment tab.
- Uncheck the box by Merge Cells.
-
 Click on OK to close the dialog.
The subtitle is back into A2 but still centered.
- Undo.
![]() Add button to
Quick Access Toolbar: If you find yourself doing a lot of unmerging or
having to take out centering, you could customize your Quick Access Toolbar to include
Add button to
Quick Access Toolbar: If you find yourself doing a lot of unmerging or
having to take out centering, you could customize your Quick Access Toolbar to include ![]() a Merge Cells button (without the centering) and
a Merge Cells button (without the centering) and ![]() an Unmerge Cells button.
an Unmerge Cells button.
|
|
| © 1997-2017 Jan Smith All Rights Reserved |
Site Map What's New |
Privacy Policy Terms of Service Copyright Acknowledgements |
~~ 1 Cor. 10:31 ...whatever you do, do it all for the glory of God. ~~
Last updated: March 22, 2017