|
 |
Step-by-Step: Copy Formatting |
|
What you will learn: |
to copy formatting with Format
Painter
to copy formatting with Paste Special
to resize
columns
|
Start with:
 trips9.xls (saved in
previous lesson)
trips9.xls (saved in
previous lesson)
Format Cell: Format Painter
For quick copying of formatting, the Format Painter can't be beat!
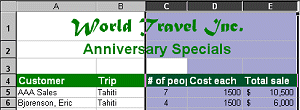
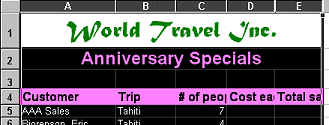
- Select cell A4 = Customer
 From the Formatting toolbar, select Arial, size = 12, Bold and Fill = Green, Font Color = White. From the Formatting toolbar, select Arial, size = 12, Bold and Fill = Green, Font Color = White.
The row resizes automatically because of the larger font size.
-
 While cell A4 is selected, click on While cell A4 is selected, click on
 the Format Painter button. The pointer changes to the Format Painter button. The pointer changes to
 the Format Painter shape. the Format Painter shape.
- Click on cell B4 =
Trip . (You don't need to drag!) The formats in cell A4 are applied to cell B4 and the pointer returns to the Select shape.
 To use Format Painter for multiple cells, double-click the
button. You must click the button again to turn off Format Painter and go
back to the select pointer shape.
Format Cell: Paste Special
-
 Select cell B4 and click Select cell B4 and click
 the Copy button.
The cell is bordered with a blinking dashed border. The dashes look like they are
chasing each other around the cell! the Copy button.
The cell is bordered with a blinking dashed border. The dashes look like they are
chasing each other around the cell!
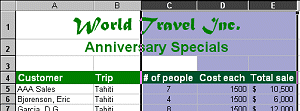
- Drag to select cells C4, D4, and E4.
-
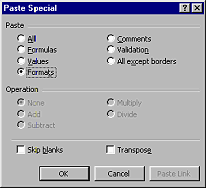 Choose | The
Paste Special dialog opens. Choose | The
Paste Special dialog opens.
- Click on the Paste option Formats. Then click OK.
All of the formatting in cell B4 is applied to C4, D4, and E4.
- Press the ESC key
to clear the blinking border around cell B4.
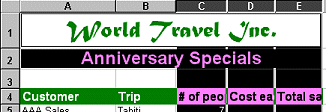
Notice that the columns did not resize when the text expanded due to a larger font size.

  Resize:
Columns Resize:
Columns
-
 Drag across the column headings C, D, and E . Drag across the column headings C, D, and E .
-
 Double
click on the right edge of the column heading of one of the
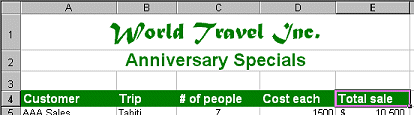
selected columns. All the selected columns are resized with AutoFit to
be wide enough to read all the characters. Now the text in C4 shows
completely. Double
click on the right edge of the column heading of one of the
selected columns. All the selected columns are resized with AutoFit to
be wide enough to read all the characters. Now the text in C4 shows
completely.
- Save as trips10.xls on your Class disk in the excel project3 folder.
 How to handle a full disk. How to handle a full disk.
 Resize: Columns Resize: Columns
-
 Drag across the column
headings C, D, and E . In Excel 97 we have a surprise! All the columns to the left
are selected, too. This is because of the merged cells in rows 1 and 2 that included columns A through E. Drag across the column
headings C, D, and E . In Excel 97 we have a surprise! All the columns to the left
are selected, too. This is because of the merged cells in rows 1 and 2 that included columns A through E.
The top left cell of a selected range has a white background and all other cells have a black background. Because cell A1 is part of a merged cell, the whole merged cell is white. This makes it a bit hard to see what is going on.
- Click in a cell to unselect.
-
 Click the heading for column C. Hold the CTRL key down and click on column headings D and E. Click the heading for column C. Hold the CTRL key down and click on column headings D and E.
Now only those three columns are selected. But the highlighting shows that
the merged cells are also selected. Don't forget that the top merged cell is
actually selected. It's hard to tell from the highlighting in this case. This is
rather confusing. Later versions of Excel do not have this behave. Hurrah!
- Double click on the
right edge of the column heading of one of the selected columns.
Normally this would resize all the columns with
AutoFit. But those merged cells won't allow this. Only one column is
resized.
- Repeat the
double-click on the right edge of column heading for the other two
selected columns to apply AutoFit.
- Save as trips10.xls on your Class disk in the excel project3 folder.
How to handle a full disk.
|