 |
Sometimes you would like part of a cell to
use different formatting from the rest of the cell. You must be in Edit
mode to do
this.
On the other hand, sometimes you would like to format all
of your data or a large section of a sheet at once. AutoFormat offers a
number of useful schemes to do just that.
Finally, there are times when you
regret you ever started formatting. You want to start over with
no formatting at all. Since Undo only remembers the last 16 actions, you
need another way to clear all the formatting you applied. Excel provides
several!
|
 |

Where you are:
JegsWorks >
Lessons >
Numbers
Before
you start...
Project 1: Excel Intro
Project 2: Excel Basics
Project
3: Format & Arrange
Format Cells

 Apply
Formatting Apply
Formatting
 Copy
Formatting Copy
Formatting
 Partial,
AutoFormat Partial,
AutoFormat
 Style - Dialog Style - Dialog
 Style - Style box Style - Style box
Format
Chart
Arrange
Summary
Quiz
Exercises
Project 4: Groups & Formulas
Project 5: Design
Search
Glossary
Appendix
|
|
 |
Step-by-Step: Format Part of a Cell, AutoFormat, & Clear |
 |
What you will learn: |
to format only part of a cell's
contents
to format with
AutoFormat
to print a selection of a
sheet
to clear all
formatting
|
Start with:
 trips10.xls (saved in
previous lesson)
Format Cell: Part of cell's text
- Double-click cell A2 to get into Edit mode so you can edit it.
- Select the word Specials and click
 the Italics button. the Italics button.
- While "Specials" is still selected, use the Formatting bar to change the Font color to Dark Red.
 Save as trips11.xls in the excel project3 folder of your Class disk. Save as trips11.xls in the excel project3 folder of your Class disk.
Format Cells: AutoFormat
- Drag to select the range A1:E25, which is the upper table on the sheet.
 Excel 97:
Watch what happens as you drag from A1 toward E25. The merged cells at the top affect the way Excel selects as you drag. Excel 97:
Watch what happens as you drag from A1 toward E25. The merged cells at the top affect the way Excel selects as you drag.
- On the menu select |
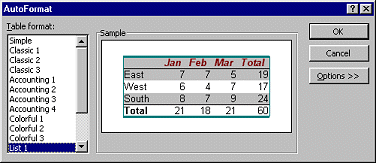
 Excel 97: Click on each Table format in the dialog's list to
see its design features in the sample on the right of the
dialog. Excel 97: Click on each Table format in the dialog's list to
see its design features in the sample on the right of the
dialog.


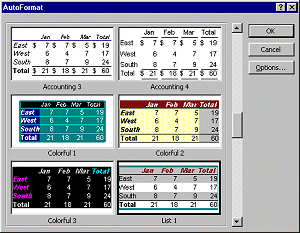
  Excel 2000/2002/2003: Scroll the list of table formats. Inspect each to see what features it includes.

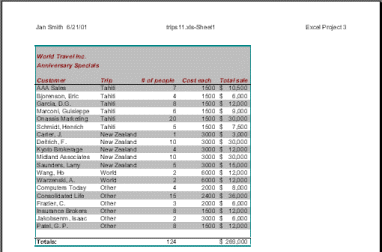
- Select the layout named List 1 and click on OK to apply this layout to your
sheet.
 Save by
clicking the Save by
clicking the  Save button. Your
document overwrites the one on your floppy disk. [trips11.xls] Save button. Your
document overwrites the one on your floppy disk. [trips11.xls]
Print Selection
- Open | and select Portrait orientation
and click OK to close the dialog.
- With Range A1:E25 still selected, select from the menu | and choose .
- Click the Preview button to check that all settings are
working correctly.

 Print. Print.
Clear Formats
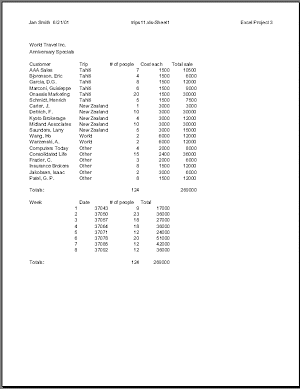
Here is a fast way to remove all the cell formats and get back to basics - Normal font, no borders, no fills, no merged cells. To return to a previous stage in your formatting, you can use Undo. But Undo only remembers 16 actions.
- Select the whole table by typing A1:E37 in the Name Box and
pressing the ENTER key.
- From the menu select
| | . All formatting is removed
from the selection.
 Alternate method that
preserves merges: AutoFormat - None,
|| Choosing the last format in the list -
None, removes all the formatting. The merged cells will stay merged with
this method. Alternate method that
preserves merges: AutoFormat - None,
|| Choosing the last format in the list -
None, removes all the formatting. The merged cells will stay merged with
this method.
-
 View Page Break Preview and,
if necessary, remove the
page break at row 26. View Page Break Preview and,
if necessary, remove the
page break at row 26.
-
 Save
as trips12.xls to the excel project3 folder on your Class disk. Save
as trips12.xls to the excel project3 folder on your Class disk.
 How to handle a full disk. How to handle a full disk.
 After saving, the Undo list is cleared. You can't undo
anything you did before you saved. After saving, the Undo list is cleared. You can't undo
anything you did before you saved.
 Print. Print.
- Close the
spreadsheet.
|

![]()