 |
All this formatting brings up the question of styles. Does Excel have styles like Word does to make it easy to format different cells alike? Yes, indeed! Excel uses cell styles instead of character or paragraph styles.
A cell style, or just style, can include any formatting that can be set in the Format Cell dialog. This includes all of the font characteristics, number formats, alignments, fills (patterns), and borders. Excel provides some pre-defined styles for numbers in the default workbook and
with the Currency, Percent, and Comma buttons.
The default toolbars for Excel do not include a Style box like the one on Word's Formatting bar. There is not room for it on the Formatting bar at 640 x 480 resolution. You can customize any toolbar or the menu bar, however, to include it. You'll learn how
in the next lesson. Without the Style box it is awkward to apply cell styles, as you will see.
|
|
Where you are:
JegsWorks >
Lessons >
Numbers
Before
you start...
Project 1: Excel Intro
Project 2: Excel Basics
Project
3: Format & Arrange
Format Cells

 Apply
Formatting Apply
Formatting
Copy
Formatting
Partial,
AutoFormat
Style - Dialog
Style - Style box
Format
Chart
Arrange
Summary
Quiz
Exercises
Project 4: Groups & Formulas
Project 5: Design
Search
Glossary
Appendix
|
|
 |
Step-by-Step: Cell Style Dialog |
|
What you will learn: |
to create a
cell style using the dialog
to apply a cell style with a
dialog
to check what style a cell has
with the
dialog
|
Start with:
 trips10.xls(This is not a mistake!)
(saved in previous lesson)
trips10.xls(This is not a mistake!)
(saved in previous lesson)
Open an existing workbook
- With the Class disk in Drive A, select from the menu and inspect the
list of recently used files at the bottom.
- Select trips10.xls from
the list. This is not the most recent version you worked with. You left
that last one with no formatting at all, so we are backing up a bit.
[You did follow the directions, didn't you?]
- If trips10.xls is not in the
list
, select from the menu | . The Open dialog appears. Type in the File name text box the
path to your latest version of the trips spreadsheet - a:\my docs\excel project3\trips10.xls Click on Open to open it.
Note: This
spreadsheet does not have the changes you made in the previous lesson
when you formatted part of a cell and when you used AutoFormat.
Style: Create with Dialog
- Select cell C4 = # of people
-
 From the menu select | From the menu select |
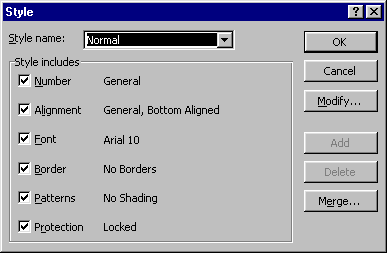
The dialog shows the Normal cell style when you
first open it instead of the current formatting settings for the cell.
- In the Style name box, type Label - white on green
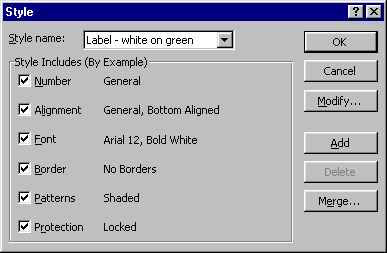
The dialog changes to show (By Example) the characteristics of cell
C4.
- Click the OK button to add this new style to the list and to apply it
at the same time to the selected cell.
 Clicking on the Add button will add the new name to the list of styles, but does not apply the style to the selected cell(s). Clicking on the Add button will add the new name to the list of styles, but does not apply the style to the selected cell(s).
If no cell already had the formatting you want, you could set all of the characteristics yourself here, the hard way. First type in a new name (or choose an existing style to change) and then click the Modify button to access the Format Cells dialog. All the settings you choose will be recorded under the current name in the Style name box. All of this is rather awkward. Using the Style box on the toolbar will be easier.
Style: Apply with Dialog
- Select range A4:E4
- Select | and drop the list and select the style Label- white
on green.
- Click on OK to apply the selected style to the selected cells. You won't see a change in
the labels since they already had the same formatting that the style sets. But
shortly, when you change the style's definition, the cells will be updated with
the changes.
Style: Check style
- Select cell E4.
- To see what style this cell has, from the menu select |
The dialog shows Label - white on green with all
its characteristics.
Style: Modify with Dialog
- Double-click cell C4 and edit it to read Number of People . This will make the text too wide for the column.
- Click the green check
mark on the Formatting bar to enter your change.
- From the menu select | . The Style dialog should show the style you created: Label - white on green .
- Click the Modify button. The Format Cells dialog appears
with all its tabs.
- On the Alignment tab check the box for Wrap text and set the Vertical Alignment to Top.
- Click on OK to close the Format Cells dialog and then on OK again to
close the Style dialog. The style Label - white on green has been changed. All
cells that use that style are updated, unless they have had manual formatting
applied after receiving the cell style.

- Prove that the cell style has changed by making column D or E narrower (drag the right edge of the column heading) until the text wraps. Then
Undo your change.
- Save as
trips13.xls.
 How to handle a full disk. How to handle a full disk.
|
