
Jan's Working with Presentations
Advanced: Images: Master Image
 An image that you insert on a Slide Master will appear on every slide even though it
is not part of the background. This is the easy way to get
your logo or decorative touches onto each slide in exactly the same
position and size.
An image that you insert on a Slide Master will appear on every slide even though it
is not part of the background. This is the easy way to get
your logo or decorative touches onto each slide in exactly the same
position and size.
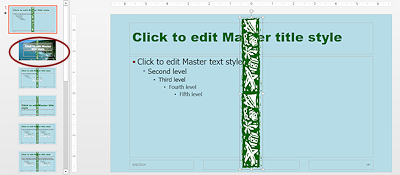
The first example to the right has a solid color background, a single image down the left, a logo image at the upper right, and several rectangles with solid fill.
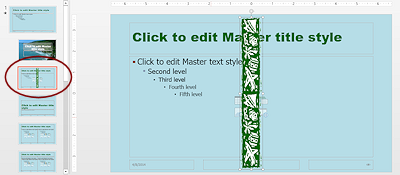
 The second example at the right has a texture background and
an image that is formed with several shapes that have been grouped
together. The star is shadowed and the two rectangles above it have
gradient fill. You can get VERY complex if you wish to!
The second example at the right has a texture background and
an image that is formed with several shapes that have been grouped
together. The star is shadowed and the two rectangles above it have
gradient fill. You can get VERY complex if you wish to!
![]() Master -> All slides: Any image that
you include on a Slide Master layout will appear on every slide that
uses that layout. You cannot remove it for an individual slide that uses that layout. Choose the size and location on the slide carefully.
Master -> All slides: Any image that
you include on a Slide Master layout will appear on every slide that
uses that layout. You cannot remove it for an individual slide that uses that layout. Choose the size and location on the slide carefully.
You can create a separate layout for those slides that don't need the image.
Slide Master: Inserting an Image
When you insert an image on a Slide Master, it will be centered vertically and horizontally. Large images will be resized to fit on the slide, but they keep their proportions. That may mean that the picture does not cover the whole slide.
Large image is reduced to |
Small image is centered |
Change Size of Image
 It is easy to change the size of an image
by dragging one of the resizing
handles, the white handles at the corners and center of each side of
the image.
It is easy to change the size of an image
by dragging one of the resizing
handles, the white handles at the corners and center of each side of
the image.
When your mouse is over one of the handles, the mouse
pointer changes to a resizing shape. ![]()
![]()
![]()
![]()
![]()
![]()
![]()
![]()
When you drag a handle, the image enlarges or shrinks in the direction that you drag.
If you cannot see the handle that you want, scroll the Slide Pane or reduce the Zoom percentage until you can see the handle you want.
![]() To
keep proportions the same: Drag by a corner handle.
To
keep proportions the same: Drag by a corner handle.
![]() No
handles showing: The image is not selected yet.
No
handles showing: The image is not selected yet.
![]() Enlarging a bitmap
image will make the image fuzzy and/or jagged.
Enlarging a bitmap
image will make the image fuzzy and/or jagged.
All photos and many drawings are bitmap images.
| Photo | Bitmap drawing |
|
|
|


A vector image can be resized without any problems because the shapes are calculated. Many of the clip art images from the Clip Art task pane are vector images, but not all are. (Nearly all web page images are bitmap images!)
Original image was a vector image; larger resized image
Formatting a Picture
Dragging works wonders, but sometimes you need precise control.
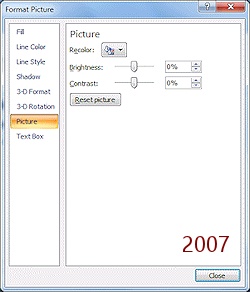
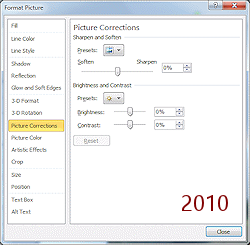
The Picture Tools: Format ribbon tab and the Format Picture dialog let you get really picky and creative about your image.
Ribbon: PowerPoint 2007, 2010, 2013, and 2016 have essentially the same ribbon for Picture Tools: Format.
 |
|
 |
|
 |
|
 |
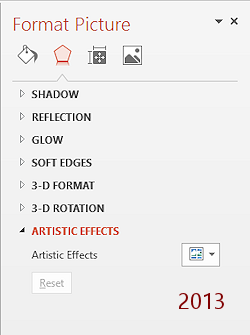
Dialog or Pane: PowerPoint 2007 has a separate Size and Position dialog while PowerPoint 2010 includes those and more in its Format Picture dialog. PowerPoint 2013 and 2016 use a pane instead of a dialog.
To open the Format Pictures dialog or pane:
- Picture Tools: Format ribbon
tab > Picture Styles tab group >
Dialog Launcher button

OR
- Right click on image > Format Picture...
| |
Step-by-Step: Image on a Slide Master |
|
| What you will learn: | to add an image to a master to position the image by dragging to position the image with Format Picture dialog to resize placeholders |
Start with: ![]() , nz-background-Lastname-Firstname.pptx
, nz-background-Lastname-Firstname.pptx
 The photo background you just applied to the Title
layout would be a
bad choice for the other layouts. They have a lot more text.
The photo background you just applied to the Title
layout would be a
bad choice for the other layouts. They have a lot more text.
Instead, you will create a Slide Master that includes the border that World Travel Inc. uses on its
stationery and pamphlets.
If you have completed Working with Words, then you used this image on some of the documents that you created.
Slide Master: Insert Image
 If
necessary, open nz-background-Lastname-Firstname.pptx from your
Class disk.
If
necessary, open nz-background-Lastname-Firstname.pptx from your
Class disk.
-
 Open the Slide Master View and select the top level thumbnail.
- On the Insert ribbon tab, click the
button Picture
 or Pictures
  .
.
The Insert Picture dialog appears.
-
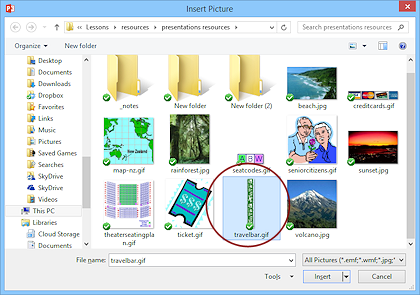 Navigate, if necessary, to the location of the resource files on your hard disk and select the image travelbar.gif.
 Problem: Cannot find
resource files
Problem: Cannot find
resource files
Solution 1: You can download the whole set of resource files for the
PowerPoint lessons and unzip them to the default location.
of resource files for the
PowerPoint lessons and unzip them to the default location.
Solution 2: You can download the online copy of the file and save it
to a location you can find in the Insert Picture dialog.
-
 Click on the Insert button.
The dialog closes and the selected image appears in the center of the Slide Master. Not a particularly nice location!Look at the Title layout. The image is running right down the middle of it too. Not what we want!
- Undo.
The travelbar image vanishes.
-
 Select the layout Title and Content and insert the image again.
Better this time. The image appears only in the Title and Content layout. You won't be using any of the other layouts, so that is just fine.
 Problem: Image
appears on Title layout
Problem: Image
appears on Title layout
You did not have the Title and Content layout selected but instead the main Slide Master at the top of the Navigation Pane. This is easy to do since they look alike!Or, you used the Redo button.
Solution: Undo, select the correct layout, and insert the image again.
- Save
As nz-bar-Lastname-Firstname.pptx to
your Class disk in the powerpoint project3 folder.
Slide Master: Position Image - Drag
Since PowerPoint automatically put the new image in the center, you must change the image's position. To get exactly the right spot, you will need to do more than just drag.
 Drag the image to the left side of the slide. The image is
not quite as tall as the slide.
Drag the image to the left side of the slide. The image is
not quite as tall as the slide.
-
Try to adjust the image's position without resizing it so that there is the same space above and below the image.

 PowerPoint 2007, 2010: By default, the image snaps to the
grid, even though the grid lines are not showing. So you cannot manually
position the image to just any place you want on the slide. That gets
frustrating fast!!
PowerPoint 2007, 2010: By default, the image snaps to the
grid, even though the grid lines are not showing. So you cannot manually
position the image to just any place you want on the slide. That gets
frustrating fast!!
You need a way to position the image more precisely without having to dig down through the dialogs to change the Snap to Grid behavior. The next topic shows you how!
 PowerPoint 2013, 2016: Snap to grid is off by default and even when on, it seems to allow more freedom of movement than in previous versions.
- Save.
[nz-bar-Lastname-Firstname.pptx]
Slide Master: Position Image - Dialog
In PowerPoint 2007 you need to use the Size and Position dialog but in PowerPoint 2010, 2013, and 2016 those features are included in the Format Picture dialog.
-
 Right click on the image to open the
context menu.
Right click on the image to open the
context menu.
- Select Size and Position.
PowerPoint 2007: The
Size and Position dialog appears.
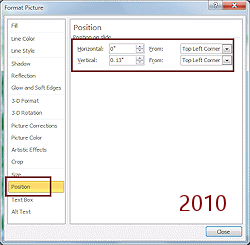
Click on the Position tab. PowerPoint 2010: The Format Picture dialog appears.
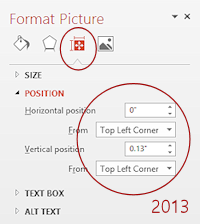
Click on the Position page. PowerPoint 2013, 2016: The Format Picture pane appears at the right. Click the Size and Properties icon to open that page.
Click on the Position menu item to expand it. -
Set:
Horizontal to 0" from Top Left CornerVertical to 0.13" from Top Left Corner
Now the image is neatly positioned!
If the directions had not told you the numbers to use, you would have to make some guesses until it looked right!
 Change
Size on ribbon: You can adjust the size of a picture or of a drawing
object directly on the Picture Tools or Drawing Tools ribbon but not its position.
Change
Size on ribbon: You can adjust the size of a picture or of a drawing
object directly on the Picture Tools or Drawing Tools ribbon but not its position. - Save.
[nz-bar-Lastname-Firstname.pptx]
Master: Resize Placeholders
The placeholders on the Slide Master are partly underneath the image. Easy enough to fix!
-
 Click in the Title placeholder to select it.
- Hold down the SHIFT key and click in the Text placeholder. Now both placeholders are selected and their resizing handles are
visible on top of the bar image.
- Move your mouse over one of the handles in the center of the left
side of either placeholder.
-
 Drag to the right until the edge of the placeholder is clear of the bar
image. TaDa!
Drag to the right until the edge of the placeholder is clear of the bar
image. TaDa!
-
Close Slide Master View.
The non-title slides still do not show the bar! Why is that??In this presentation, slides 2 - 8 use the main Slide Master at the top of the list. You put the bar image on a different layout. You just need to apply it!
- Save.
[nz-bar-Lastname-Firstname.pptx]
Apply Layout
To get the travelbar.gif image to show on the slides, you need to actually apply the Title and Content layout to all of the slides except the Title slide. Right now that layout is not being used at all.
-
 Change to Slide Sorter View.
- Click on Slide 2, hold SHIFT
down, and click on Slide 8.
All slides except the Title slide are selected.
-
 On the Home ribbon tab, click the Layout button
to show its palette.
On the Home ribbon tab, click the Layout button
to show its palette.
- Click on the second thumbnail at the top, Title and Content.
The layout is applied to all selected slides.
- Save.
[nz-bar-Lastname-Firstname.pptx]
|
|
| © 1997-2017 Jan Smith All Rights Reserved |
Site Map What's New |
Privacy Policy Terms of Service Copyright Acknowledgements |
~~ 1 Cor. 10:31 ...whatever you do, do it all for the glory of God. ~~
Last updated: March 22, 2017
(For those who just have to know!)
Select an image, object, or placeholder to make the Drawing Tools ribbon tab show. In the Arrange tab group, click the Align button