|
Rehearse Timings
 Some slides need to
stay in view longer than others. The Rehearse Timings feature records the
actual time intervals while you advance through the show by clicking. Some slides need to
stay in view longer than others. The Rehearse Timings feature records the
actual time intervals while you advance through the show by clicking.
You need different time intervals for different slides and different
animations. Keep in mind that it takes longer to read when the information is
new to you, but also, long waits are boring! It's a balancing act.
The arrow button
 advances the rehearsal to the next transition or animation.
The Pause button  lets you pause the rehearsal.
The time in the white box
 is
for the current effect. is
for the current effect.
The Restart button
 starts the
current slide's transition and animations over again. starts the
current slide's transition and animations over again.
The time at the right of the bar
 is
the total time for all slides that you have timed. is
the total time for all slides that you have timed.
When you have finished walking through the show, a message box asks if you
want to save the timings to the slides. Just pick No if all was not perfect!

Edit timings for one slide: Edit an individual slide by quickly
clicking
 the Advance button
until you get to the slide. Use the Start over button the Advance button
until you get to the slide. Use the Start over button
 to restart the timer for a slide.
When you have finished your edits, click to restart the timer for a slide.
When you have finished your edits, click
 the Close button. the Close button.
 Existing timings are replaced only
for slides that you actually timed in the rehearsal. The total time on the bar
and in the message box will not be correct unless you actually timed each part. Existing timings are replaced only
for slides that you actually timed in the rehearsal. The total time on the bar
and in the message box will not be correct unless you actually timed each part.
 |
Step-by-Step:Verify |
 |
What you will learn: |
to verify that presentation is complete & correct
to configure with Set Up Show
to configure to advance automatically
to use Rehearse timings |
Start with:  ,
nz-animatedata.ppt ,
nz-animatedata.ppt
Verify Content
-
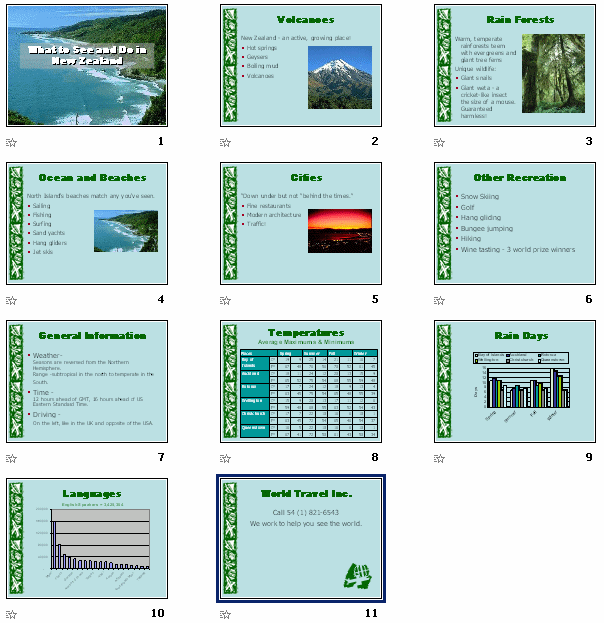
Open the presentation in Slide Sorter view.
-
Verify the following. Make corrections as
necessary.
-
Order of the slides
-
Background and fixed image
-
Slide Titles: text, formatting, alignment
-
Slide text: text, formatting, alignment, bullets
-
Images: size and position
-
Table & charts: position, formatting
-
 Spell
Check. Spell
Check.
-
Change
the font for the title of the last slide to Matura MT Script
Capitals. This is the font that World Travel Inc. uses on all of its
stationery and publications.
 Can't
find font: If you do not find Matura MT Script Capitals in your Font
list, choose another handwriting type font. Can't
find font: If you do not find Matura MT Script Capitals in your Font
list, choose another handwriting type font.
-
 Save
as nz-finish-xxx.ppt to your
Class disk, but
replace xxx with your own initials. Save
as nz-finish-xxx.ppt to your
Class disk, but
replace xxx with your own initials.
Verify Transitions & Animations
You need to add a some animations so that the table and
charts are not sitting there already while the title fades into view.
-
Play the Slide Show and verify:
-
Transitions - none
-
Animations -
-
Titles- Fade
-
Bullet text- Wipe from left
-
Table - none
-
Chart (Rain Days) - Fade in series
-
Chart - Languages - none
-
Text box above chart: English - none
-
Clip art globe- Light Speed
-
Select the table on slide #8
Temperatures.
-
 Apply
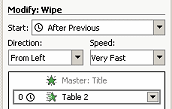
the Wipe entrance effect, with Start as After
Previous and Direction as from Left. Apply
the Wipe entrance effect, with Start as After
Previous and Direction as from Left.
-
Select chart on slide #10
Languages.
-
Apply the same effect: Wipe, after previous, from
left.
-
Select the textbox below the title, English
speakers.
-
Apply the Fade effect, after previous,
medium.
-
Play the show, starting with slide #7, to be sure
your new animations are working correctly. Depending on your version of
PowerPoint and exactly what you have done, you may need to make
adjustments.
Print Handouts
Once the slides themselves are proofed, you can print
handouts. Afterwards, there are more choices to make about how the
presentation will run.
-
 Select
|
from the menu. Select
|
from the menu.
-
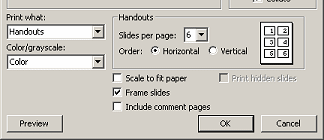
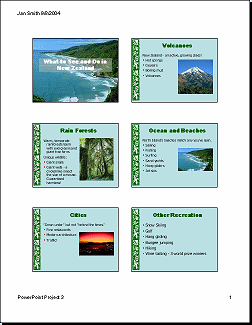
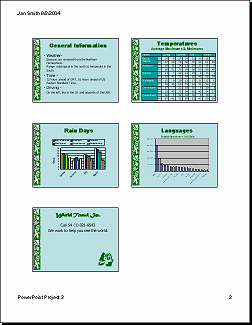
Select to print Handouts with 6 slides per
page, Horizontal and Frame slides.
-
If you have a color printer, choose Color.
- Click on the Preview button.
- In Print Preview, click on the Options button and select
Header and Footer.
- In the header, type your name and the date.
- In the footer type PowerPoint Project 3.
 Print. Print. Save.
[nz-finished-xxx.ppt] Save.
[nz-finished-xxx.ppt]
Dialog: Setup Slide Show - Show Type
It's time for final decisions about how your show will run.
-
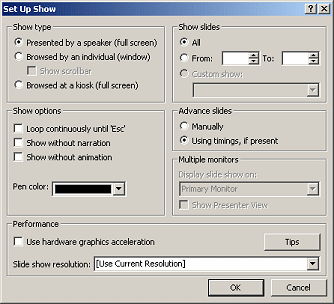 From
the menu, select |. From
the menu, select |.
The Set Up Show dialog appears.
The default Show type is Presented by speaker (full screen).
This is not what World Travel Inc. wanted for this show.
-
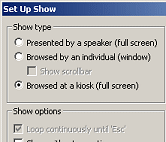 Change
Show type to Browsed at a kiosk (full screen). Change
Show type to Browsed at a kiosk (full screen).
In Show options the choice Loop continuously until 'ESC'
is automatically checked.
With this setting, the viewer can click or use keys to advance through the
show, but cannot edit the presentation.
-
Click on Using timings, if present.
For this presentation needs to run by itself, this choice is necessary.
-
Click on OK.
-
Click on the first slide and play the show all the way through.
-
Make any corrections to transitions and animations that are needed.
AutoPlay
Sometimes you want a presentation to run itself, like during the pre-event
time or at a trade fair booth. What do you need to do to make this presentation play all by itself,
without any clicking?
- Timings on all transitions
- Timings on all animations
You will also need to rehearse the timings to be sure the viewer has enough time
to read what is on the slide, without having long wait times.
-
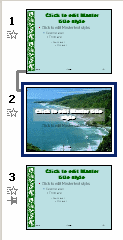 Open
the Master view to the Slide Master. Open
the Master view to the Slide Master.
You have three slide masters: Default Design Slide Master, Default Design
Title Master, and Chart Master Slide for slide 9
-
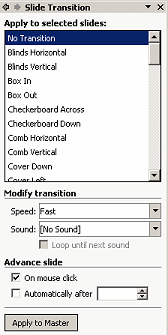 Open
the Slide Transition task pane. Open
the Slide Transition task pane.
- Click on each slide master to see what transition is applied
to it. None! Each is set to advance with a mouse click, however.
You need to leave the No Transition in place, but change how the slide
advances.
- Select all three thumbnails.
- In the Advance slide
section, click in the box beside Automatically
after, and set the time to 7 seconds, 00:07.

 You need to
select a time setting that is long enough for your animations to play and still have a
second or two left over. You don't want the slide to advance immediately after
the last word or object is displayed! You need to
select a time setting that is long enough for your animations to play and still have a
second or two left over. You don't want the slide to advance immediately after
the last word or object is displayed!
- Close Master View.
Rehearse Timings
It can take a lot of tweaking to get an AutoPlay slide show working just
right.
- From the Slide Show menu, select . The timer starts immediately.
- Wait for the title to fade into view. Click the slide when
the fade is finished and you feel that the viewer had enough time to absorb
the photo and title.
- Continue through all of the slides, clicking the slide once an effect or transition
is finished and you think it is time to go on to the next one. If necessary,
restart a slide by clicking
 the Restart
button. the Restart
button.When the show is finished, a message box appears asking if you want to
keep these timings.
- Click Yes, if you are happy with your timings.
Click No, if you are not satisfied. Rehearse the timings again until you are happy
with the show.

- Click on
 the
Slide Show button at the bottom of the pane to view the show. Don't use
the mouse. Wait for the slides to advance on their own. the
Slide Show button at the bottom of the pane to view the show. Don't use
the mouse. Wait for the slides to advance on their own.
 If
all is working well, save.
[nz-finished-xxx.ppt] If
all is working well, save.
[nz-finished-xxx.ppt]
If all is not well, fix the problems and then save.
 How to handle a full Class disk


~~ 1 Cor. 10:31 ...whatever you do, do it all for the
glory of God. ~~
Last updated:
30 Apr 2012 |

