 |
Images that are on the same line
as text are called inline images. The spacing
between lines of text must expand to hold the whole image.
These lessons have lots of inline images. Examples: the
little footprint icon
 in the table
of contents on the right and the in the table
of contents on the right and the
 icon for
the Class disk, which is at the beginning of a step where you save your
work. icon for
the Class disk, which is at the beginning of a step where you save your
work.
Notice how the space between the lines above expanded to
hold the Class disk icon. It is taller that the line height. Later you will
learn how to change the way images line up with text.
|
 |

Where you are:
JegsWorks >
Lessons > Web
Before you start...
Project 1: Browser Basics
Project 2: HTML Basics
HTML Code
About HTML
What You Need
Code by Hand
WYSIWYG
FrontPage/ FPX
Images in HTML

FrontPage OR
OR  FPX FPX

 Insert
Image Insert
Image
 More
Images More
Images
 Inline
Images Inline
Images
 Replace
Image Replace
Image
 Image
Link Image
Link
Align & Space
 Align
Images Align
Images
Image Issues
 Save
to New Location Save
to New Location
 Save
Non-Web Image Save
Non-Web Image
Formatting
Tables
Print
Convert
Summary
Quiz
Exercises
Search
Glossary
Appendix |
|

|
Step-by-Step: Inline Images in FPX
|
 |
| What you will learn: |
to insert inline images
what a broken image looks like |
Start with:
 , ,
 hector8.htm,
resource files hector8.htm,
resource files
Inline images
The photos of the family were put in a paragraph of
their own. You can put photos inside a paragraph with text. It will look
awkward unless the image is very small. The line spacing will increase to
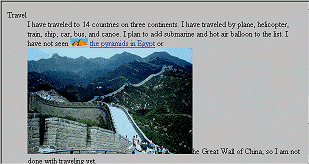
hold the image. Hector wants to put a small clipart image of the pyramids
and an image of the Great Wall of China into the Travel paragraph.
-
 In
the paragraph about Travel, put your cursor to the left of "the pyramids
in Egypt". In
the paragraph about Travel, put your cursor to the left of "the pyramids
in Egypt".
- Click
 the
Insert image button and type the path a:\my
docs\web\pyramids.tif in the From file: textbox.
Note that the TIF format is in the drop list of file types. So FPX
should be able to open it. the
Insert image button and type the path a:\my
docs\web\pyramids.tif in the From file: textbox.
Note that the TIF format is in the drop list of file types. So FPX
should be able to open it.
Whoops! An icon for a broken image
 appears instead of the pyramids. The TIFF image format is one of many
that come in different versions. FPX apparently does not understand this
particular one.
 Sadly, knowing
that the file format is usually an acceptable one does not always
guarantee that the software can handle the image file. Sadly, knowing
that the file format is usually an acceptable one does not always
guarantee that the software can handle the image file.
- Select the broken image icon and remove it by pressing
the DELETE key.
- Click
 the
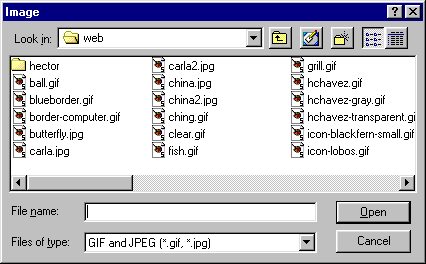
Insert image button and click the Browse button. The Image
dialog appears. The contents of the web folder
should be displayed. the
Insert image button and click the Browse button. The Image
dialog appears. The contents of the web folder
should be displayed.
If not, navigate to the floppy drive and then to the
web folder. If necessary, change the File
type box to show GIF and JPEG.

-
 Select
the image pyramids.gif and click the
Open button. Select
the image pyramids.gif and click the
Open button.
Some cute little pyramids appear in the sentence. The spacing between
the lines enlarged to hold the image.
-
 Resize
the image until the line spacing is back to normal. Resize
the image until the line spacing is back to normal.
- Add a space, if necessary, to have a blank space on each side
of the pyramids.
-
 Move
your cursor to the left of "the Great Wall of China". Move
your cursor to the left of "the Great Wall of China".
- Click on
 the Insert image button and click the Browse button.
- From the Image dialog, select the image
china.jpg and click the Open button. Way too large!
-
 Resize
the image to get the line spacing back to normal. Hmmm. The image does
not look like much at this size! Resize
the image to get the line spacing back to normal. Hmmm. The image does
not look like much at this size!
If the sentence wraps to a new line just after the image, put the
cursor at the right of the image and press DELETE once. This should
remove the line break. You will probably need to put a blank space on
one side of the image for good spacing.
- Look at the estimated loading time. It is up to 109 seconds.
There is one more image to insert, for now.
- Place your cursor at the left end of the last paragraph.
-
 Click
on Click
on  the Insert image
button and type in the path a:\my docs\web\Mail.gif the Insert image
button and type in the path a:\my docs\web\Mail.gif
 Once your web
page is on a server, your capitalization may be important. On a Unix
server, for example, the filename mail.gif is
not the same as Mail.gif. Typing the name with
the wrong case can mean it will not show up on the page! It is less
confusing to keep all of your file names in lower case. If you use FPX
to upload your pages, it will automatically make all filenames lower
case and will change the paths in the HTML code to match. Once your web
page is on a server, your capitalization may be important. On a Unix
server, for example, the filename mail.gif is
not the same as Mail.gif. Typing the name with
the wrong case can mean it will not show up on the page! It is less
confusing to keep all of your file names in lower case. If you use FPX
to upload your pages, it will automatically make all filenames lower
case and will change the paths in the HTML code to match.
 Save as hector9.htm to the
web folder of your Class disk.
In the next lesson you will reduce the horrendously high download times
by replacing these images with correctly sized ones. |
 Inline Images
![]()
![]()