
Jan's Working with Words
AutoTools: Margins & Breaks: Bullets
The default circle bullets are nice enough, but it is easy to change the symbol used for bullets to something more interesting. The same procedure works to change the format of numbered lists, too.
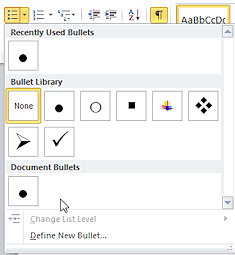
Gallery of Bullets (Word 2010)
The gallery of choices for bullet shapes shows shapes you have used recently at the top, then shows a library of default choices plus any that you have added to the Bullet Library. At the bottom you can see what bullet shapes are already in your document somewhere.
You can pick a new shape by clicking Define New Bullet....
Styles Pane
The drop-down Styles Gallery can be awkward to use when you are applying styles to several paragraphs. Plus, styles that have not been applied yet do not show in the gallery. There is another way! The Styles Pane offers several advantages over the Styles Gallery.
| |
Step-by-Step: Bullets |
|
| What you will learn: | to manage the Styles Pane to use the Styles Pane to apply a style to change the bullet shape to update style to match selection to use the Styles Pane to modify a style to change the bullet size and color to change the bullet indention |
Start with:![]() , trip_planner8-Lastname-Firstname.doc
, trip_planner8-Lastname-Firstname.doc
Custom Bullet List: Style Pane
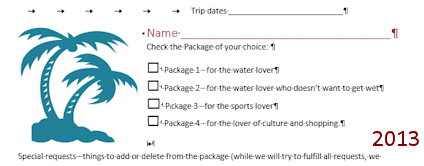
The list of packages in the form on the last page of the Trip Planner has a square at the left that was inserted as a symbol. To make the square a bullet, you will have to make some changes. It is handy to have a bullet style in place in case you want to add another package to the list. You can even save a style to the document template to use in other documents from that template.
-
 Save as trip_planner9-Lastname-Firstname.docx
 Show Styles Pane: Click the Dialog Launcher arrow
 for the Styles gallery.
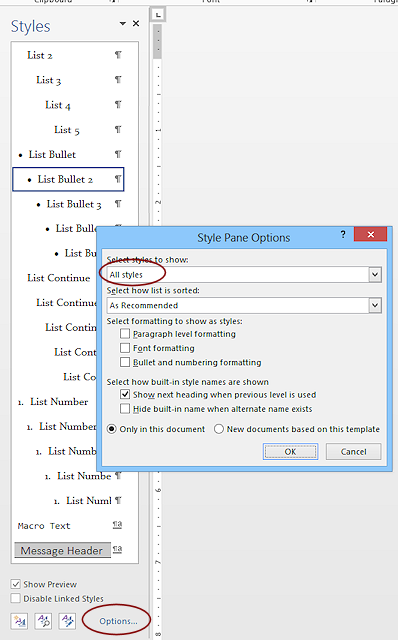
The Styles pane displays.- Show All Styles: At the bottom of the Styles pane, click the Options... link.
The Styles Pane Options dialog opens. -
Change the text box at the top to All styles.
The default is to show only recommended styles. That does not let you apply other styles that exist. Odd choice for the default. Sort Order: The default sorting order for the Styles pane shows the recommended styles first (in their own recommended order) and then the other styles in alphabetical order. You need to know which styles are 'recommended' so that you know to look for them at the top of the list.
 - Click on OK to close the dialog.
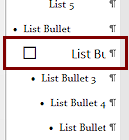
- Select the lines for the four Packages on the last page below the Name line.
- Apply the style List Bullet 2.
This style does not show unless you show All styles.
The indention changes.
Now all four items are in a bulleted list but use the default circle symbol instead of a square. The square is still there! It was inserted as a symbol. <sigh> - Select a bullet item and change the Font to Calibri 14 pts.
-
 While the line is still selected,
on the Home tab in the Paragraph tab group, click the arrow beside the Bullets button.
While the line is still selected,
on the Home tab in the Paragraph tab group, click the arrow beside the Bullets button.
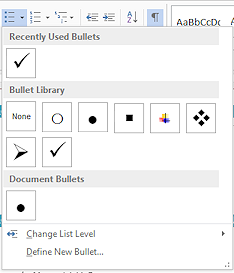
The gallery of bullet choices appears.
(Your gallery will probably show different choices!)The most recently used bullets are shown at the top. If you use the same shape with different font sizes, the thumbnails may look just alike. Confusing!
-
 Experiment: Bullet Shapes
Hover over each of the choices in this gallery.
Live Preview shows how the document will change.
-
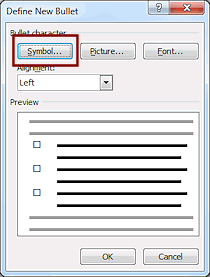
 Click the command at the bottom, Define New Bullet...
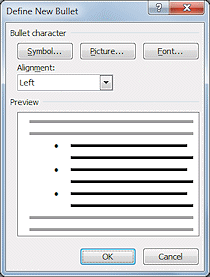
The Define New Bullet dialog appears.
Symbol button: Use a character from a font as the bullet
Picture button: Uses an image from a gallery of bullet images from Office.com or you can import one of your own.
Font button: Formats a symbol bullet with font size, color, etc.
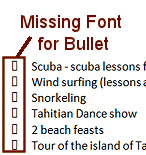
 Warning:
Missing Font = Missing Bullet
Warning:
Missing Font = Missing Bullet
If you pick a bullet symbol and view the document on a computer that does not have the font that you picked, all you see is a narrow rectangle or another odd character instead of your carefully chosen symbol bullet. On the other hand, picture bullets are saved with the document!
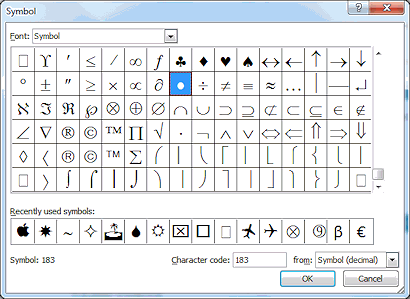 Click on the Symbol button.
The Symbol dialog opens to the font containing the current bullet, which is selected.Across the bottom are the most recently used characters. They might be from several different fonts.
Keyboard Shortcut for symbol: ALT + code number
Hold the ALT key down and type the decimal character code.- Click the arrow at the right of the Font
box at the top of the dialog.
A list of fonts installed on your computer appears. This list shows just the name of the font and does not give you a sample of what it looks like.Older versions of Word showed only "symbol" fonts in this list. A symbol font may not have any letters and numbers at all. Instead, it has various shapes and designs such as arrows, stars, or tiny pictures.
-
Experiment: Symbols
Select a font in the drop list and click on it. Scroll the display in the dialog to see all the characters for this font. Some fonts have a LARGE number of characters. Would any of them make a good bullet?Repeat for several regular fonts and several symbol fonts, such as Symbol, Webdings, Wingdings, Wingdings 2, Wingdings 3, Cambria Math, MT Extra.
When you are ready to continue...
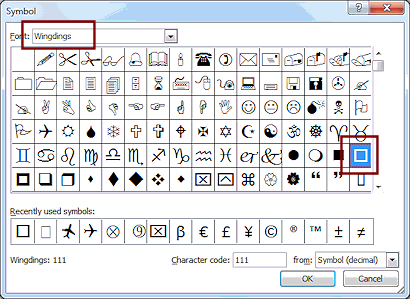 Select the font Wingdings and then click on the square shape.
 Click on OK to close the Symbol dialog.
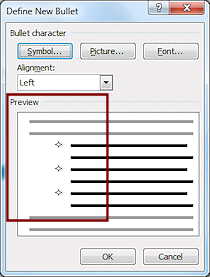
The Define New Bullet dialog has a preview of a short bullet list that is now using the new character for the bullet.
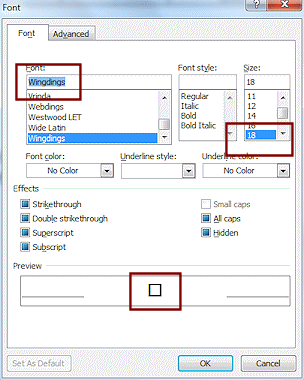 Click the Font... button and then on 18 pt.
 - Click on OK to close the Font dialog and then on OK to close the Define New Bullet dialog.
-
 In the Styles Pane, right
click on the style name List Bullet 2 and choose Update List Bullet 2 to Match Selection.
In the Styles Pane, right
click on the style name List Bullet 2 and choose Update List Bullet 2 to Match Selection.
The style now shows the square and the new font size.Also, all four of the items your previously formatted as List Bullet 2 now have the new square bullet.
If the original square symbol was still there, there are now two boxes! Could you tell before that the original squares were insert manually? One clue sometimes is that for a bullet list there is a TAB symbol between the bullet symbol and the text. If you see spaces, it is not a bullet.
 If necessary, delete the second square and the space between the square and the text in each item.
Change Bullet Shape: Ribbon
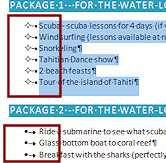
The lists of activities for each package are already bullet lists that use the default solid circle shape. You can pick out a more interesting shape.
-
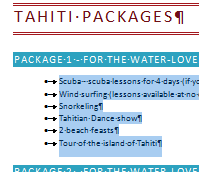 Select the bulleted lines for Package 1 on page
3.
Select the bulleted lines for Package 1 on page
3.
(Don't worry if your bullets are not lined up exactly under the headings like the illustrations. You will be changing it later anyway.)
 Change the bullet symbol:
Bullet List button > Define New Bullet... command > Symbols... button > Wingdings > 4 point star (character code 178) > OK
The Define New Bullet dialog has a preview using the new character for the bullet.- Click on OK again to close the Define New Bullet dialog.
The new bullet is applied to all of the items for Package 1, but not for the other packages yet. You have not yet changed the underlying style.
 Save.
Save.
[trip_planner9-Lastname-Firstname.docx]
Update Style to Match Selection
Your bullet lists all have List Paragraph style. Changes made to the style will be applied automatically to all of the paragraphs that are using the style. This is a great time-saver, if you apply styles to start with.
If you also applied formatting manually, however, that formatting does not change when you apply or update a style. This can be very confusing!
- With the new bullet list still selected, on the Home ribbon tab in the gallery of styles, right
click on style List Paragraph and then click on Update List Paragraph to
Match Selection.
Your other package lists update to use the same bullet symbol.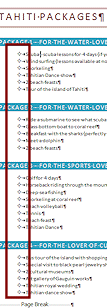
 Problem:
Other lists did not update to new bullets
Problem:
Other lists did not update to new bullets
Exactly what you did and how you did it along the way can make a difference in whether you see a change in a style. Manually applied formatting won't change!
Easy solution: Select another package list and apply the newly updated List Paragraph style. Repeat until all four Package lists show the new bullet shape. From now on, changes to the style will automatically show up in all of these lists.  Inspect at the style
List Paragraph in the Styles gallery.
Inspect at the style
List Paragraph in the Styles gallery.
It shows your new bullet shape now.- Save.
[trip_planner9-Lastname-Firstname.docx]
Styles Pane
-
 Inspect the style List Paragraph in the Styles pane.
You will have to scroll up to find it.
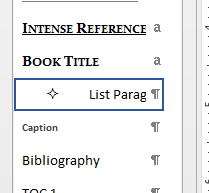
The default sorting of styles puts the Recommended styles first and shows those in their own 'recommended' order instead of alphabetical order. The List Paragraph style is at the end of the Recommended styles.Notice that further down the list is a style named List Bullet 2 which uses the square shape you put in earlier to use as a check box on the last page.
-
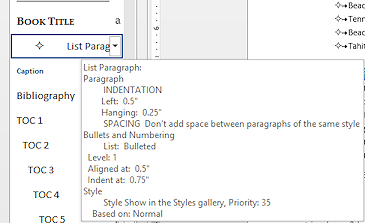 Hover over List Paragraph in the Styles pane.
A ScreenTip appears detailing the formatting for this style.But there is nothing about which bullet shape this style will use. Unexpected! It's a good thing that the bullet shape shows in the thumbnail.
Modify Style
The Modify Style dialog lets you make many changes in one spot and includes some features that are not available anywhere else.
What you can choose for a style:
- Style Type:
 Paragraph,
  Character, or
  Linked.
 - Style based on: You must base a style on another style, even if it is just Normal. You new style will inherit the current settings and any changes you make later to that underlying style.
- Style for following paragraph: This is the style of the paragraph that is created when you press ENTER.
- Formatting: Quick access to common formatting choices. More formatting choices are available at the Format button at the bottom of the dialog.
- Add to Quick Style list: Makes the style show on the Home tab and in the Styles pane when just Recommended styles are showing.
- Automatically update: Useful and dangerous! This choice automatically puts into the style definition all of the formatting changes you make to a paragraph that uses the style. This affects every paragraph that uses the style!
- Only in this document or New documents based on this template: Do you want to make the change to the style permanent for all future documents that use the current template?
-
 Put
your cursor in one of the bullet list items with the star bullet.
Put
your cursor in one of the bullet list items with the star bullet.
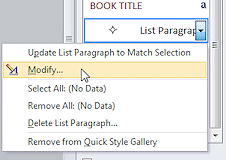
- In the Styles pane, hover over List Paragraph.
- Click the arrow that appears
at the right of the style name.
A list of actions appears.
-
 Click on Modify...
The Modify Style dialog appears. Lots of choices here! -
Inspect the dialog to see what you can change from here. The style type, style based on, and style for following paragraph can only be managed in this dialog.
Note the check box Add to Quick Style list or Add to the Styles gallery. A style MUST have this checked or it won't show in the ribbon, no matter how many times you use it!
-
Change the following:
Font = Century Gothic
Font size = 12
Decrease indent
The preview in the dialog of the paragraph shows the changes. Live Preview shows the same changes in the document... in ALL of the lists. Sweet!
-
 Click on OK to close the
dialog.
Click on OK to close the
dialog.
The modified paragraph style is applied to all paragraphs using this style.Problem:
Other lists did not update.
You did not apply List Paragraph style to the lists.
Solution: Select the list items and click List Paragraph style.
- Scroll through the whole document and look for
paragraphs that have been updated to the new List Paragraph style.
What changed?
- New page: The Page Break was pushed over to another page. A list item may have moved over also.
- Other paragraphs: On page 2 in the middle of the table, a short bullet list has changed. The list on the last page did not change. It uses a different style.
- New page: The Page Break was pushed over to another page. A list item may have moved over also.
- Save.
[trip_planner9-Lastname-Firstname.docx]
Modify Bullet: Context Menu > Define New Bullet
If you want to edit the formatting of a bullet, you must go back to the Define New Bullet dialog and make changes. The style will be updated to match automatically. Hope that's what you want!!
- Right click on one of the package list paragraphs.
-
Open the Define New Bullet dialog:

 Word 200 , 2010: On the context menu, hover over Bullets and then click Define New Bullet...
 Word 2013, 2016: On the Mini-Toolbar, hover over the Bullets button and click the arrow. Then click on Define New Bulet...
The dialog opens.
-
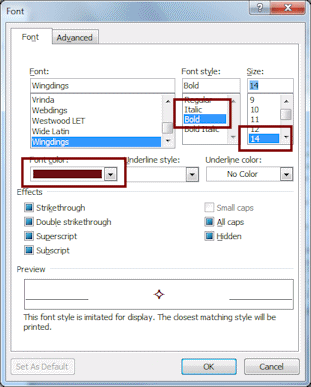 Click on Font...
- Change the following:
Font style = Bold
Font Size = 14
Font Color = Red, Accent 2, Darker 50%
- Click on OK to close the Font
dialog.
- Click on OK to close the
Define New Bullet dialog.
A message box appears to warn you that making these changes will change all of the lists.
-
 Click on Yes.
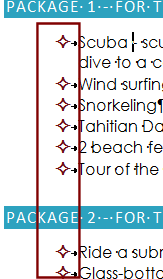
The new bullet size and color appear in all the package lists.
This is much easier than having to change each list separately!What changed?
- Indention: Previously, the bullet was over at the left margin, because you decreased the indention when modifying the style. Now the list is indented again. Another unexpected change!
- List item on next page: Changing the font and font size has pushed a list item onto the new page with the page break. You will fix this in the next lesson when you create columns.
So now we know... the order that you format things can make a difference.
 Look at the List Paragraph
style in the Styles pane and in the Styles gallery.
Look at the List Paragraph
style in the Styles pane and in the Styles gallery.
It now shows the new formatting. The gallery thumbnail is too small to show much.- Save.
[trip_planner9-Lastname-Firstname.docx]
Trip Planner 9 - Done
|
|
| © 1997-2017 Jan Smith All Rights Reserved |
Site Map What's New |
Privacy Policy Terms of Service Copyright Acknowledgements |
~~ 1 Cor. 10:31 ...whatever you do, do it all for the glory of God. ~~
Last updated: March 22, 2017
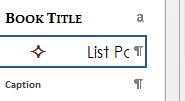
Advantages:
This usually illustrates the style better than the gallery thumbnail, but borders may not show for larger font sizes.
Disadvantages: