
Jan's Working with Words
AutoTools: Margins & Breaks: Text Wrap
After you pick a location for your image, you must decide how it will fit in your text. Text can flow or not flow around an image or another object in several different styles. You can add a text-wrapping break or edit the wrap points for more precise control.
Text Wrapping Styles
Unless an image is as wide as the page, you must decide how you want the text to flow around the image. In the examples below, the dog is an image with a transparent background. These examples are of the styles that are easiest to apply.
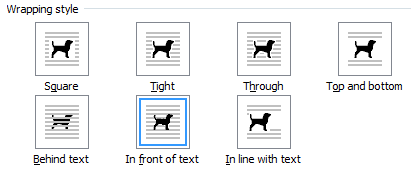
Default Text Wrapping Styles:
 AutoShape: In front of text is the default style.
The shape floats over the text.
 Picture, most clip art: In line with text is the default style.
The picture is just part of the paragraph.
| |
Step-by-Step: Text Wrapping |
|
| What you will learn: | to apply text wrapping from ribbon to apply text wrapping from dialog to apply text wrapping using Format Painter to edit wrap points to search for and insert clip art image to apply text wrapping from context menu to insert a text wrapping break to recolor an image |
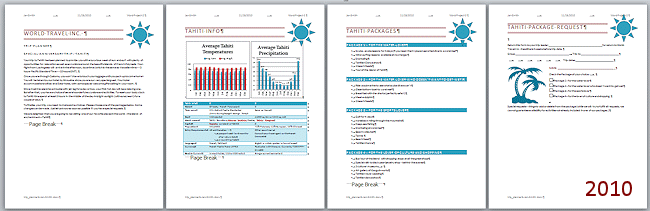
Start with:![]() , trip_planner7-Lastname-Firstname.docx
, trip_planner7-Lastname-Firstname.docx
Wrap Text: Ribbon
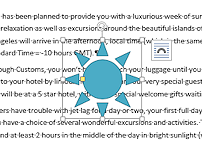
When you experimented with the Position button, you saw how square text-wrapping looked with the Sun image in different places on the page. There are other types of text wrapping besides Square.
-
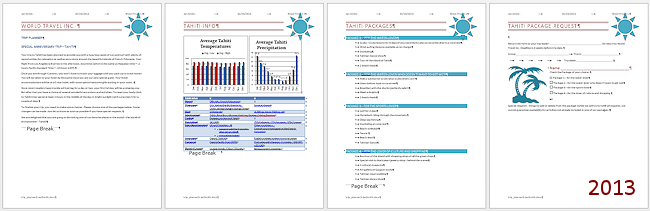
 Save as trip_planner8-Lastname-Firstname.docx
- On
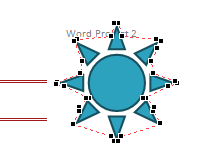
page 1, click on the Sun shape on the first page to
select it.
-
 Experiment: Text Wrapping
-
 Copy the Sun shape and paste.
The second copy appears slightly below and right of the original.
- Drag the copy into the middle of the text.
It floats over the text.
 In the Drawing Tools: Format tab
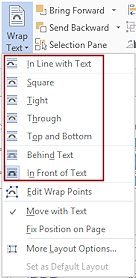
in the Arrange tab group, click on the button Text Wrapping/Wrap Text.
In the Drawing Tools: Format tab
in the Arrange tab group, click on the button Text Wrapping/Wrap Text.
A gallery of choices appears.
-
With the new Sun shape selected, test each choice from In Line with Text through In Front of Text:
 Word 2007: Click on the first choice and observe its effect.
Open the list and click on the next choice. Repeat to see all of the choices.
Live Preview does not work for this list.

 Word 2010, 2013, 2016: Hover over each of the
gallery choices. Live Preview shows what each one will do.
Word 2010, 2013, 2016: Hover over each of the
gallery choices. Live Preview shows what each one will do.
Observe what the text does in various choices. - When you are ready
to continue, delete the new Sun shape.
-
- Click on the original Sun shape at the upper right of
page one.
-
In the Drawing Tools: Format tab in the Arrange tab group, click on the button Text Wrapping/Wrap Text to open the list of choices.
The highlighted item is In Front of Text.
Word 2013 and 2016 have a check mark by Move with Text. This effect is true for earlier versions also but does not show on the list.
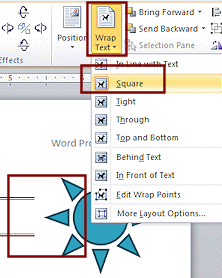 Click on the choice Square.
The border lines now stop at the edge of the image, even though the background is transparent. There is no text near the image to shift so you can't see that effect. Word 2013, 2016: The image shifted down so that it no longer overlaps the header.
Fix it: Undo. Open the list of text wrapping choices again and click the item Fix Position on Page. Choose Square from the Wrap Text list again. Now the border lines stop outside the image entirely.- Save.
[trip_planner8-Lastname-Firstname.docx]
Wrap Text: Format AutoShape/Layout Dialog
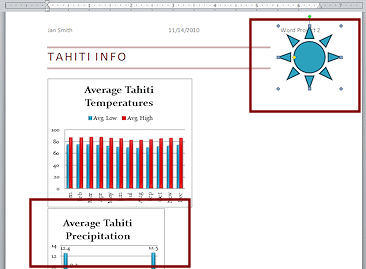
Let's set text wrapping for another image using a dialog. On page 2 there is no text near the image, but there are charts to bump into.
- Scroll to page 2.
- Right click on the Sun shape.
The context menu appears.
- Open the Layout dialog to the tab with text wrapping choices:
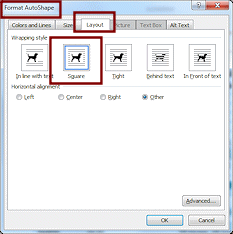 Word 2007: Select Format AutoShape from the context menu. The Format AutoShape dialog appears. Click the Layout tab, if
necessary.
Word 2007: Select Format AutoShape from the context menu. The Format AutoShape dialog appears. Click the Layout tab, if
necessary.
 Word 2010, 2013, 2016: Select More Layout
Options...
Word 2010, 2013, 2016: Select More Layout
Options...
The Layout dialog appears. Click the Text Wrapping tab, if necessary.
You do not get a Live Preview from the dialog, only from the ribbon.
-
 Click the box for Square and then on OK.
Square text wrapping is applied to the shape, making the border lines stop at the edge of the image.The precipitation chart pops down below the temperatures chart and forces some text onto a new page. Did you expect that? With Square alignment, the Sun shape cannot touch or overlap any text or any objects, like charts.
The Sun is still aligned to the middle of the page's title and overlaps the header.
You will fix this in the next section. It will take some fancy tinkering with the wrapping.
- Save.
[trip_planner8-Lastname-Firstname.docx]
Copy Text Wrapping: Format Painter
The Format Painter feature can record not only text formatting, but
also formatting for shapes and pictures.
- Click on
the Sun shape on page 2 again to select it.
- On the Home tab in the Clipboard tab group,
double-click the Format Painter button
 .
.
The pointer changes to the Format Painter shape and Format Painter records the formatting of the object. Since you
double-clicked the button, you can click on any number of objects to
apply the formatting.
and Format Painter records the formatting of the object. Since you
double-clicked the button, you can click on any number of objects to
apply the formatting.
- Scroll to the page titled 'Tahiti Packages',
and click the Sun shape.
Format Painter applies Square text wrapping to the Sun shape. - Repeat for the Sun shape on the page titled 'Tahiti Package Request'.
- Click on the Format Painter button again to turn it off.
The pointer changes back to its normal shape.
-
Word 2013, 2016: The position on the page is not preserved by Format Painter.
For each of the Sun shapes on pages 3 and 4, select the shape, open the Layout dialog again to the Position tab, and reset the positions values. The vertical position must be below Margin. - Save.
[trip_planner8-Lastname-Firstname.docx]
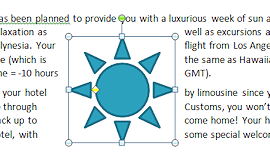
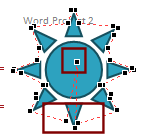
Edit Wrap Points
When none of the pre-designed text wrapping choices are quite right, you can edit the details about the wrapping. This is really cool! You will use this feature to fix the second page so that the chart does not move when the Sun shape is in place.
![]()
![]() Wrap points are small black square handles, similar to the resize
handles you have used before. They lie just outside the shape's border. A red line connects the handles and shows where the text must stop.
Wrap points are small black square handles, similar to the resize
handles you have used before. They lie just outside the shape's border. A red line connects the handles and shows where the text must stop.
Shape points, on the other hand, are on the shape's border and control the shape itself! Yes, there is a red line there, too, but it lies on top of the border. Moving a shape point changes the shape of the shape.
Moving, removing, or adding wrap points affects the shape of the flow of text for Tight and Through text wrapping styles. It affects only the distance from the shape for Square or Top and Bottom text wrapping.
- Experiment: Edit Wrap Points
-
 On
page 1, copy and paste the Sun shape, which has Square text
wrapping from earlier. The new shape appears a bit to the right
and below the original.
On
page 1, copy and paste the Sun shape, which has Square text
wrapping from earlier. The new shape appears a bit to the right
and below the original. - Drag the new shape over the text in the middle of the page.
The text flows around the rectangle that holds the shape. Text lines up neatly on the right side of the rectangle, but are uneven on the left. This is because Word flows text only by whole words. That's a good thing! - Show the Wrap Points: With the shape selected...
Word 2007: Drawing Tools: Format in the Arrange group, click Text Wrapping and
then Edit Wrap Points. Word 2010, 2013, 2016: Use the Word 2007 method OR right click on the new shape, hover over Wrap Text to expand the submenu, and
click on Edit Wrap Points. Do not use the Edit Points command on the context menu. That is for changing the shape itself.
 Small black squares appear on the
shape. In Word 2007, 2013, and 2016 the text wrapping changes to Tight but in Word 2010 it remains Square.
Small black squares appear on the
shape. In Word 2007, 2013, and 2016 the text wrapping changes to Tight but in Word 2010 it remains Square. - If necessary, change the text wrapping to Tight.
This puts the text as close as possible to the shape borders. - Drag one or more handles around and observe how the text wrapping changes.
- Delete a wrap point.
[CTRL + click on handle to delete.]
Observe how the text wrapping changes. - Add a wrap point.
[CTRL + click on the red outline where you want the new handle.] - Drag the new handle around to see how the text wrapping changes.
- Drag the shape around to different areas and play with the handles. What interesting effects can you come up with? Be careful not to get a wrap point underneath the Layout Options button that floats nearby!
- Delete this Sun shape.
-
-
 On page 2, select the Sun shape
 - Verify that it is still in its proper position. If not, reset the position values.
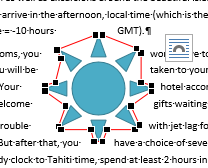
- On the tab Drawing Tools: Format in the Arrange group, click on Text Wrapping/Wrap Text and then on Edit
Wrap Points.

The red outline shows how close to the shape your text can sit when you choose Tight or Through wrapping styles.
The outline is dashed in Word 2007 and solid in Word 2010, 2013, and 2016.Each black square is a text wrapping handle. You can move these around without affecting the shape itself. Sweet!
-
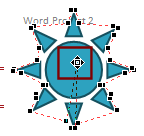 Move your mouse pointer over one of the handles.
The pointer changes shape to the Edit Wrap Points shape, a square with 4 tiny arrows.
- Change the Zoom to 150% so you can see the handles clearly. Some are very
close together.
- With the pointer in the Edit Wrap Points shape, click on the bottom left handle and drag up into the middle of the Sun
and release.
-
 Repeat with the second handle at the bottom of the shape.
 - Continue moving wrap points, if necessary, from the bottom to the middle until the chart pops
back into place.
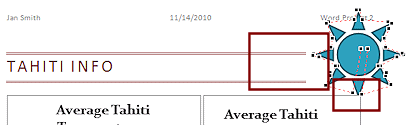
 Problem: The Sun shape is underneath the chart, hiding part of the bottom ray.
All objects on the page are in a stack. The Sun shape has wound up underneath the chart. Another unexpected change to fix!
Solution: Change the stacking order.
-
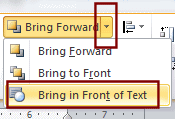
On the tab Drawing Tools:Format in the Arrange group, click on the arrow beside the button Bring to Front or Bring Forward.
A short list appears. Objects like charts, AutoShapes, and Pictures can overlap each other. You can manage the order of items in the stack of objects. -
Click on Bring in Front of Text.
The bottom tip of the Sun shape moves on top of the chart.
But the Sun shape is still not lined up with the Title. - Click in the shape but not on a handle to
select the shape instead of the wrap point handles.
-
 Drag the Sun shape down until the points in the middle line up in the
middle of the title's borders.
Drag the Sun shape down until the points in the middle line up in the
middle of the title's borders.
That rascal of a chart dropped down again! Ah well. You can fix this by moving more wrap points. Practice is good for you!
- Click on Text Wrapping/Wrap Text and then on Edit
Wrap Points.
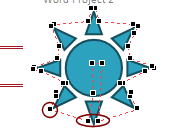
- Drag each of the wrap point handles that would overlap the
chart up into the middle of the shape. (Circled in the illustration).
The chart pops back up and the Sun shape is on top of it. Whew! What a lot of tweaking.
-
-
 Save.
Save.
[trip_planner8-Lastname-Firstname.docx]
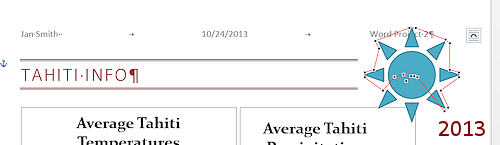
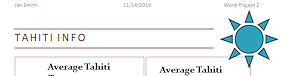
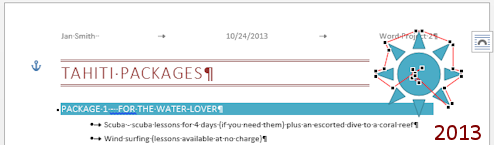
- Scroll to the next
page, Tahiti Packages.
The Sun shape on this page is keeping the background color of Package 1's heading from showing all the way to the right margin. It's looks odd with the other heading backgrounds on the page spreading across to the margin.
-
If necessary, move the shape back into alignment with the title and then edit wrap points for the Sun shape.
You want the turquoise/aqua background to reach the right margin. The shape may still be underneath the background color. 
If necessary, on the tab Drawing Tools:Format in the Arrange group, click on the arrow beside the button Bring to Front/Bring Forward and then on Bring in Front of Text.
Now the Sun shape is on top of the background color. At last!
Wrap Text: Context Menu
The context menu for a picture or clip art is somewhat different from the context menu for an AutoShape and it is a bit different between the versions. All versions have a menu item for text wrapping.
You will insert a new image and do more digging into text wrapping.
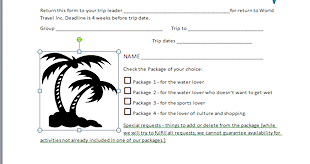
- Scroll to the last page and put the cursor to the left of the Name line.
-
On the Insert tab in the Illustrations tab group, click on Clip Art/Online Pictures.
The Clip Art search pane or dialog appears. -
Search for online clip art image:
Word 2007: Set the Search in box to search All collections.
Open the list Results should be: and check only Clip Art Word 2010: Check the box, if necessary, beside Include Office.com content.
Open the list Results should be: and check only Clip Art Word 2013, 2016: Use the Bing search box.
There is no way to restrict the results to just clip art. - Type the word palm in the search box and press the ENTER key.
-
Scroll the results and find the palm tree image shown in the illustration and click on it.
That will insert the image from the Clip Art pane. In the search results dialog you must click the Insert button.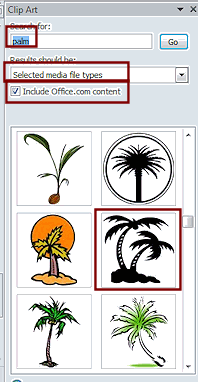
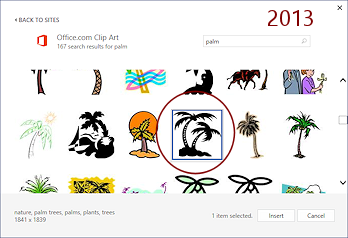 Problem:
Cannot find the exact illustration
Problem:
Cannot find the exact illustration
Solution: Use a similar image of a palm tree or a beach related item from the search results. The image should not be AutoShape but should be simple. It needs to have a white or transparent background. Later you will recolor this image, so one that is a single color to start with may work best.Problem: Cannot go online for this
search
There is an image of a palm tree in the resources files, courtesy of Visual Pharm . If you click the link, the picture will open in your browser. Copy and then paste it to your Word document.
 Close the Clip Art pane or search dialog by clicking its Close
button at the top right.
Close the Clip Art pane or search dialog by clicking its Close
button at the top right.
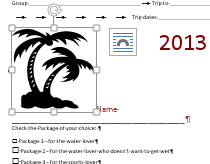
- Size the new image to be 2.1" wide.
Picture Tools: Format > Size > Height and Width text boxes
The line Name wraps oddly. It has too many underscores (which create the blank for the customer to write in) to fit to the right of the image.
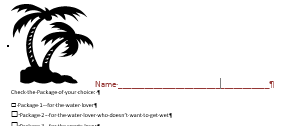 Delete enough underscores to allow the whole Name line to fit to the right of the image.
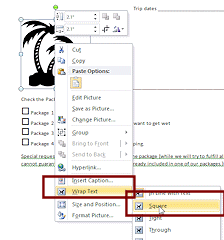
-
 Right
click on the inserted image.
Right
click on the inserted image.
A context menu appears. This one is somewhat different from the one for AutoShapes.
-
Experiment: Text wrapping from context menu
From the context menu hover over Text Wrapping or
Wrap Text to open the list of choices. Word 2007: [No Live Preview] Click on the first choice. Observe
what changes. Undo and pick a different choice. Repeat for each choice in the list. Word 2010, 2013, 2016: Hover over each
wrapping choice. Live Preview shows
what each one will do. A new helpful feature appears
as you hover. The original menu becomes transparent so you can see
what Live Preview is doing to your document.When you are ready to continue...
-
 Change the text wrapping to Square.
The text moves over to the right side of the palm trees. - If necessary, delete more of the underscores to keep them on the same line as NAME.
There should not be a blank line before the line "Check the Package of your choice:" - If necessary, fix the first choice in the list, Package 1, which got a Heading 3 style along the way in some versions of Word.
- On the Home ribbon tab, click the Dialog Launcher button for the Styles tab group to open the Styles pane.
- Put the cursor in the Package 1 line on page 4.
- In the Styles pane, scroll to see the bottom of list of styles and click on List.
The text now matches the other list items but the check box is not the same size. - Delete the check box for Package 1.
- Copy the check box for Package 2 and paste it to replace the deleted box.
All check boxes should now be the same size with one space between the check box and "Package 1..." .
- Save.
[trip_planner8-Lastname-Firstname.docx]
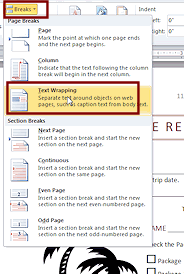
Add Text Wrapping Break
Even with all of the options for managing text wrapping, sometimes
you will want to make the text stop wrapping and just drop down below
the image. That takes a text wrapping break ![]() .
.
Notice on page 4 that the last paragraph starts at the right of the palm trees but eventually wraps below. Looks a bit odd, don't you think? Wouldn't it look better if the whole paragraph was below the palm trees, leaving just the check list beside the image?
-
 Put
your cursor at the beginning of the line that starts Special requests.
Put
your cursor at the beginning of the line that starts Special requests.
- On the Page Layout tab in the Page Setup tab group, click on Breaks and then on Text Wrapping.
The paragraph moves below the image entirely.
- Save.
[trip_planner8-Lastname-Firstname.docx]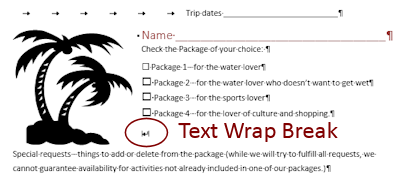
Change Image Color with Paint
The method below works for all versions of Word, but the Recolor tool in Word 2010, 2013, and 2016 is easier.
The Recolor tool in Word 2007 does not work well on the palm tree image. All that changes is the color of the white pieces in the trunks. Not much help! You can use Paint to change the color to match the turquoise used in this document.
![]() Word 2007:
Word 2007:
- Select and copy the palm tree image.
- Open Paint and resize the canvas to very small.
- Paste.
- Switch back to Word 2007 and copy the Sun image.
- Switch back to Paint and paste to the same canvas.
The Sun shape is on top of the palm tree. - Drag the Sun shape to the right and down until just a piece of it still shows and all of the palm tree shows.
- Click on the Color Picker tool (eye dropper shape) and then on the turquoise area in the Sun shape.
The color now shows on the palette as the current color. - Click the Fill tool and then click on the Palm image.
Your palm tree is now turquoise! - Click the Select tool and drag around the Sun shape and Delete.
- Copy.
- Switch back to Word, delete the palm tree image, and paste.
- Apply Square text wrapping again.
Yes, it matters what order you do things in. In the wrong order, you wind up having to repeat steps. - Save.
[trip_planner8-Lastname-Firstname.docx]
Word 2010, 2013, 2016: Recolor Image
The image does not match the colors in this document. You can fix that in Word 2010, 2013, and 2016!
-
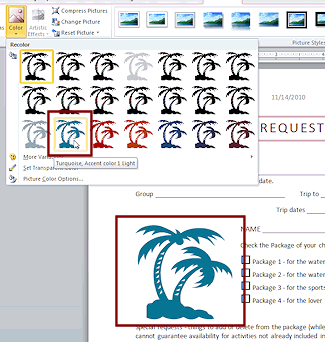 With the image selected, on the Picture Tools: Format tab in the Adjust tab group, click on the Color button.
A gallery appears showing the actual image in different theme colors. This is a different sort of Live Preview, but Live Preview actually is working at the same time!
- Click in the third row on the color:
Word 2010: Turquoise Accent Color 1, Light. Word 2013, 2016: Aqua, Accent Color 5, Light 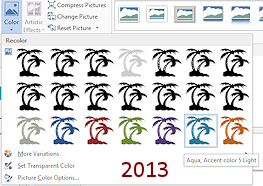
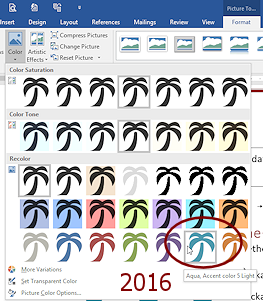
- Save.
[trip_planner8-Lastname-Firstname.docx]
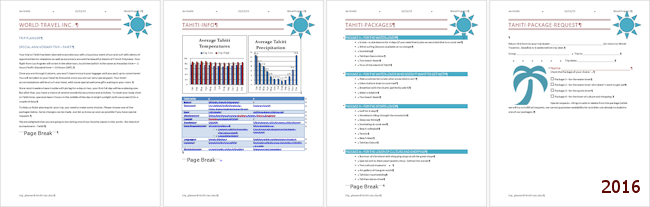
Trip Planner 8 finished
|
|
| © 1997-2017 Jan Smith All Rights Reserved |
Site Map What's New |
Privacy Policy Terms of Service Copyright Acknowledgements |
~~ 1 Cor. 10:31 ...whatever you do, do it all for the glory of God. ~~
Last updated: March 22, 2017
How do I...