
Jan's Working with Words
AutoTools: Margins & Breaks: Copy Image
Those new titles look a little bare. Let's put the same clip art on the other pages that you put on the first page. You can start with a simple copy and paste. Then you can adjust the position. In the next lesson you will apply some text wrapping choices and a text wrapping break.
Control Image Position
Word allows you to control the position of an image very exactly... eventually. You do not have much control when you first paste. AutoShapes paste as floating over text but other images paste as inline with text.
How to adjust floating image position:
- Drag image, like you did in a previous lesson
- Advanced Layout dialog - set specific distances
Drawing Tools: Format or Picture Tools: Format > Position > More Layout Options... - Arrow keys to nudge position
How to adjust inline image position:
- Drag to new inline location
- Cut and paste to new inline location
You can change whether an image is inline or floating at any time by changing the text wrapping, as you will see in the next lesson.
|
|
Step-by-Step: Copy & Position Image |
|
| What you will learn: | to apply a Shape style to copy and paste image to new location to adjust image position by dragging to adjust image position with dialog to adjust image position with arrows |
Start with:![]() ,
trip_planner6-Lastname-Firstname.docx
,
trip_planner6-Lastname-Firstname.docx
Shape Style
The Drawing Tools: Format ribbon has several tools you can use to adjust the look of a shape. In particular, there are a number of pre-designed shape styles. In addition you can separately edit the shape's fill, outline, and effects. There's lots of room for artistic flair here!
-
 Save as trip_planner7-Lastname-Firstname.docx to the word project2 folder on your Class drive.
 - Click on one of the Sun shapes to select it.
The Drawing Tools: Format ribbon tab appears. - Click on the new tab and inspect it.
What features of a shape can you change?  Experiment: Shape Style
-
 In the Shape Styles tab group click the More button to open the full gallery and hover over each of the pre-designed shape styles in the gallery. Live Preview changes the selected shape temporarily.
 Problem: Cannot see the Sun shape with gallery open
Solution: Instead of opening the whole gallery, use the small arrows above the More button to rotate each row into view on the ribbon itself.
- Try the buttons for Shape Fill, the Shape Outline, the Shape Effects.
What features are hiding there? - Undo your changes
-
-

 Word 2013, 2016: Apply to the Sun shape the pre-designed style Aqua, Accent 5 on the first row of the gallery.
This will match the color used for the Heading 1 background. You will work on the chart and table colors later.
Copy and Paste Image
You are going to copy and paste the Sun shape onto the other pages along side the titles. You will have to adjust the position of each new image. Why? The Space Before the title on the first page is larger than the Space Before the new titles, even though all are using the same style. Apparently, coming right after a page break keeps the Space Before from showing. Who knew??
- Click on the Sun shape on the
first page to select it.
- Copy.
- Scroll to the top of page two and click
at the left end of the title.
-
Paste.

 Word 2007, 2010: The image appears on the page in about the same position as on page
1, but not quite. It does not line up neatly with the title borders like it
did on
the first page. There are two reasons. First, the Space Before is not showing for this
title. Second, the pasted image is a bit down and right of the
original position on the page.
Word 2007, 2010: The image appears on the page in about the same position as on page
1, but not quite. It does not line up neatly with the title borders like it
did on
the first page. There are two reasons. First, the Space Before is not showing for this
title. Second, the pasted image is a bit down and right of the
original position on the page.
 Word 2013, 2016: The image appears at the top left corner of the text area. The position on the first page was at the far right and overlapping the margin a bit.
-
Scroll to page 3, click at the left of the title, and paste.
Problem: Nothing pasted
You did something else and the Clipboard lost what you copied.
Solution: Repeat the copy and then paste immediately.
- Scroll to page 4, click at the
left of the title, and paste.
Word 2007, 2010: Each time
you pasted, the Sun shape was further right and down.
Interesting... but somewhat annoying! -
Save.
[trip_planner7-Lastname-Firstname.docx ]
Adjust Image Position: Drag
If you hold the SHIFT key down, you can easily drag your image straight up, down, or sideways.
Recall that Word 2013 and 2016 show a green line when your image reaches the margin. There is a hesitation before the image will move across that line.
-
Scroll back to the top of page 2.
-
Click on the Sun shape to select
it.
-
Drag to position the image to put the middle sun rays centered between the border lines.
-
 Hold the SHIFT key down and drag sideways until the top ray is
about over the 'ec' in 'Word Project 2' in the header. Adjust the position if necessary to keep the
title's border lines from showing at the right of the Sun's center circle.
Hold the SHIFT key down and drag sideways until the top ray is
about over the 'ec' in 'Word Project 2' in the header. Adjust the position if necessary to keep the
title's border lines from showing at the right of the Sun's center circle.Using the SHIFT key keeps the vertical position fixed while you move the image sideways.
-
Save.
[trip_planner7-Lastname-Firstname.docx ]
Adjust Image Position: Page Layout Dialog
You will use a different technique on page 3 to position the image to match.
-
 Scroll
to page 3 and click on the Sun
shape at the top.
Scroll
to page 3 and click on the Sun
shape at the top. - Change the view to show the whole page.
 In
the Drawing Tools: Format tab in the
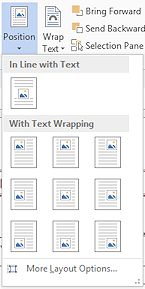
Arrange tab group, click
on the Position button to open the gallery.
In
the Drawing Tools: Format tab in the
Arrange tab group, click
on the Position button to open the gallery.
-
Experiment: Position (of image)
Hover over each choice in the gallery.
Live Preview shows the effect.
The image jumps all over the page! Notice that each of these choices use Square text wrapping.When you are ready to continue...
-
 Click
on More Layout Options... at the bottom
of the gallery.
Click
on More Layout Options... at the bottom
of the gallery.
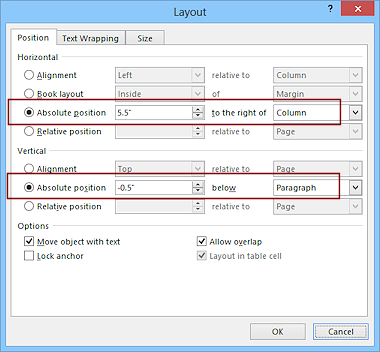
The Advanced Layout dialog appears with the Picture Position tab showing. What a lot of options!
- Change the Horizontal absolute
position to 5.5" to the right of
Column.
- Change the Vertical absolute
position to -0.5" below Paragraph.
(That's a negative half inch below, which is the same as a half inch above.) - Click on OK to close the dialog.
- If necessary, drag the Sun shape to keep those border lines in the Title from showing to the right of the center circle.
-
Save.
[trip_planner7-Lastname-Firstname.docx ]
Adjust Image Position: Arrow Key
If you have trouble dragging an image to just the right spot, especially when you only need a tiny move, the arrow keys can save the day.
- Scroll to the top of page 4 and
click on the Sun shape to select it.
-
Press the up arrow key until the middle sun ray is in the middle of the title's borders..
Press and hold the right or left arrow key to move the sun to the right margin with the top ray over the 'ec' in Project in the header and the border lines hidden under the center of the sun.The Sun shape appears to be in about the same location as on the other pages. It is hard to be sure.
-
 Open
the Layout Options dialog again from the Position menu and inspect the
values.
Open
the Layout Options dialog again from the Position menu and inspect the
values.
They should be close but are probably not exactly 5.5" and -0.5".
- Repeat this check for each Sun shape.
Which one has the best position to your eye? Make note of the position values! - Use the Layout Options dialog to change the position values for all of the Sun shapes to be exactly the same and close the dialog.
-
Save.
[trip_planner7-Lastname-Firstname.docx ]
|
|
| © 1997-2017 Jan Smith All Rights Reserved |
Site Map What's New |
Privacy Policy Terms of Service Copyright Acknowledgements |
~~ 1 Cor. 10:31 ...whatever you do, do it all for the glory of God. ~~
Last updated: March 22, 2017