
Jan's Working with Words
Printing: Header/Footer
Paper documents often have information at the top or bottom that appears on every page or on alternating pages - page numbers, chapter titles, the author's name, file name, or the book title.
 The header is the area at the top of a page that is reserved for such text. The footer is the area
at the bottom of a page for such information. In some word processors the
headers and footers are visible all the time, just like regular text. In
others they are hidden until printing. Word half-hides them. The header
and footer are visible, but in paler colors than what will actually print.
The header is the area at the top of a page that is reserved for such text. The footer is the area
at the bottom of a page for such information. In some word processors the
headers and footers are visible all the time, just like regular text. In
others they are hidden until printing. Word half-hides them. The header
and footer are visible, but in paler colors than what will actually print.
You will be using the header and footer areas to include identifying information - whose document this is and what class assignment it is for. This will help you find your print out in the stack in the classroom printer's out-tray. It also helps you sort your papers correctly when it is time to turn them in to your teacher.
In this lesson your header and footer will be simple, but you could make them quite colorful and fancy and even include images.
Fields
A field is a placeholder for data that might change. The date, the current page number, the total number of pages, and the file name are some of the fields frequently used in headers and footers. Fields are also used in mail merge documents, where a field is replaced with information from a database that makes the document personal, like each person's name and address.
The complete list of fields available in Word is shown in the Field dialog, on the ribbon on the Insert tab > Text group > Quick Parts button > Field. It's a long list! It includes such useful items as the current date, the date the file was created or when it was edited last and by whom, the file name, the original author, and the number of words.
Display in document |
 By
default a field
shows on the screen with a gray background when the pointer is over
the text. This background color will not print. By
default a field
shows on the screen with a gray background when the pointer is over
the text. This background color will not print.
You have 3 choices for this behavior. You can shade the background of a field Always, Never, or When Selected. The default is "When Selected". Set this behavior in the Options dialog: Office button/File tab > Word Options > Advanced > Show document content section > Field shading. |
Update field values |
To have a field use the most recent values you must update the field. Forgetting to do this can be a problem! Update a single field: Select it and press the F9 key or right click and from the context menu choose . Update all fields in a document:
Select the whole document (Use CTRL + A ). Then press the F9 key or right click any field and from the
context menu select . Update all fields at printing: You can set your documents to update fields automatically at printing in Word Options > Display > Printing Options > Update fields before printing . |
| |
Step-by-Step: Header & Footer |
|
| What you will learn: | to create and view headers and footers to insert the date with a field to switch between header and footer to insert the page number and total number of pages with fields |
Start with:![]() , flyer-World Travel Inc-Lastname-Firstname.docx from a previous lesson
, flyer-World Travel Inc-Lastname-Firstname.docx from a previous lesson
Add a Header
Standard headers have three sections: left, center, and right. Anything you put in those sections is already aligned - left, centered, or right.
-
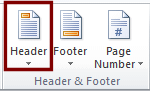 From the
ribbon, on the Insert tab in the Header and Footer group, click on
the button Header.
From the
ribbon, on the Insert tab in the Header and Footer group, click on
the button Header.
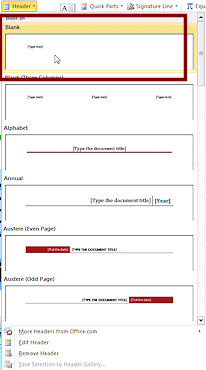
A drop list appears with some common layouts for the header.The Header and Footer group may be collapsed if your window is too narrow to show the group's buttons side-by-side.
-
 Point to
each choice.
Point to
each choice.
Sadly, there is no Live Preview. Can you tell what each choice would do?
- Click on the first choice - Blank header.
A header is created. The ribbon changes to show the Header and Footer Tools: Design tab.

 Word 2007, 2010: A funny-looking text box appears, ready for you to type.
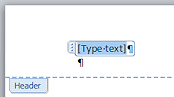
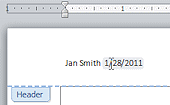
- Type your name and press the spacebar twice to insert 2 spaces.
Insert Date
Dates come in a variety of formats. Sometimes you want the date to update automatically to 'today' but other times the date should stay frozen. The Date and Time dialog helps with all of this.
-
 Click on the Date button
  on the
Header and Footer: Design tab.
on the
Header and Footer: Design tab.
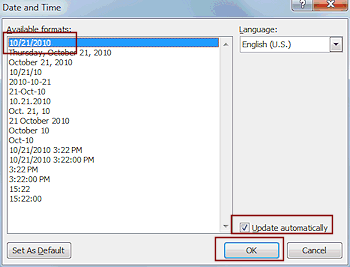
The Date and Time dialog opens.
- Inspect the various formats for a date, with and
without the time.
-
Click to check the box Update automatically.
This guarantees that whenever you open the document, the current date will be in the header to show when the document was viewed last.If you wanted the date be unchanged, you would leave the box unchecked.
- Click, if necessary, the first format, like 10/5/2010.
- Click on OK.
- Hover over the date and then over your name.
The date gets a gray background. This shows that it is a field.
Your name does not get a gray background. It is not a field, even if you typed it in a similar box in Word 2007 or 2010.

 Click on the date.
The date gains a fancy text box with an Update Field button.
Add a Footer
You are going to add some text to the footer and then the number of the current page and total number of pages in the document. You will be using two different fields in the footer.
- On the Header and Footer: Design tab, click on
the Go to Footer button
 to switch to the footer.
- Type the words Word Project 1 , then two spaces and type the word Page and then one space.
Insert Page Number and Total Number of Pages
The page number is certainly a common thing to find in a page footer. There are a number of acceptable placements and styles. You also need the total number of pages. Otherwise you can walk away from the printer with a large stack of pages and never realize that the printer has not actually printed quite all of the them! This could be anything from embarrassing to disasterous!
-
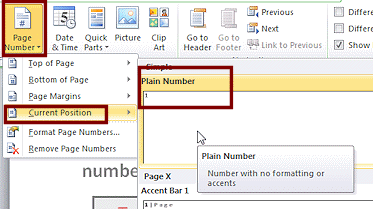 Click the Page Number button
  on the Header and Footer: Design tab.
A list drops.
- Inspect the various choices on this drop list.
- Click on Current Position and then on Plain Number to insert the page number.
- Type a space, the word of , then another space.
-
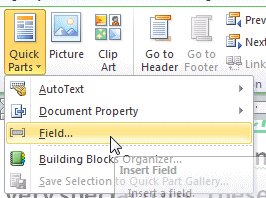 Click the button
Quick Parts
Click the button
Quick Parts  .
.
- Click on Field...
The Field dialog opens.
- Inspect this long list.
What cool stuff can you add to a document as a field?
-
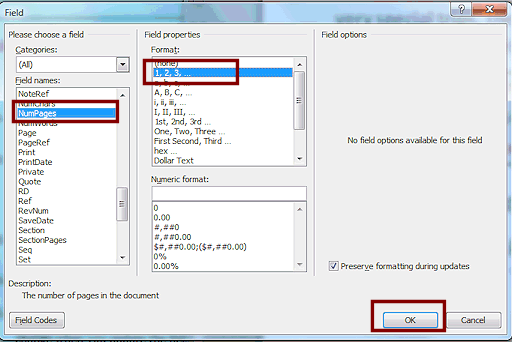 In
the Field dialog, scroll the list and click on NumPages and then on the Format 1,2,3...
In
the Field dialog, scroll the list and click on NumPages and then on the Format 1,2,3...
- Click on OK.
The total number of pages appears in the footer.
- Center the line in the footer with the key combo CTRL + E.
- Double-click in the document outside the footer and header
to close the Header and Footer view.
 Save.
Save.
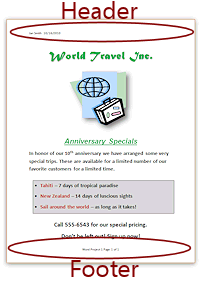
[flyer-World Travel Inc-Lastname-Firstname.docx ]


Flyer with
Header and Footer
(Your image may be different)
|
|
| © 1997-2017 Jan Smith All Rights Reserved |
Site Map What's New |
Privacy Policy Terms of Service Copyright Acknowledgements |
~~ 1 Cor. 10:31 ...whatever you do, do it all for the glory of God. ~~
Last updated: March 27, 2017