
Jan's Working with Words
Printing: Spell Check
One of the most useful tools in Word is the spelling and grammar checker, called spell check for short.
Spell Check
For spelling, Word compares the words in your text to what is in Word's own dictionary plus words you have added to a custom dictionary. Of course, Word won't know every word that you know or every variation of a word.
Be sure any words you add yourself are spelled correctly! Be especially careful with names of people and companies, which are often spelled oddly. (Below, you will find directions for how to get a mistake out of the custom dictionary.)
Grammar Check
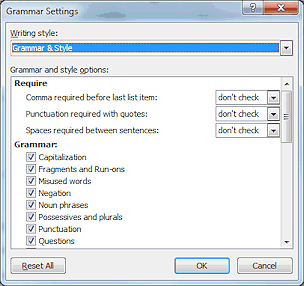 Word can also do a grammar check, looking for a variety of grammar errors. You
can choose how picky you want Word to be. In the Word Options dialog on the
Proofing page, the button Settings opens a dialog for Grammar Settings. You choose the level of formality you want
and whether or not you want Word to check style also. You can create you own Custom combination of rules, if you like. Of course, you
can still choose to break the "rules" on purpose.
Word can also do a grammar check, looking for a variety of grammar errors. You
can choose how picky you want Word to be. In the Word Options dialog on the
Proofing page, the button Settings opens a dialog for Grammar Settings. You choose the level of formality you want
and whether or not you want Word to check style also. You can create you own Custom combination of rules, if you like. Of course, you
can still choose to break the "rules" on purpose.
Marking Errors
Word marks possible errors with a wavy underline. Sometimes you meant exactly what you typed!
Settings that control the underlines and where to adjust the settings:
-
 Spelling error in red: Word Options > Proofing > Check spelling as you type
 -
 Grammar error in green: Word Options > Proofing > Check grammar as you type
 -
Formatting inconsistencies in blue:
Word Options > Advanced > Editing Options > Keep track of formatting and Mark formatting inconsistencies. This setting is off by default. Small differences in formatting are ignored by this feature.
What Was That Error?
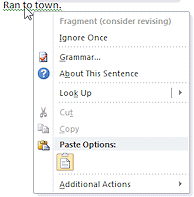
Context menu: To find out what kind of error Word thinks it has found, right click on the word or phrase that has a wavy underline. A context menu will appear with suggested corrections.
For spelling, you will see a list of suggested replacement words.
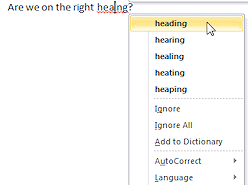
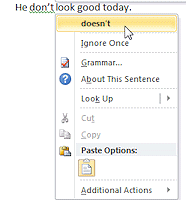
For grammar errors, at the top of the menu you will see either a correction, like "doesn't" for "don't" or the type of error, like "Fragment" or "Passive Voice"
For formatting, the menu will tell you what changes would make the formatting consistent.
Word has rules![]() for what it will mark. [The link is to an article about Word 2002, 2003, and 2007 but the newer versions seems to use the same rules.] Word ignores formatting that is very different! That makes the blue squiggles less common than the red and green...
usually. Sometimes Word throws those blue squiggles under the whole document!
for what it will mark. [The link is to an article about Word 2002, 2003, and 2007 but the newer versions seems to use the same rules.] Word ignores formatting that is very different! That makes the blue squiggles less common than the red and green...
usually. Sometimes Word throws those blue squiggles under the whole document!
![]() Don't just accept every correction. Word often marks things that were actually
OK as they were. Word does not know if you meant what you typed!
Don't just accept every correction. Word often marks things that were actually
OK as they were. Word does not know if you meant what you typed!
Other Choices on Context Menu
From the context menu you can add a word to your custom dictionary by choosing Add to Dictionary. All Office programs use the same dictionary and the same custom dictionary. Each user with a logon for the computer has a separate custom dictionary. So the words you add won't be available to others if they log on the computer separately.
If you like the text the way it is, you can tell Word to ignore the problem for this session by clicking on Ignore Once. Choose Ignore All (for spelling) or Ignore Rule (for grammar) to have Word continue ignoring the 'error' if it occurs again in the same document.
You can add a spelling correction to AutoCorrect so that Word will automatically fix this error. AutoCorrect already recognizes certain common typing errors, like transposing letters as in teh for the. But AutoCorrect does not check spelling in general.
Summary: Ways to Find Spelling, Grammar, and Formatting Problems
Wavy underlines |
Scroll through the document and look
for the wavy underlines. You can make corrections directly in the document
or right click on a underline to get the context menu which has suggestions. |
Dialog |
Open the Spelling and Grammar dialog with the Spelling and Grammar button on the Review tab, or (Word 2007 or 2010) by right clicking on a word with the wavy underline and then from the context menu, choose or . You will be shown each possible spelling or grammar error in the document in turn. Choose to change it or ignore it in this spot or to ignore it everywhere in the document. Formatting inconsistencies are not shown by this dialog. |
Status bar icon |
Double-click the icon Formatting inconsistencies are ignored by the Status bar icon. |
| |
Step-by-Step: Spelling & Grammar Check |
|
| What you will learn: | to use check spelling, grammar and formatting consistency with - right click menu dialog Status bar |
Start with:![]() , flyer-World Travel Inc-Lastname-Firstname.docx with header and footer info
included.
, flyer-World Travel Inc-Lastname-Firstname.docx with header and footer info
included.
Create Errors
Since all your typing so far has been perfect(!), for practice, you'll have to deliberately create some errors! If you have other errors in your document, fix them, too, as you go along.
- In line 1, select the word World by double clicking it. Retype so that it is Wordl .
- In line 3, delete an n from the word Anniversary in 'Anniversary Specials'..
- In
line 7, delete the final e in the word paradise.
-
In line 8, select the paragraph for the New Zealand trip and on the Home ribbon tab click once on
 the Increase Font Size button .
The whole line and its bullet and paragraph mark increase to 20 pts., which pushes the last two lines over to another page again! We will fix all shortly.There may be squiggles everywhere!!
-
Red:
"Wordl"
"Aniversary"
"paradis" -
Green:
header = Smith
"anniversary" in paragraph
"Don't"
footer = Project Page -
Blue: all of line 8
Which 'errors' are marked in your document depends on the Settings for Grammar checking in Word Options. The defaults seem to be a bit different in different versions of Word.
-
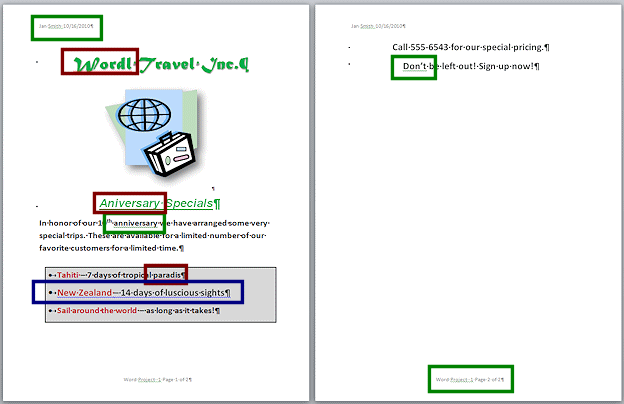
It's hard to see the red wavy line under "Aniversary". The green underline is in the way!
![]() Multiple
errors in one spot:
Multiple
errors in one spot:
Only one kind of error can be marked at a time!
Remember to look again after you make a correction to see if a hidden
error has shown up.
![]() Problem: No blue wavy lines
Problem: No blue wavy lines
Formatting errors are not shown by default in recent versions of Office. The choice to show them is in the Options dialog.
![]() File > Options > Advanced > Editing options group > check box 'Keep track of formatting' and check box 'Mark formatting inconsistencies'
File > Options > Advanced > Editing options group > check box 'Keep track of formatting' and check box 'Mark formatting inconsistencies'
Spelling: Right Click Menu
-
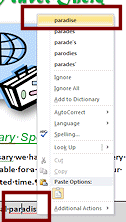 Right click on the misspelled word paradis .
- Inspect the suggestions in the menu.
You have a lot of choices!
- Click on the correct spelling paradise from the list of
suggestions.
-
 Use the key combo CTRL + HOME to move the cursor to the top left of the
document.
Use the key combo CTRL + HOME to move the cursor to the top left of the
document.
Spelling: Dialog
If you want Word to walk you through all of the spelling and grammar 'errors', you need to open the Spelling and Grammar dialog from the Review tab.
-
On the Review tab, click on
 the Spelling button .
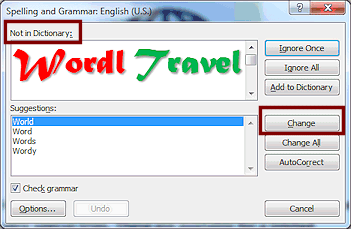
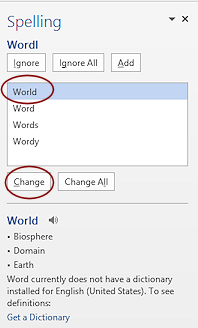
The Spelling and Grammar dialog box or the Spelling pane opens, with suggestions for the first marked word in the body of the document, Wordl.
At the top of the dialog is the explanation of why Word flagged this word: Not in Dictionary. Good reason!! The Spelling pane does not provide a reason. For spelling errors, it's pretty obvious! The word to be
corrected is in bold red in the dialog. That can be hard to see if the text was already in
red!
The word to be
corrected is in bold red in the dialog. That can be hard to see if the text was already in
red!You have choices:
- Ignore Once/Ignore - You want to spell the word this way, but just in this one spot.
- Ignore All - You don't want to add the word to the dictionary, but you want it spelled this way throughout this document,
- Add to Dictionary/Add - Adds the word
to your custom dictionary. All Office programs will see your addition.
 Be careful
about adding a word!! You must be completely sure that the word is spelled correctly first! Please don't
add this one!
Be careful
about adding a word!! You must be completely sure that the word is spelled correctly first! Please don't
add this one! - Change - Accept the selected suggestion from the list. Be sure the correct suggestion is highlighted.
- Change All - Go ahead and change the spelling wherever it occurs in the document.
- AutoCorrect - Add this change to
the list of things Word will correct for you without asking. This is good
for typing errors that you make regularly!
(Not available in the Spelling pane -Word 2013 and 2016.)
- Correct the word by selecting the suggestion World and then clicking on the Change button.
The dialog displays the next error.
- Select the suggestion Anniversary and click the Change button.
- Continue through all of the errors. You may not see the errors below:
- Choose to Ignore the suggestion, if you get this one, to rewrite the sentence "Call 555
-6543 for our special pricing." It is not a fragment. It's a
command!
- Choose to Ignore Once for the suggestion to replace "Don't" with "Do not".
That is a style issue, not grammar, anyway.
- Choose
to Ignore the spacing 'error' in the header.
The display of the document changes when Spell Check hits this one!
- Choose to Ignore the spacing 'error' in the footer.
When Word bring up an error in the header or footer, it changes to Draft
view with a split window. A surprise!
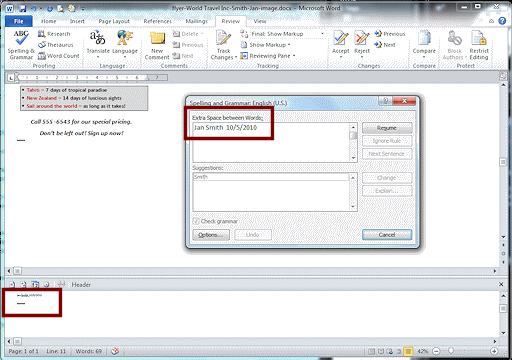
The header or footer is in the bottom split and the rest of the document is in the top split. If you cancel the spell check before Word has finished with it, you will be left in this split screen view.
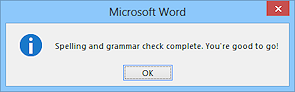
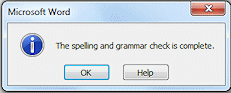 Once
there are no more errors to look at, Word is proud to put a message box that
says "Spelling and grammar check is complete." Word 2013 adds a cheeky "You're good to go!"
Once
there are no more errors to look at, Word is proud to put a message box that
says "Spelling and grammar check is complete." Word 2013 adds a cheeky "You're good to go!"
- Choose to Ignore the suggestion, if you get this one, to rewrite the sentence "Call 555
-6543 for our special pricing." It is not a fragment. It's a
command!
- Click on OK in the message box to return to your document.
- If you are in Draft view with a split window, click on the
Page Layout button
 at the bottom
right of the window.
at the bottom
right of the window. - If necessary, double-click in the document area to get out of the
header/footer.
Spelling: Status Bar
- Select a word in the document (any word!) and retype it incorrectly
(so that it is not a word at all).
- Click somewhere else in the document to deselect the
word.
Word immediately runs spell check. A red squiggle should appear under your word.
Watch the Status bar icon carefully. You may be able to catch the animation while Word is running an automatic spell check.
- Retype another word so that it is
spelled incorrectly.
- Inspect the icon in the status bar.


 When Word likes your spelling and grammar,
the icon has a check mark.
When Word likes your spelling and grammar,
the icon has a check mark.


 When
there are questionable spots, the icon has an X.
When
there are questionable spots, the icon has an X.
- Click the spelling status icon .
The first error in the document is highlighted and the context menu is displayed with suggestions.
- Select the correct spelling from the list.
If the correct spelling is not in the list, correct it yourself.
The next error is highlighted.
- Correct all of the new errors.
Formatting Inconsistency: Right Click Menu
The formatting inconsistency that you created was not included in the Spelling and Grammar dialog or from the Status bar icon with the default Options settings. You must spot the blue wavy underline in the document yourself.
A small difference in the font size, line spacing, indention, size of a bullet or list number may not jump out at you while you are working. That's the kind of difference that Word looks for. Big differences are ignored by the Format Consistency Checker. Apparently Word figures that either you meant to do it that way or that you don't need help to spot the error.
What Word will correct for you may not be all that you expect! There are some tricky rules![]() involved.
involved.
-
 Right
click in line 8 anywhere.
Right
click in line 8 anywhere.
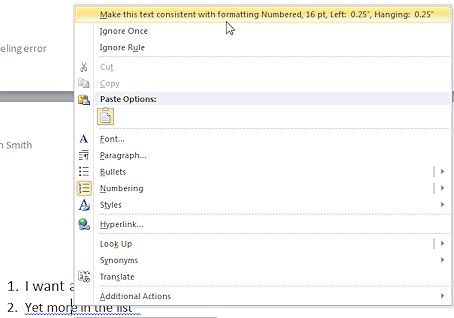
A really tall context menu appears with suggested formatting way up at the very top. This time the full list of formats is too long to fit across the menu. - Click on the suggestion to accept it.
Can you tell what changed?
Just the size of the bullet and the paragraph mark! The text remains at the larger size. No wavy underlines.
Very unexpected!!
- With line 8 selected, decrease the font size
to 18 pts. using the ribbon.
This resizes the text so that it matches the other items in the list.
Does the blue wavy line shows up again? It might! What's with this??
- If necessary, right click on the selection to see the
context menu again.
It offers the same suggestion as before.
-
Click on the suggestion and then click out of the line to deselect it.
Now the text looks like the other items. No more wavy underlines.What a lot of work! Sometimes it might be worth it.
Save
Be sure that all the errors you created in this lesson and any accidental errors have been corrected!
-
 Save.
Save.
[flyer-World Travel Inc-Lastname-Firstname.docx]
|
|
| © 1997-2017 Jan Smith All Rights Reserved |
Site Map What's New |
Privacy Policy Terms of Service Copyright Acknowledgements |
~~ 1 Cor. 10:31 ...whatever you do, do it all for the glory of God. ~~
Last updated: March 27, 2017
Word Options or Options > Proofing >
Custom dictionaries (button) >
Select the default dictionary list and click the button 'Edit Word List...'.