
Jan's Working with Words
Brochure: Cover
The Cover panel of a brochure is what you see first. It's important that you communicate immediately what your brochure is about.
 The cover for the Tahiti brochure will show two lines of
text and an image. The orientation and formatting make all the
difference.
The cover for the Tahiti brochure will show two lines of
text and an image. The orientation and formatting make all the
difference.
|
|
Step-by-Step: Brochure Cover |
|
| What you will learn: |
to change text direction in a text
box to align text inside text box to add a bottom border to a paragraph to add a picture on top of a text box to use a custom color for text |
Start with: ![]()
![]() ,
brochure-tahiti-Lastname-Firstname.docx
(from Doc Template lesson)
,
brochure-tahiti-Lastname-Firstname.docx
(from Doc Template lesson)
You will need to access the
resources files ![]() in the tahiti
folder.
in the tahiti
folder.
Online copies:
Online folder for brochure resource files ![]()
Change Text Direction
-
 Save
to your Class disk in the folder word project3 as
brochure-tahiti2-Lastname-Firstname.docx
Save
to your Class disk in the folder word project3 as
brochure-tahiti2-Lastname-Firstname.docx
-
Click
in Text Box 3, on the far right of page 1.
-
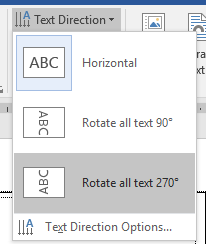
Set text direction:
 Word 2007: Button toggles through 3 choices
- From the ribbon on the Text Box Tools:
Format tab, click on the button Text
Direction
 .
.
The paragraph mark moves to the upper right of the box and the button icon changes to to match.
- Click the Text Direction button again.
The paragraph mark moves to the bottom left of the text box.
The button icon changes to match .
.


 Word 2010, 2013, 2016: Gallery of 3 choices
-
 From the ribbon
on the Drawing Tools: Format tab,
click the button Text Direction
From the ribbon
on the Drawing Tools: Format tab,
click the button Text Direction 
Click on Rotate all text 270°.
The paragraph mark moves to the bottom left of the text box.
The icon on the button Text Direction on the ribbon does not change directions to match.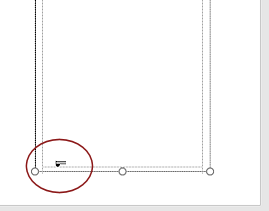
- From the ribbon on the Text Box Tools:
Format tab, click on the button Text
Direction
-
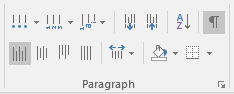 Switch
to the Home tab and look at the buttons
in the Paragraph tab group.
Switch
to the Home tab and look at the buttons
in the Paragraph tab group.
Their directions match the current text direction.
- Move your mouse pointer over Text Box 3.
The cursor shape changes to a sideways I-bar to match the new direction for text.
 - Save.
[brochure-tahiti2-Lastname-Firstname.docx]
Format Cover Text
You will add text formatting and align the text inside the text box.
- With the
cursor in Text Box 3, if necessary, set the paragraph style to
Normal.
-
 Type the
following two lines in Text Box 3:
Type the
following two lines in Text Box 3:
World Travel Inc.
Tahiti
Doesn't it feel weird to see your text crawling UP the page?
-
 Format World Travel Inc. like you did
for the letterhead in Project 2. It's the company's standard formatting for the
company name.
Format World Travel Inc. like you did
for the letterhead in Project 2. It's the company's standard formatting for the
company name.
font: Matura MT Script Capitals
 [When marks are showing, spaces may show as a box with this font, but the boxes won't print.]
size: 36
color: Green - on the Standard Colors row
effect: Shadow -
Word 2007: Font dialog: Shadow check box
Word 2010, 2013, 2016:
Text Effects button: Offset Diagonal Bottom Left - Format Tahiti with:
font: Times New Roman
size: 36
Bold
Italics
-
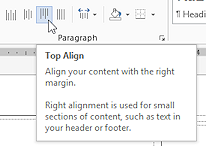
 While Tahiti is selected,
on the Home tab, click on the button with the lines even at the top of the button. Word 2007, 2010: Align Text Right
While Tahiti is selected,
on the Home tab, click on the button with the lines even at the top of the button. Word 2007, 2010: Align Text Right
Word 2013, 2016: Top Align.The word Tahiti moves to the top of the box, which is the right end of the text line.
You are confused about the directions?Early versions of Word and Word 2013 and 2016 change the names of these alignments. The text directions in Word 2007 and 2010 are with respect to the direction of the text on the line but the button icons show the alignment with respect to the text box.
-
With the cursor in the line World Travel Inc.:
Word 2007:
-
 On the
Text Box Tools: Format tab,
click the dialog
box launcher button for Text Box Styles. The dialog Format Text Box
opens.
On the
Text Box Tools: Format tab,
click the dialog
box launcher button for Text Box Styles. The dialog Format Text Box
opens. -
Click the tab Text Box.
-
In the section Vertical Alignment, click on Bottom.
The text shifts to the right edge of the text box.
Word 2010, 2013, 2016: -
 On
the Drawing Tools: Format tab in
the Text tab group, click the
button
Align Text
On
the Drawing Tools: Format tab in
the Text tab group, click the
button
Align Text
 to open the gallery.
 -
Select Right.
The text shifts to the right edge of the text box.
Did you expect that? The icons in the gallery show what will happen. So many different ways of looking at the 'direction'!
-
-
Save.
[brochure-tahiti2-Lastname-Firstname.docx]
Add Bottom Border
A border does not have to go all the way around an object. You can use the border feature to create a fancy underline or divider.
 If necessary, move the cursor to the line
World Travel Inc .
If necessary, move the cursor to the line
World Travel Inc .
- From the Home tab in the
Paragraph tab group, click on the arrow beside the
Borders and Shading button
 to open the gallery.
(Your button may look different. The icon on the button shows the previous choice.)
- Click on Borders and Shading
at the bottom of the list to open the dialog.
- In the Style list
choose the
double line which has a wide line at the top and a thin line below it
 .
.
 Set Width to
3 pt.
Set Width to
3 pt.
- Click in the preview at the right on the unwanted edges, leaving only the bottom edge showing the border.
- If necessary, set Apply to: Paragraph.
- Click on
OK.
- Save.
[brochure-tahiti2-Lastname-Firstname.docx]
Add Picture
You are going to insert an image as part of the brochure cover. This simple task is a bit tricky because of the text boxes. They lie above any text or images that are placed inline on the page. If you are not careful the image will be underneath a text box. Hide and Seek time!
If the cursor is in the text box when you insert your image, the image will be an inline image. Such an image is treated like a character on the line. You can't drag it around. You cannot change this with the Format Picture dialog. Thus a very simple action (well, it should be simple!) becomes quite confusing.
-
 Click in a blank area of the page that is
not in a text box.
Click in a blank area of the page that is
not in a text box.
Be sure you aren't still in a text box! Your cursor should be blinking at the upper left of the page, underneath Text Box 1. You may not see it at all. It certainly is not very noticeable!
- If necessary, set Zoom
to show the whole page so you can see what
is going on.
- On the Insert tab, click on
the button
Picture
 .
.
A dialog opens for you to navigate to the picture that you want.
-
Copy the link that follows and paste it into the File name box in the Insert dialog to download the file and insert it all in one step: http://www.jegsworks.com/Lessons/resources/words%20resources/tahiti/travelbar.wmf
 OR...
OR... Navigate to the local copy of your resource files and click on the image travelbar.wmf in the tahiti folder in your resource files.
If you used the default location for the resource files, the path to the local copy should be:
c:\My Documents\complit101\words\tahiti\travelbar.wmf
Your instructor may have put these files in a different location.
The icon for this picture is likely not a thumbnail but instead shows the icon for the graphics program that your computer would use to edit the picture. The illustration shows the icon for Paint, which comes with Windows.
 Click on the
button Insert in the dialog.
Click on the
button Insert in the dialog.
(If you pasted the link, there is will a short wait for the file to download.)
A rectangle with handles appears at the far left of the page. Where is the image?? It's underneath Text Box 1. It was pasted as an inline image onto the first line of the page itself.
 Problem: No rectangle with handles
The image is nowhere to be seen but the cursor is blinking in the middle of Text Box 1! What ever has happened?You clicked somewhere in the document after inserting the image. Your image is still hiding underneath Text Box 1. Now you need to select it again.
Solution:
Hold down the SHIFT key and press the Left Arrow key. Since the cursor is to the right of the image, the image is now selected. It is still underneath the text box so all you see is the rectangle with handles.
-
 On the
Picture Tools:Format or
Drawing Tools: Format
tab, click the Text Wrapping
or Wrap Text button and choose
In Front of
Text.
On the
Picture Tools:Format or
Drawing Tools: Format
tab, click the Text Wrapping
or Wrap Text button and choose
In Front of
Text.
Your image is now on top. Visible!
-
 Drag the image over to Text Box 3 and position it in the
top left corner of the text box.
Drag the image over to Text Box 3 and position it in the
top left corner of the text box.
- Enlarge the image by dragging the
bottom right handle until the image stretches from the top to the bottom of
the text box.
If your image is the same height as the text box or larger, the image hides part of the line around the text box. You will remove the line later, so don't worry about it now.
-
Save.
[brochure-tahiti2-Lastname-Firstname.docx]
Custom Color for Text
The green color in the picture is not the same as the green you used for the company name. In earlier versions of Word, the plain green was the very close to the same color as in the image. In versions these lessons use, the greens clash. You can change the text to a custom color that is better.
-
 Select the text "World Travel Inc."
-
On
the Home tab, click on the
Font Color button to open the gallery of colors.
The Green in the Standard Colors row has an outline to show it is the current color for your selection. None of the greens in the Theme Colors is a match to the green in the image.
- Click on More Colors...
- If necessary, click on the
Custom tab.
- If necessary, set the Color model to
RGB.
-
 Experiment: Custom Color
Click in the rainbow panel to pick a new custom color. The preview box at the bottom right of the dialog changes the top color. You can easily compare the old and new colors here. There is no Live Preview to show the effect in your document.Look at the changes in the values for Red, Green, and Blue as you change colors.
When you are ready to continue...
-
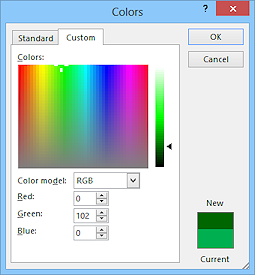 Enter the following values:
Red = 0
Green = 102
Blue = 0
The dialog shows both the current color and the new color. - Click on OK.
Now the text matches the dominant green in the image.
- Save.
[brochure-tahiti2-Lastname-Firstname.docx]
|
|
| © 1997-2017 Jan Smith All Rights Reserved |
Site Map What's New |
Privacy Policy Terms of Service Copyright Acknowledgements |
~~ 1 Cor. 10:31 ...whatever you do, do it all for the glory of God. ~~
Last updated: March 22, 2017
How to find the color values using Paint
How did I know what numbers to use to get the correct green? I used a graphics editing program to tell me what the color values were for the green in the image.
Open the picture in Paint.
Click on the eye dropper button and then on a green spot in the picture.
The first color square changes to match where you clicked.
Be careful where you click. Near the white areas you will find several different colors of green from the anti-aliasing used to create smooth lines.
Open the dialog Edit Colors.
Word 2007: menu Colors
Word 2010, 2013, 2016: button Edit Colors
The Edit Colors dialog opens.
If necessary, click on the button Define Custom Colors.
Read the values for Red, Green, and Blue from the dialog.
You can now use those values in other programs to set a color to exactly match this one.
Screenshots below are from Paint in Vista and in Windows 7.
Paint in Vista
Paint in Windows 7
(Similar in Windows 8, 8.1, and 10)