
Jan's Working with Words
Report: Tables: Draw
 When you need a complicated table or just a small
one, it may be easier to draw it instead of using the
Insert Table button. By drawing the size you want, you can avoid resizing and merging cells.
When you need a complicated table or just a small
one, it may be easier to draw it instead of using the
Insert Table button. By drawing the size you want, you can avoid resizing and merging cells.
The tools take just a little bit of practice. Once you know what they can do, you'll be looking for excuses to create tables!
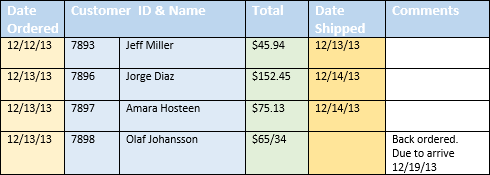
The example below is a fairly simple table. The default table would create equal width columns. This one is a good candidate to draw instead because you know that several columns will be narrow - Date Ordered, Customer ID, Total, and Date Shipped.
| |
Step-by-Step: Draw a Table |
|
| What you will learn: | to draw the outside of a table to draw lines in a table to TAB between table cells to distribute rows and columns evenly to erase and redraw cell borders to move text between cells to add a row inside a table to set cell height and width in ribbon to add a column inside a table |
Start with: ![]()
![]() , blank
document
, blank
document
Draw a Table
- If necessary, open a new blank document.
- If necessary, show both rulers in the Word window.
The View tab has a check box to Show Ruler.
If the vertical ruler still does not show, open the Word Options dialog to the Advanced panel. In the Display section, there is a check box to Show vertical ruler in Print Layout view.
-
 On
the Insert tab, click on Table button and then on the Draw Table command.
On
the Insert tab, click on Table button and then on the Draw Table command.
Your pointer changes to the pencil shape.
-
 Experiment: Draw a Table
- Drag the pencil shape around and let go.
- Try out different sizes and directions of drag in different locations on the page.
- Drag across the table to create rows and columns.
- Drag in different directions for different distances.
- Drag from inside the table to outside.
- Drag from outside the table to inside.
- How crazy a table can you create??
- Drag from the top left corner to the bottom right corner to create a diagonal.
Drag from the top right corner to the bottom left corner to draw the other diagonal. - Can you add a row or column to the table?
When you are ready to continue, either save your document and start a new blank document or just delete all of your constructions.
-
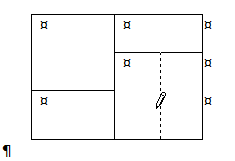
 Drag the pencil to draw a rectangle about 3" wide and 2" high at the top left of the text area on the page.
 The pointer shows a small dotted square as you drag to show that you are creating a rectangle.
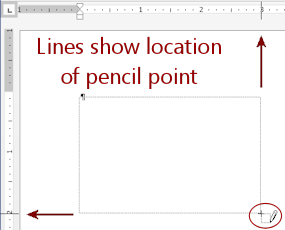
Look at the rulers as you drag. A line on the ruler shows where the pencil point is.
You will adjust the dimensions later.
-
 Drag with the pencil to draw vertical lines in the rectangle at 1" and 2" on
the ruler.
Drag with the pencil to draw vertical lines in the rectangle at 1" and 2" on
the ruler.
- Use the pencil to draw a horizontal line in the rectangle at 1" on the
vertical ruler.
- To turn off drawing:
-
Press the ESC key
OR
- Click on

 the Draw Table button
to toggle drawing off.
the Draw Table button
to toggle drawing off.
-
-
 Click in the top left cell and type a 1 .
- Press TAB to move to the next cell to the right. Type a 2 .
- Continue numbering each cell and using TAB to change cells.
Did you notice that the rulers changed to measure each column and each row? Problem: New
row appears
Problem: New
row appears
You used TAB one time too many.
Solution: Just use Undo to get rid of the extra row. -
 Save as table2-Lastname-Firstname.docx on your Class disk in the folder word project4.
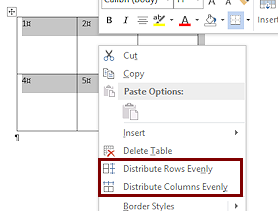
Distribute Evenly
Hand drawing a table usually creates rows and columns that are not quite the same size. Word makes it easy to even things out.
-
 If
necessary, select the entire table.
If
necessary, select the entire table.
- Right click on the table.
The context menu appears.
-
Watch the table carefully while you click on the command Distribute Rows Evenly.
All selected rows are now the same size while using the same total space as the original rows.Did you see any adjustments take place? If you drew your table well, you may not notice any changes. Congratulations!
- Right click on the table again to get the context menu.
- Watch the table carefully while you click on the command Distribute Columns Evenly.
All selected columns are now the same size, while using the same space as the original columns.
- Save.
[table2-Lastname-Firstname.docx]
Erase and Redraw
Erasing and drawing lines is actually rather fun. After you have text in your cells, however, things don't go back the way they were.
When you erase the line between two cells, the cells merge. When you add a new dividing line into a cell, the cell splits into two cells. There are also buttons on the Table Tools: Layout tab for handling merging and splitting. What happens to the text that was in the cells? It depends!
- If necessary, click inside the table so that the whole table is not selected but the Table Tools tabs are visible.
- Click on

 the Eraser toggle button.

 Word 2007, 2010: Table Tools: Design tab

 Word 2013, 2016: Table Tools: Layout tab
The pointer changes to the eraser shape.
 Click on the dividing line between cell 2 and cell 3. When it is highlighted, release the mouse button and the line is erased.
The two cells are now merged. The contents of the two cells now show as two paragraphs in a single cell.
Click on the dividing line between cell 2 and cell 3. When it is highlighted, release the mouse button and the line is erased.
The two cells are now merged. The contents of the two cells now show as two paragraphs in a single cell.You have to drag to erase lines across more than one cell.
-
 Click on the Draw Table button again, and draw a line to split the merged cell into two cells again.
Word easily connects your line to the existing line, but the cell contents remain in cell 2. - Save.
[table2-Lastname-Firstname.docx]So we have seen that merging cells together keeps all of the text from both cells. But splitting cells apart leaves all the text in the first cell.
Select and Move Text in Cell
You need to move the text back into cell C1. The text is so short that it would be easy to delete it and just retype, but you need some practice. Selecting just what you want and getting it to a new location can be a bit tricky in a table.
-
 If
necessary, press the ESC key to toggle the pointer back to its normal shape.
If
necessary, press the ESC key to toggle the pointer back to its normal shape.
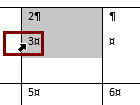
- Move the pointer to the left of the line with the number 3 in it.
The pointer changes to the select cell shape .
.
-
Click.
The highlighted part includes the padding at the left, all the blank space to the right of the actual text, and the end-of-cell symbol .
That's how you know that the whole cell is selected even though there is white space below the line
with the 3 on it.
.
That's how you know that the whole cell is selected even though there is white space below the line
with the 3 on it.This is not what you want! You just need the one line.
-
Click to the right of the 3 to put the cursor there, hold the SHIFT key down, and press the Left Arrow key once.
Now just the number 3 is selected.You could also have dragged to select. But, it is easy to select the whole cell while dragging.
-
 Drag the 3 over to the cell C1 on the right and drop.
While you are dragging, the pointer changes shape .
.
Once you drop, the 3 is back in place.Notice that cells B1 and C1 each now have a paragraph mark plus the end-of-cell symbol. Extra paragraph marks can change the height of your rows.
-
 Click to the left of the paragraph mark in cell B1.
- Press the Delete key.
- Repeat for cell C1.
The table now looks just like it did before you merged the cells. No paragraph marks.
- Save.
[table2-Lastname-Firstname.docx]
Insert Row
- Put the cursor in
the cell in the bottom right corner.
(It has a 6 in it.)
-
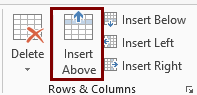 On
the Table Tools: Layout tab, click on the button Insert Above.
On
the Table Tools: Layout tab, click on the button Insert Above.
A new row appears above the current row that is the same height as the row where the cursor is.
- Label the cells in the new row with the letters A, B, C.
- Save.
[table2-Lastname-Firstname.docx]
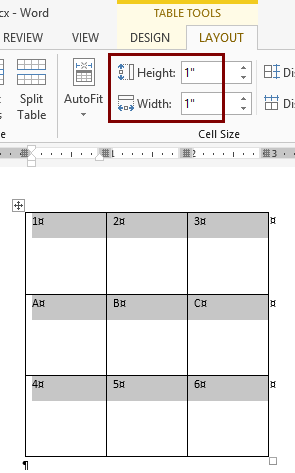
Size: Cell Height and Width
Your table cells are all the same height and width but they are probably not exactly an inch square. You can set exact measurement directly.
-
 Drag from the top left cell (A1) to the bottom right cell (C3) to select all
the cells.
Drag from the top left cell (A1) to the bottom right cell (C3) to select all
the cells.
-
From the Table Tools: Layout tab in the Cell Size tab group, look at the text boxes for row height and column width.
If the boxes are blank, it is because the cells have different heights and widths! Only one value can be displayed, so when a selection has various values, Word shows no value at all.
- Use the spin arrows or just type to enter 1" for both row height and column width.
Now all cells are exactly 1" x 1" square.
Warning: If you type in the values into a blank box, the box may stay blank... but the size will be applied. Weird!
- Save.
[table2-Lastname-Firstname.docx]
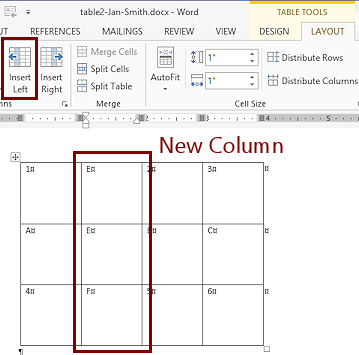
Insert Column
The Table Tools: Layout tab has buttons for inserting new columns, similar to the ones for rows.
- Put the cursor into cell B1, which has the number 2 in it.
-
 From
the Table Tools: Layout tab in the Rows & Columns tab group, click the button Insert Left.
From
the Table Tools: Layout tab in the Rows & Columns tab group, click the button Insert Left.
A new column appears at the left of the cell where the cursor is.
- Click in the top cell of the new column and type a D.
- Press the down arrow key to move to the next blank cell. Type in E.
- Repeat with F for the last blank
cell.
- Save.
[table2-Lastname-Firstname.docx]
|
|
| © 1997-2017 Jan Smith All Rights Reserved |
Site Map What's New |
Privacy Policy Terms of Service Copyright Acknowledgements |
~~ 1 Cor. 10:31 ...whatever you do, do it all for the glory of God. ~~
Last updated: March 22, 2017