|
When your HTML page contains
images, saving to a new location gets tricky. Sometimes the image files are
copied to the new location, too. Sometimes FPX changes the HTML code for the
source of the image file. It's confusing!
What makes the difference?
|
|
Where you are:
JegsWorks >
Lessons > Web
Before you start...
Project 1: Browser Basics
Project 2: HTML Basics
HTML Code
About HTML
What You Need
Code by Hand
WYSIWYG
FrontPage/ FPX
Images in HTML

FrontPage
OR  FPX FPX
 Insert
Image Insert
Image
More
Images
Inline
Images
Replace
Image
Image
Link
Align & Space
Align
Images
Image Issues
Save
to New Location
Save
Non-Web Image
Formatting
Tables
Print
Convert
Summary
Quiz
Exercises
Search
Glossary
Appendix |
|
Saving Page with Images
When you save your page to a different drive on your computer or to a
different computer (for example, a web server), FPX may change the path and
may copy the image... or not!
|
If the original path is a: |
then the
image will be: |
and the new path will be: |
Filename
src="carla2.jpg"
(The image is in the same folder as the HTML file.) |
Copied to same folder as
HTML file |
unchanged
Great! Just like the original! |
| Relative path
src="../../web/carla2.jpg" |
Copied to same folder as
HTML file |
changed to just the
Filename src="carla2.jpg"
If pages in other folders use this image, their links to it are
broken. If you saved those pages with FPX, then FPX made copies of the
image in the other folders. What a waste! |
| Full path to a web site
src="http://www.jegsworks.com/mail.gif"
|
Not copied |
unchanged
Good! |
| Full path to a file on hard disk or
floppy disk
src="file:///A:/my%20docs/web/carla2.jpg"
|
Not copied |
unchanged Not at all what
you want!
The link to the image is now broken since the file is on your
computer, not the viewer's! |
FPX and Site Design
Uploading with FPX: If you use FrontPage Express
to upload web pages, plan to have the images in the same folder as
the HTML files. That is where FPX will put them!
Some web designers recommend keeping your images in a
separate folder from your HTML files. This practice likely started in
the olden days when images had to be downloaded separately. It was
convenient then to have all images in one folder. It's not
particularly helpful these days.
Alternate upload method: If FPX does not put your
images where you want them, upload your pages with an FTP program or an
advanced WYSIWYG editor like Microsoft FrontPage. You can have complete
control of the locations that way.

|
Step-by-Step: Save to a New Location
|
|
| What you will learn: |
to save a web page to a different folder
to save a web page to a different drive or computer |
Start with:
 ,
hector12.htm,
resource files ,
hector12.htm,
resource files
You will save your web page to a different folder on
your Class disk and then to a folder on the hard drive. FPX will save your
images differently in these two cases.
Create Folders
-
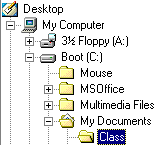 Open
Explorer to the folder C:\My Documents. Open
Explorer to the folder C:\My Documents.
- Create a new folder named Class .
(Your folder tree will probably look different from the illustration.)
-
Insert
your Class floppy disk into the drive.
-
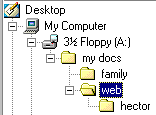 Open
Explorer to the web folder of your Class disk. Open
Explorer to the web folder of your Class disk.
- Create a new folder inside the web
folder and name it hector .
- Create a folder inside the my docs
folder named family .
Save to Same Disk - Different Folder
Folder at the same level
You will first save the page to the folder family,
which is a folder on the same disk as the original file. The new location
is on the same level of the folder tree as the web
folder. The images won't be moved, so the paths must change.
- Switch back to FrontPage Express, with
hector12.htm. opened.
- From the menu select |
|
-
Save
the HTML file as hector13.htm to the folder
family. FPX now shows
hector13.htm.
- View the HTML code and see what the paths are now for
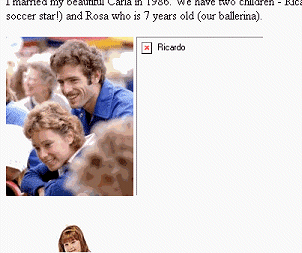
the images. For example, the code for the photos of Hector's family now
shows new paths:
<p
align="center"><img
src="../web/carla2.jpg"
alt="Hector and Carla" width="170"
height="212"> <img
src="../web/ricardo2.jpg"
alt="Ricardo" width="170"
height="212"> <img
src="../web/rosa2.jpg"
alt="Rosa" width="284"
height="213"></p>
The paths show that from the folder
family that holds the HTML file
hector13.htm, the browser must go up one level
and then down to the folder web to find the
image files.
- Close the HTML code window and close
hector13.htm.
Subfolder
You will now save the page to a subfolder of web
. The images won't be moved, so the paths will change again.
- In FPX, open the page hector12htm.
again. ( | )
- From the menu select |
-
Save
the HTML file as hector14.htm to the folder
hector, which is a new subfolder of
web.
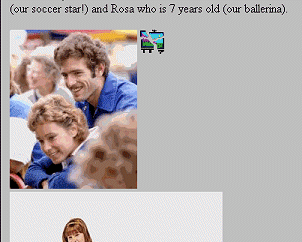
- View the HTML code to see the paths for the images. The
photos of Hector's family have different paths now.
<p
align="center"><img
src="../carla2.jpg"
alt="Hector and Carla" width="170"
height="212"> <img
src="../ricardo2.jpg"
alt="Ricardo" width="170"
height="212"> <img
src="../rosa2.jpg"
alt="Rosa" width="284"
height="213"></p>
The paths show that the images are one folder up the folder tree from
the HTML file.
- Close the code window and close
hector14.htm
Save to a Different Drive
Now you will save the page to the hard disk. This will
be a bit different since the new location is on a different drive. FPX
will offer to copy the images to the same folder. You will accept the
offer for all but one of the images, just to see what will happen.
-
Open
hector12.htm again.
- From the menu select |
|
-
Save
the HTML file as hector15.htm to the folder
Class, which is the new subfolder of
My Documents on drive C.
A sequence of dialogs will ask you if you want to save the images to
the same location.
-
 For
each image except for ricardo2.jpg, select
Yes. For ricardo2.jpg select No. For
each image except for ricardo2.jpg, select
Yes. For ricardo2.jpg select No.
(Normally you would select Yes to All to copy all of the
images.)
- View the HTML code to see the paths for the image.
The path for each image is just the filename. The images were copied
to the same folder as the HTML file.
<p
align="center"><img
src="carla2.jpg"
width="170" height="212">
<img src="ricardo2.jpg"
width="170" height="212">
<img src="rosa2.jpg"
width="284" height="213"></p>
Whoops! Even though you did not copy ricardo2.jpg to
the new folder, the code was changed as if it had been! But FPX still
shows the picture! It's in the cache.
- Open IE, if necessary, and type in the address
box the path
c:\My Documents\class\hector15.htm . Then
press the ENTER key.
 IE
shows the page with a broken image where ricardo2.jpg
should be. This is correct. The image file is not in the
location that the code says it is. IE
shows the page with a broken image where ricardo2.jpg
should be. This is correct. The image file is not in the
location that the code says it is.
- Switch back to FPX.
-
 Refresh
the display by clicking Refresh
the display by clicking
 the
Refresh button. You may see a broken image now, but sometimes FPX will
still display the cached copy. It can be stubborn! the
Refresh button. You may see a broken image now, but sometimes FPX will
still display the cached copy. It can be stubborn!
- If you still see the picture of Ricardo, close
hector15.htm by clicking its close button and
then reopen hector15.htm from the bottom of
the FPX File menu.
Now there is a broken image where ricardo2.jpg
should be. FPX apparently has a memory that is little bit too good.
- Close the page hector15.htm.
If you are sharing this computer with others, delete the folder
Class from My Documents on the hard drive.
|
 Save to a New Location