 |
Step-by-Step: File Properties |
|
What you will learn: |
to access a document's file
properties
to reduce a document's file
size
|
Start with:

 ,
report-WorldTravel8.doc
,
report-WorldTravel8.doc
Open File Properties
- Write down the
FileSize numbers in all of the
headers. Since the fields were inserted at different times, it
is possible that they are different from each other.
- From the menu select | . The Properties dialog opens. The tabs show some
useful information.
You can view this dialog also from an Open or Save As dialog by right clicking on a file and choosing Properties from the popup menu. This can help you pick the right file before
opening it or saving over it.
-
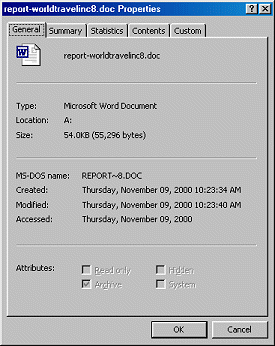 General tab:
Shows lots of information about the file. You already put the
file size in the report header.
General tab:
Shows lots of information about the file. You already put the
file size in the report header.
Write down the file size. It is probably different from the number in the
illustration.
This tab shows the basic file properties:
- file path
- file size
- MS-DOS name
- date created
- date modified
- date last accessed
- file attributes
-
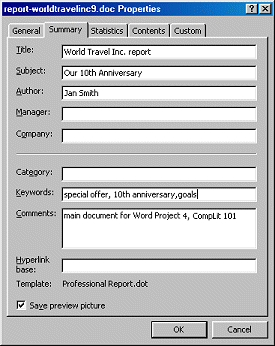 Summary tab: This information can help you pick
the right file without having to open it.
Summary tab: This information can help you pick
the right file without having to open it.
Enter
the info as shown at right.
Title: World Travel Inc. report
Subject: Our 10th
Anniversary
Author: Use
your own name
Keywords: : special
offer, 10th anniversary, goals
Comments: main document for Word Project
4, CompLit 101
-
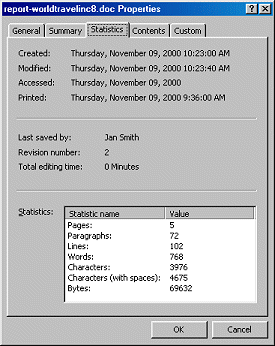 Statistics tab: Shows for the number of pages, words,
paragraphs, etc.
Statistics tab: Shows for the number of pages, words,
paragraphs, etc.
This is where you look to
see if you've gotten enough words yet for that school
paper that has to have 500 words.
-
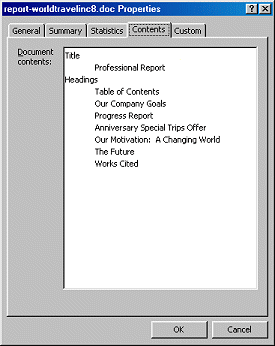 Contents
tab: Shows an outline created from your Heading
styles. Those heading styles are just SO useful.
Contents
tab: Shows an outline created from your Heading
styles. Those heading styles are just SO useful.
The
next time
you open File Properties the Title here will be the one you typed on
the Summary page.
-
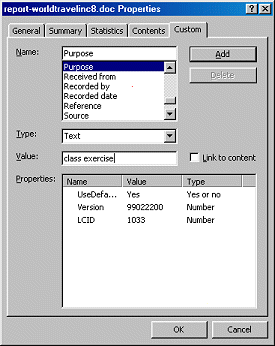 Customs tab: You
can set values for some standard properties or create your own
properties.
Customs tab: You
can set values for some standard properties or create your own
properties.
Select the property
Purpose in the upper
list.
In the Value box type
class exercise .
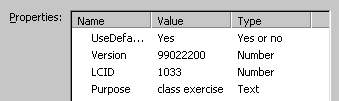 Click the Add button. Your new property is listed in
the bottom list.
Click the Add button. Your new property is listed in
the bottom list.
- Click on OK to close the File
Properties dialog.
Update All Fields
The three different headers contain a FileSize field. As you added
headers, you changed the file size, but the fields may not update
automatically! You can update each field separately or all fields
at once. All at once is an attractive thought, if you can remember the
keys!
- Compare the File Size shown on each page of your
report. Are they all the same? Possibly
not! You created them at different times.
- Compare the
FileSize field showing in the header of the Cover Page to the file size
you wrote down from the File Properties dialog. Are they exactly the
same? Possibly not! The difference may be small for this file.
The header number has not been updated yet. Even a
little bit of editing, such as changing the file properties, makes a
difference in the file size.
- Select the FileSize field in the
header of the first page.
- Press the F9 key. The field is updated.
- Repeat for the other headers.
- Scroll
through the document and check that all headers now show the same number. Is this the number you saw in
File Properties?

To update all the fields in a document
at once, select the whole document (CTRL + A) and then press the F9 key.
Save to Reduce Size
As you work with a document, the file size has a tendency to
grow. It can become several times larger than necessary! You can often reduce the size substantially by saving the document under a different name. You have been saving your report with a different name at the various stages of work to avoid this very thing.
When working with the print version of this web site,
my files
that started with a file size of about 2 MB grew to over 20 MB each! I had not added
that much material!!! Saving
under a different name from time to time kept the file size under
control.
- Save this document on your Class disk with a new name: report-World Travel-9.doc .
 How to handle a full disk
-
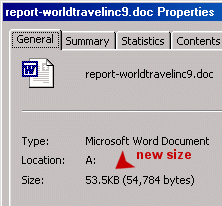 Open | | again to see
the new file size.
Open | | again to see
the new file size.
-
Open the header for the Cover
Page. Update the File size field by right clicking
the field
and choosing Update Fields.

- Scroll through the
document and look at the FileSize shown on other pages. Did any
others update?
- From the menu select | | and in the Print Options
section check the box for Update fields . Now when
you print, you will be prompted to update fields first.
 Print page 1 only of report-World Travel-9.doc.
To save space on your disk, once you
have printed your documents and see that all is well, you may delete the
larger, original file and then rename the smaller file to the original
name. This technique seems to help with documents that have been worked
with a lot. Keep it in mind as your disk gets
full.
- Close the document.

If you checked the Save preview picture box in the dialog, an image of the first page of the document will be shown in the web page view.
When you don't remember where you put a file or what its name is, you can search for files containing keywords. Windows Find will look in File Properties, too. So, you can enter keywords in the File Properties Keywords box that aren't even in the document itself.