|
Step-by-Step: Shrinking Document |
|
What you will learn: |
to reduce margins with Page Setup
to adjust line spacing
to
use Shrink to Fit
|
Start with:

 ,
report-WorldTravel6.doc
,
report-WorldTravel6.doc
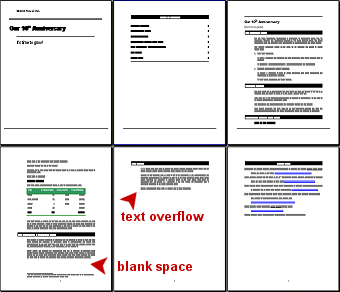
Your report has left the last Heading and its
paragraphs on a page by themselves. There is some blank space at the
bottom of the preceding page, but not enough for the Heading plus the
first line of the next paragraph. The Heading paragraph styles require
that a heading stay with the next paragraph so you won't have a heading
all by itself at the bottom of a page.
Page Setup
Since so much of the text is deeply indented in the main part of the report, you can reduce
the page margins without the text looking too close to the edge. This will let your text use more of the width
of the page, while keeping the indentions.
-
 Put cursor
on the first page of actual report text. (The page after the Table
of Contents.)
Put cursor
on the first page of actual report text. (The page after the Table
of Contents.)
-
From the menu select
| .
-
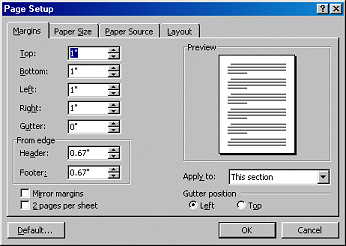
On the Margins tab,
change the Left and Right Margins to 1" and choose to apply to This section .
The report template created several sections in the report so that
you could have different page numbering and different headers and
footers.
Hmmm. That helped, but there is still text left, looking
rather lonely.
-
Scroll through the document and
look at the page margins in the
ruler. The three pages of the report text and the Works Cited page
should show 1 inch for all margins. The first two pages have left and
right margins of .67" and 1.25".
-
Check the
Table of Contents. The page number for the item The
Future has changed to match its new starting point. Is this too
cool??
-
Save as report-worldtravel7.doc
on your Class disk.
 How to handle a full disk
Line Spacing
You need to create
more space in the first part of the report to reduce the number of
lines left over. It will take several small adjustments to move enough text off so that the Shrink to Fit command will work.
To reduce the blank spaces you can resize or remove blank lines. You can also adjust the spacing before and after paragraphs.
-
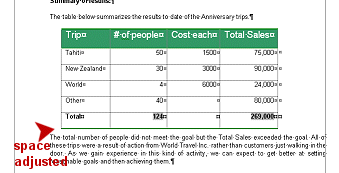
 Remove the paragraph below your table.
This change makes the following paragraph bump up too close to the bottom edge of the table.
Remove the paragraph below your table.
This change makes the following paragraph bump up too close to the bottom edge of the table.
-
 Move
the cursor to the paragraph below the table. Right
click and select from the
popup menu.
Move
the cursor to the paragraph below the table. Right
click and select from the
popup menu.
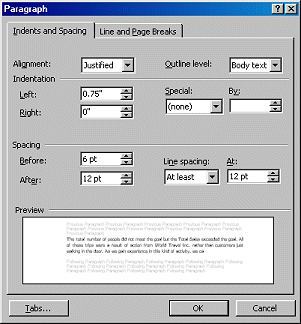
- On the Indents and Spacing tab,
change the Spacing Before to
6 pt and leave everything else the same.
-
 Click on
OK . There is now a nice gap between the table and the paragraph.
Click on
OK . There is now a nice gap between the table and the paragraph.
-
 Scroll
to the bottom of the page. Has more text has moved onto this page? If not, your
table is probably a bit larger than mine.
Scroll
to the bottom of the page. Has more text has moved onto this page? If not, your
table is probably a bit larger than mine.
-
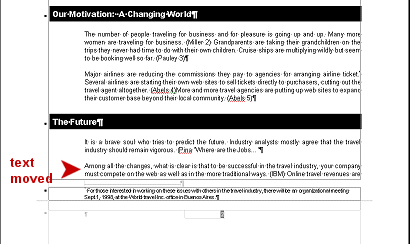
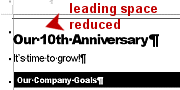 Move your cursor to the title line Our 10th Anniversary on the first page
of the report body (not the Cover page).
Move your cursor to the title line Our 10th Anniversary on the first page
of the report body (not the Cover page).
- Open the
Paragraph dialog for this paragraph and
reduce the Spacing Before from 11 pt to 6 pt
.
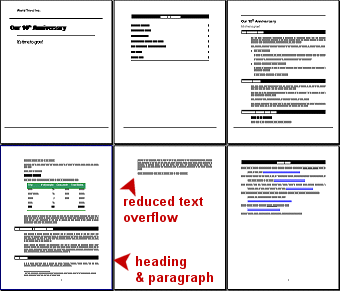
Even more text should now be on
page 4, but not quite all.
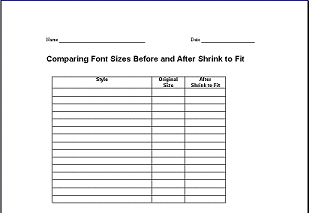
Inspect Styles Used
You will be using the Shrink to Fit command shortly. To see what
changes it makes you must first see what your styles are doing to start
with.
-
 From the resources files,
open the file sizes.doc.
From the resources files,
open the file sizes.doc.
 Print sizes.doc and close it.
- Fill in the first 2
columns. Put your cursor in each
paragraph of your report. Look on the Formatting bar at the Styles
and Size boxes to see what style and size are being used. There are at
least 12 styles actually used. Don't forget the footnote!
- Column 1 = paragraph styles that are used in the
report
- Column 2 = font size
used by each paragraph style
- Column 3 =
new font size after Shrink to
Fit is applied later.
Shrink to Fit
A special command in the Print Preview window can help when you have
just a few lines on that last page.
-
 Open the Print Preview.
- Click
on
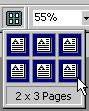
 the Multiple Pages button
on the Print Preview toolbar and drag across the palette to select 6 pages. Now
you can see all the pages at once. Page 5 has just a few lines. This document is now a
good candidate for the Shrink to Fit feature.
the Multiple Pages button
on the Print Preview toolbar and drag across the palette to select 6 pages. Now
you can see all the pages at once. Page 5 has just a few lines. This document is now a
good candidate for the Shrink to Fit feature.
-
 Click on
 the Shrink to Fit button to see if the report can be shortened by one
page.
the Shrink to Fit button to see if the report can be shortened by one
page.
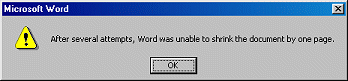
Error: Whoops! A message may appear that says Shrink to Fit failed. You
need to move more text over yourself.

 In Word 97
and Word 2002 you are more likely to have success at this point. They
shrink the font
sizes more than Word 2000 does, so it is easier to shrink by
one page.
In Word 97
and Word 2002 you are more likely to have success at this point. They
shrink the font
sizes more than Word 2000 does, so it is easier to shrink by
one page.
- Close
Print Preview.
-
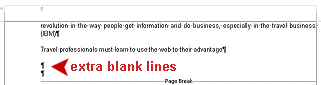 Remove any blank paragraphs below the report text and
before the Works Cited page. Do not
remove the Page Break.
Remove any blank paragraphs below the report text and
before the Works Cited page. Do not
remove the Page Break.
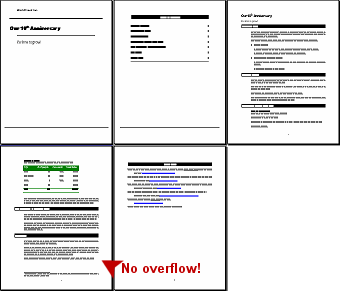
- Open Print Preview
again and try the Shrink to Fit command. Success!!
- Close Print Preview.
- Check the Table of Contents. Shrink to
Fit shortened the document by a page, but the Works Cited entry in the TOC
is not updated until you exit Print View. Update the fields if
necessary.
 The Table of Contents entry in the
Table of Contents shows its page number as 1 even though it prints on a
separate page from the first page of actual text. Confusing?
The Table of Contents entry in the
Table of Contents shows its page number as 1 even though it prints on a
separate page from the first page of actual text. Confusing?
- Inspect
the results. What changed?
Fill in column
3 of your styles list for the font sizes now being used for
each
paragraph style you found.
All font sizes have been reduced. The different versions of
Word reduce to different sizes in some cases.
The paragraph style
definitions have not changed. The changes
were done "manually". New paragraphs will use the original
paragraph styles. So, Shrink to Fit should
be the last thing you do before
printing.
If you applied formatting manually instead of
using the paragraph styles as the directions described, your formatting may
have been lost.
The footnote may be on the wrong
page or may have vanished entirely!
This can be caused by blank lines
in the wrong place. Check for additional blank lines before the Works Cited page and delete them.
How to Un-Shrink
Suppose you decide later that you want
to return your document or parts of it back to the unshrunken state. Undo
won't work if you have closed the document. You can restore the
original paragraph
styles with a key combo. There are some limitations,
of course. Any formatting applied separately from paragraph styles will be
lost.
-
Select whole document with the key
combo CTRL + A.
-
 Use the key combo CTRL + ALT + Z. This
will remove all
manually added formatting (including what Shrink to Fit applied). The
document returns to the paragraph styles assigned.
Use the key combo CTRL + ALT + Z. This
will remove all
manually added formatting (including what Shrink to Fit applied). The
document returns to the paragraph styles assigned.
-
Scroll
through the document to see what has been restored.
-
Check the style of the footnote. Did it return
to the original formatting, too? No. It was not selected apparently.
-
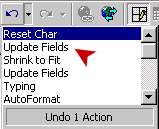 Click on the arrow beside
 the Undo button to see the list of actions.
Your list may be somewhat different, depending on exactly what you have
done.
the Undo button to see the list of actions.
Your list may be somewhat different, depending on exactly what you have
done.
The action Reset Char is what
your key combo did, but Update Fields also applied.
Word checks to see if the Table of Contents numbers need to change.
There may be several entries of Update Fields.
- Click on the item Reset Char to get the report back
to the smaller number of pages with the Table of Contents still updated. The command you click on gets undone,
plus any before it.
- Check the Table of
Contents. Are
the page numbers right? If not, check the Undo list again
or just Update Fields yourself.
Manual Corrections
If you used manual formatting in the document instead of the paragraph styles that the directions called for, Shrink to Fit may have lost some of the formatting. Check the report
carefully.
- Fix any formatting changes that Word made that you don't want to keep.
For
example, you likely have lost the Bold for the lines:
"Goals for this promotion" and "Summary of results" and in the last line
of table.
If you didn't quite follow the directions about the various styles, you may have other spots that need correction.
-
Save as report-worldtravel7.doc
on your Class disk.
How to handle a full disk