
Jan's Working with Presentations
Basics: Printing: Print Settings
The ![]() Print dialog and the
Print dialog and the ![]()
![]()
![]() Print Preview pane allow you to
make a a number of changes about how your presentation prints.
Print Preview pane allow you to
make a a number of changes about how your presentation prints.
- Which printer?
- Change printer properties
- media (paper, transparency, card stock...)
- quality of print/print resolution
- What slides to print?
- How many copies? Collate?
- Print what? slides, handouts, notes, outline?
| |
Step-by-Step: Print Settings |
|
| What you will learn: | to select a printer to select slides to print and number of copies to configure printer with the printer's Document Properties dialog to print only selected slides |
Start with: ![]() ,
,![]() worldtraveloffers2-Lastname-Firstname.pptx from previous lesson
worldtraveloffers2-Lastname-Firstname.pptx from previous lesson
The ![]() Print Dialog and the
Print Dialog and the ![]()
![]()
![]() Print Preview pane are packed with choices! It's great to
have such flexibility, but it can be confusing, too.
Print Preview pane are packed with choices! It's great to
have such flexibility, but it can be confusing, too.
-
From your Class disk, open worldtraveloffers2-Lastname-Firstname.pptx.
(You closed it in the last lesson.)
This file may be showing still in the Recent Files list. If it is not, click the Open button and navigate to where you saved this presentation earlier.  Save as worldtravel3-Lastname-Firstname.pptx to the powerpoint project1 folder on your Class disk.
-
From the Quick Access Toolbar, click the button


 for Print Preview.
(You added this button in a previous lesson.)
Print Preview appears with each slide taking up a whole page.
(If you did not close the presentation, Outline still selected for the page layout.) -
Change the page layout to 2 slides per page.
Print Preview in PowerPoint 2007 and 2010
Select a Printer
You may have only a few printers or you may have many to choose from.
- Open the list of printers:
 PowerPoint 2007:
Click the Print button and then on the arrow at the end of the
Name text box.
PowerPoint 2007:
Click the Print button and then on the arrow at the end of the
Name text box.


 PowerPoint 2010, 2013, 2016: Click the Printer button, which currently shows your
default printer. (Do NOT click the Print button just yet!)
PowerPoint 2010, 2013, 2016: Click the Printer button, which currently shows your
default printer. (Do NOT click the Print button just yet!)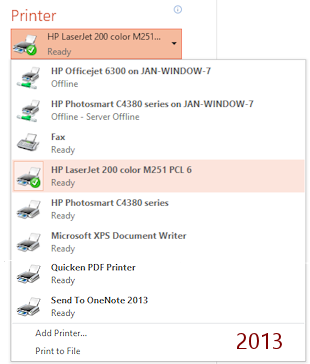
A list of printers appears.
How many are in your list? Your list may be short, including only one physical printer plus one or more virtual printers, like Fax, Microsoft XPS Document Writer, and Send To One Note.
Default icons are used, even when the icons are different in the Control Panel > Printers list. The illustration shows 3 different icons: network printers, fax, and printers (both real and virtual).
The default printer has a check mark on the icon. Oddly, in the illustration from PowerPoint 2013, the default printer uses the normal printer icon but it is a wireless network printer.
-
 Experiment: Printers and
Printer (Document) Properties
Experiment: Printers and
Printer (Document) Properties
Each of your printers has different features. Let's explore but don't print anything just yet.- With your default printer selected:
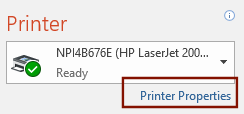
PowerPoint 2007: Click the Properties button

 PowerPoint 2010, 2013, 2016:
Click the Printer Properties link.
PowerPoint 2010, 2013, 2016:
Click the Printer Properties link.
A dialog for the selected printer appears, probably with a title that includes 'Document Properties'. What is in this dialog will vary from printer to printer.
This should be the same dialog that you see if you are in the Control Panel and choose Printer Preferences (NOT Printer Properties) from the right click menu for your printer!
- Explore the dialog.
What can you change - orientation, media size, media type, color or not?
Does this printer have special features? For example the Samsung printer in the illustration for PowerPoint 2007 can print a watermark, which will not show in the preview. These choices are sticky. That is, the printer will remember your choices later. That might be a problem!
- Open the list of printers and choose a different printer.
- Check its Printer Properties.
- Repeat for all printers.
 Same printer listed twice or more:
- Different port: When you unplug your printer and plug it back into a different USB port, the computer installs it as a new device but does not forget about its previous connection. Of course only one 'copy' will work! You can remove an extra device, if you wish, in the Control Panel > Printers section.
- Wireless plus cabled: A wireless printer that is connected to the computer with a network cable will show twice.
- Network printer: A printer that is connected to the network rather than to a particular computer may show as a shared printer connected to another computer on the network.
-
Return the printer selection to the default printer, or to the printer your instructor wants you to use.
- With your default printer selected:
Range and Copies
Range: which slides to print
![]() PowerPoint 2007:The choices are...
PowerPoint 2007:The choices are...
- All - the default
- Current slide only
- Selection - only selected slides.
(You cannot print part of a slide.) - Custom Show - a show can be based on just part of the presentation
- Slides - only the slides listed by number or range, for example 1-3, 7, 10-12 would print slides 1,2,3,7,10,11,12.
![]()
![]()
![]() PowerPoint 2010, 2013, 2016:
PowerPoint 2010, 2013, 2016:
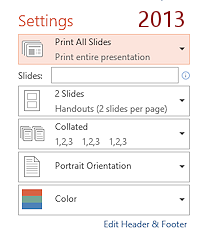
Common choices are in a drop-down list. The default is All Slides.
Custom Range in the drop list just sends you to the Slides: text box. Just type in the
slides you want to print. Seperate the slide numbers with a comma, like 1,3,5, and show a range with a hyphen, like 6 - 10. You can evencombine these, like 1,4,6-8,9, 12-14.
Copies: Default is 1
Collate: Collating will print out one whole copy before starting over with page 1 again. Not collated means that all copies of page 1 print first and then all copies of page 2, etc. This is an important choice when you want several copies and the presentation will take several pages to print.
-
Pick settings:
PowerPoint 2007: In the Print dialog, click on the radio button for Slides to select it
 PowerPoint 2010, 2013, 2016: In the Print Preview pane, click in the box labeled
Slides
PowerPoint 2010, 2013, 2016: In the Print Preview pane, click in the box labeled
Slides
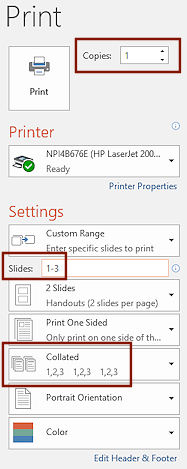
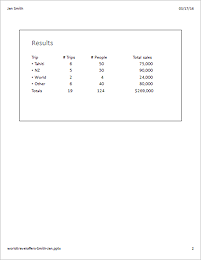
- In the Slides: box, type 1, 2, 3.
This will print slides 1, 2 and 3 only.
Alternate: Type 1-3.
-
Leave the number of copies at 1.
For this print job the Collate choice won't matter.
You are only going to have 1 copy of 1 page.
More Printing Options
Now you can adjust your choice of handout layout and colors.
 If necessary, in the Handouts section or drop list, select Slides per page as 2 per page.
-
If necessary, click on the Frame slides check box to check it.
-
If you have a color printer, choose Color, if you wish and are allowed.
If your printer won't do color, choose Grayscale.
Pure Black and White does not use any shades of gray at all.
Printer Document Properties/Printer Preferences
Your printer's Document Properties dialog may have more or fewer choices than the illustrations. These vary with manufacturer and model for the printer. You may need to consult with your instructor or network administrator about which printer to use and what choices to make. For example, are you allowed to print in color on a classroom printer?
![]() Changes
made in the Document Properties dialog can be remembered by the printer. The next
document you create or open with the same program may use these same
Properties settings.
Changes
made in the Document Properties dialog can be remembered by the printer. The next
document you create or open with the same program may use these same
Properties settings.
-
Click on:
 PowerPoint 2007: Properties button
 PowerPoint 2010, 2013, 2016: Printer Properties link
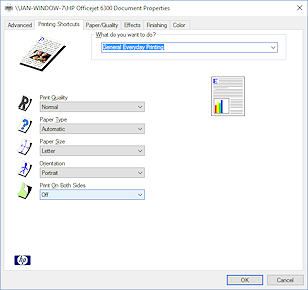
The dialog of Document Properties for your default printer opens.
Different printers will show different tabs and have different choices. The word 'Document' may not be in the title bar.
Examples:

You have already seen this dialog.
-
Make the following choices, if they exist for your printer:
-
Orientation: Portrait
-
Page Order (depending on your printer type):
-
Laser printer: Select Front to Back
-
Ink jet printer: Select Back to Front.
Why the difference? It's because of the way the pages come out of the printer. In a laser printer the pages come out face down. So the pages in a document with multiple pages are stacked correctly when page 1 prints first.
An ink jet printer sends the pages out face up to allow the ink to dry. If page 1 prints first, the pages will be stacked in reverse order. Not what you want! By changing the order in which the pages are printed, you can avoid the reshuffle. However, it may slow your printer down on a large document.
You are only printing 2 pages and there aren't any large areas of dark ink.
-
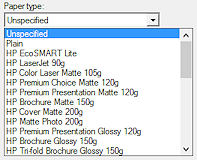
- Media:
Plain Paper
 It
is important to choose the correct Media. You choice changes how much
ink or toner is used. A mismatch can result in a mess!
It
is important to choose the correct Media. You choice changes how much
ink or toner is used. A mismatch can result in a mess!Examples:
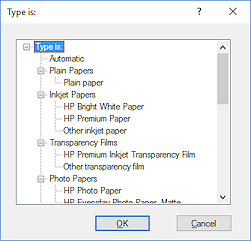
 Printing photos: Photos print much better on
photo paper matched to your printer type. Photo paper
produced by your printer's manufacturer will usually give you the best
results. Really. It does make a difference!
Printing photos: Photos print much better on
photo paper matched to your printer type. Photo paper
produced by your printer's manufacturer will usually give you the best
results. Really. It does make a difference!
-
Quality settings: Normal
Draft or Fast quality is good for the first printing of a document that you expect to edit. Don't use Best quality until you are sure you are finished editing. It will be much slower, especially if there are graphics or photos in the document. For some purposes you will not notice a difference between Normal and Best, but for photos you probably will.
- Color: Color, if you are allowed. Otherwise, choose Black and White, which prints only in black. Gray Scale would be better if there were pictures or colors that you want to see in shades of gray.
-
- Click on OK to close the Document Properties dialog. Your choices are saved and you are returned to where you were.
Print Preview again!
It is usually a good idea to preview your work again after you have changed printer settings. The mouse may have gotten away from you without your noticing!
Get to Print Preview:
PowerPoint 2007: Click on the Preview button  at the bottom of the Print dialog. The Print dialog vanishes and the
Print Preview window appears. There is only one page because you are not
printing all of the slides. PowerPoint 2010, 2013, 2016: You
are still in Print Preview.
at the bottom of the Print dialog. The Print dialog vanishes and the
Print Preview window appears. There is only one page because you are not
printing all of the slides. PowerPoint 2010, 2013, 2016: You
are still in Print Preview.
-
Check to be sure that you are printing the right things and that your header is there.
-
Check the spelling.
Print Selected Slides
-
 Click the Print button. PowerPoint 2007: Click on OK to start printing and close the Print dialog. At last!! PowerPoint 2010, 2013, 2016: Printing started when you clicked the Print button in Print Preview.
Two pages print.
Did they land in the output tray in the order that you expected?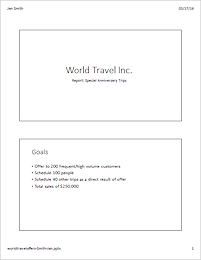
- Save.
[worldtravel3-Lastname-Firstname.pptx] -
Close the presentation.
In the Appendix there is a Pre-Print Check List![]() that brings together all of the things you need to check on before you print a presentation.
that brings together all of the things you need to check on before you print a presentation.
|
|
| © 1997-2017 Jan Smith All Rights Reserved |
Site Map What's New |
Privacy Policy Terms of Service Copyright Acknowledgements |
~~ 1 Cor. 10:31 ...whatever you do, do it all for the glory of God. ~~
Last updated: March 22, 2017