Advanced PowerPoint:
Animate Data

Did you want: Working with Presentations: PowerPoint 2007,2010,2013,2016 or español
Advanced PowerPoint:
|
|
|||||
|
Did you want: Working with Presentations: PowerPoint 2007,2010,2013,2016 or español |
||||||
Revealing you data in parts by using an animation effect can help your audience digest the numbers. Animation Scheme or Custom AnimationAnimation scheme - Applies to a slide or master and usually includes animations for title and body placeholders, and often includes a slide transition also. Choosing Apply to All Slides will apply the scheme to the masters instead of just selected slides. Custom animation - Applies to selected objects on a slide or master. Can include several animations in sequence. Does not include a slide transition. Tables
Charts
|
Project 2: PowerPoint Formatting Project 3: Advanced PowerPoint
|
|||||||||||||
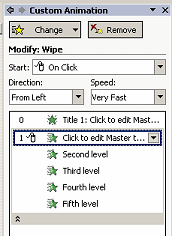
How to Animate a TableAs a whole: Select the table and apply any custom animation. By parts (rows or columns): Method 2: Create a separate table for each row (or column) and apply custom animation to each one. (Yes, it is awkward!)
How to Animate ChartAs a whole: Apply animation scheme to slide or select chart and apply a custom animation. By parts (series or categories):
|
||||||||||||||
|
|
Step-by-Step:Animate Data |
|
What you will learn: |
to apply custom animation to create new master from old to rename a master to reveal chart by series to reveal chart by category |
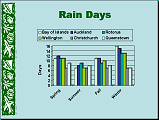
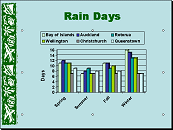
Start with: ![]() ,
nz-import.ppt from previous lesson
,
nz-import.ppt from previous lesson
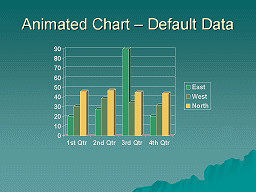
The animation scheme that you applied to the slide master applies the Fade effect to the Title placeholder and the Wipe effect to the Body. What does it do to the chart?
![]() Animation Scheme:
Animation Scheme:
Fade Title, Wipe Body
You can make the chart appear in parts, but you must create a Custom Animation to do so.
 Click on the chart to select it.
 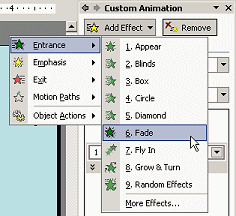 Click
the Add Effect button at the top of the Custom Animation task pane
and select Entrance and then Fade.
Click
the Add Effect button at the top of the Custom Animation task pane
and select Entrance and then Fade.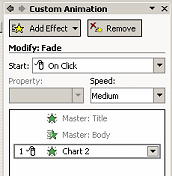
![]() Run animation effects:
Run animation effects:
Fade Title, Wipe chart, Fade chart
The only way to keep the animations on the slide master from playing is to
create a new master. This feature appeared first in
![]() PowerPoint 2002. You want to
include all of the formatting of the Slide Master except the animation scheme.
PowerPoint 2002. You want to
include all of the formatting of the Slide Master except the animation scheme.
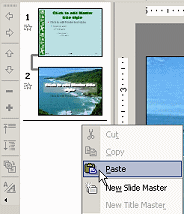 Open
the Master view to the Slide Master.
Open
the Master view to the Slide Master.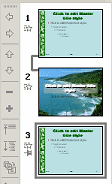 Click
on the new Title Master and press the DELETE key. Now
you have just 3 thumbnails.
Click
on the new Title Master and press the DELETE key. Now
you have just 3 thumbnails.You can now make changes to the new master. The new master will look just like the old one. You can give it a new name so you can tell the difference in the list of design templates.
 If necessary,
open the Custom Animation pane. [|]
If necessary,
open the Custom Animation pane. [|] 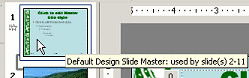 Hover
over each thumbnail at the left. A popup tip tells you the name of
the design template and which slides use it. VERY helpful.
Hover
over each thumbnail at the left. A popup tip tells you the name of
the design template and which slides use it. VERY helpful.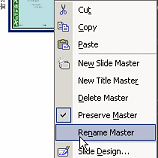 Right
click on the thumbnail of the new slide master and select
from the popup menu.
Right
click on the thumbnail of the new slide master and select
from the popup menu. 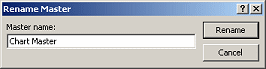 Type
Chart Master and click the Rename
button.
Type
Chart Master and click the Rename
button. 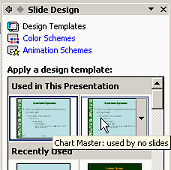 Hover
over the templates at the top, Used in this presentation. Do not click
the template thumbnail! That would apply the template to all slides.
Hover
over the templates at the top, Used in this presentation. Do not click
the template thumbnail! That would apply the template to all slides.
![]() Run animation effects:
Run animation effects:
Fade Title, Fade chart
Now you can modify the Fade effect to show just part of the chart at a time.
 Click
the down arrow at the right of the animation effect in the list in
the Custom Animation task pane.
Click
the down arrow at the right of the animation effect in the list in
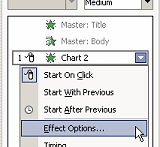
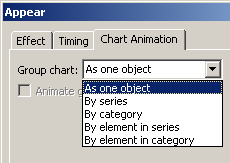
the Custom Animation task pane.Click on The Effect Options dialog for Fade appears.
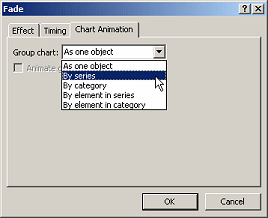 Click
on the Chart Animation tab.
Click
on the Chart Animation tab.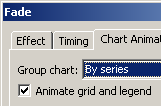
![]() Run animation effects:
Run animation effects:
Fade Title, Fade chart by parts
![]()
![]()
![]()
![]()
|
Teachers: Request permission to use this site with your class Copyright © 1997-2012 Jan Smith <jegs1@jegsworks.com>All Rights Reserved |
~~ 1 Cor. 10:31 ...whatever you do, do it all for the glory of God. ~~
Last updated: 30 Apr 2012
 Select
the chart.
Select
the chart.