Title Bar

PowerPoint has a standard Title Bar. It shows the PowerPoint icon at the
far left and the current document's file name in the middle. At the far
right are the window control buttons: Minimize, Maximize and Close.
 The Close button The Close button
 on the Title
Bar closes PowerPoint and all open presentations. There are other Close
buttons in the Interface! Be careful what you click!! on the Title
Bar closes PowerPoint and all open presentations. There are other Close
buttons in the Interface! Be careful what you click!!
Menu Bar

 PowerPoint's Menu
Bar is a fairly standard set of cascading menus - menus open from inside
other menus. PowerPoint's Menu
Bar is a fairly standard set of cascading menus - menus open from inside
other menus.
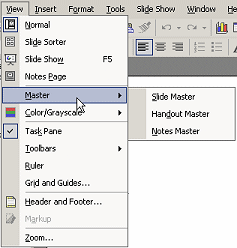
A small arrow at the right
of a menu item
 means that this item leads to a submenu. A set of 3 dots
 means that a
dialog will open. means that a
dialog will open.
 Open menu from keyboard: You
can open a menu with a key combo, ALT + the underscored letter in the
menu's name. For example, to open the View menu from the keyboard you would hold down the ALT
key and press the V key on the keyboard.
 No key combo is needed after the menu is open. To choose an item in an open menu,
just type the underscored letter, like the N for the Normal view.
 Keyboard shortcuts: Some menu commands have a key or key combo to the
side in the menu, like the F5 beside Slide Show above. Such a keyboard
shortcut lets you avoid the menu altogether!
 The Help text box The Help text box
 is part of all Office XP and Office 2003 programs. You can type your question or
keywords in the text box and just press Enter to get a list of possible Help
topics. Click a topic and the Help dialog opens directly to that topic.
Standard Bar
The Standard Bar is not quite standard between the various versions of
PowerPoint.
 
 
 Missing
buttons: If your PowerPoint window does not show all of the buttons, then
either your window is too narrow or your Standard and Formatting bars are sharing
one row. See Arrows below. Missing
buttons: If your PowerPoint window does not show all of the buttons, then
either your window is too narrow or your Standard and Formatting bars are sharing
one row. See Arrows below.
 Click on
a button in the image of the Standard Bar above. A short explanation about
what the button does will appear in a separate window. You can switch back
and forth between the windows or you can use the Next button in the new
window to go through all the buttons in order. Click on
a button in the image of the Standard Bar above. A short explanation about
what the button does will appear in a separate window. You can switch back
and forth between the windows or you can use the Next button in the new
window to go through all the buttons in order.
OR
 View all descriptions on one page in a new window.
 all
buttons all
buttons
 all
buttons
PowerPoint 2003 adds a Permission button
 and a Research button
 and moves the Search feature to the File menu.
Formatting Bar

 Click on a
button in the image of the PowerPoint 2002/03 Formatting Bar above. A short explanation about
what the button does will appear in a separate window. You can switch back
and forth between the windows or you can use the Next button in the new
window to go through all the buttons in order for a particular bar. Click on a
button in the image of the PowerPoint 2002/03 Formatting Bar above. A short explanation about
what the button does will appear in a separate window. You can switch back
and forth between the windows or you can use the Next button in the new
window to go through all the buttons in order for a particular bar.
OR
 View all the descriptions on one page in a new window.
  All buttons
Drawing Bar

 Click on
a button in the image of the Drawing Bar above. A short explanation about
what the button does will appear in a separate window. You can switch back
and forth between the windows or you can use the Next button in the new
window to go through all the buttons in order. Click on
a button in the image of the Drawing Bar above. A short explanation about
what the button does will appear in a separate window. You can switch back
and forth between the windows or you can use the Next button in the new
window to go through all the buttons in order.
OR
 View all the descriptions on one page in a new window.
Status Bar

 The diagonal lines in the corner of the Status Bar mean that the window can
be resized by dragging its edges.
 Click on
a button in the image of the Status Bar above. A short explanation about
what the button does will appear in a separate window. You can switch back
and forth between the windows or you can use the Next button in the new
window to go through all the buttons in order. Click on
a button in the image of the Status Bar above. A short explanation about
what the button does will appear in a separate window. You can switch back
and forth between the windows or you can use the Next button in the new
window to go through all the buttons in order.
OR
 View all the descriptions on one page in a new window.
Managing Toolbars
You are not stuck with the default toolbars. You can display or hide any
of the toolbars. You can even customize what items are on a menu or toolbar. Surely you
can find a way to make the tools you use the most easy to find!
Display/Hide a Toolbar
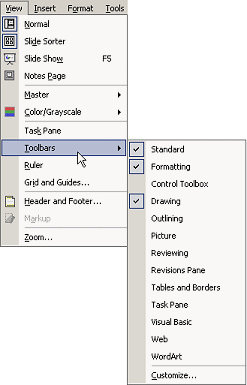
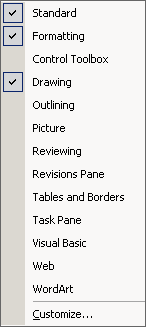
  To
see a list of available toolbars: To
see a list of available toolbars:
- Right click on a blank part of a toolbar to get a popup menu
OR
- From the menu, choose |
A checkmark shows which toolbars are currently displayed. Clicking a
toolbar name toggles the toolbar on or off and closes the menu list. When
you open the list again, the checkmark will have changed.
Dock or Float
 The
toolbars can be docked or
floating, meaning that they can be attached to an edge of the
window or they can float freely over the PowerPoint window. The
toolbars can be docked or
floating, meaning that they can be attached to an edge of the
window or they can float freely over the PowerPoint window.
You can have more than one docked toolbar in the same row. The buttons that
won't fit in the window will be hidden. You'll want a big window!
Methods to dock/float:
-
Drag:
  To
change docking locations, drag a docked toolbar's
handle (the vertical bar at the left end of the
toolbar) to another edge of the window and drop after the bar lines up on
the window edge. To
change docking locations, drag a docked toolbar's
handle (the vertical bar at the left end of the
toolbar) to another edge of the window and drop after the bar lines up on
the window edge.
To float a toolbar, drag by the handle until the bar is free of the window edge and
then drop.
To dock a floating bar, drag the title of the bar to the window edge
until the floating bar docks.
-
Double-click:
To dock a floating bar, double-click on its title bar.
 If there is room
in the window, you can slide a docked toolbar away from the edge by dragging on the handle. If there is room
in the window, you can slide a docked toolbar away from the edge by dragging on the handle.
Arrows


Double arrow
 :
Indicates that there are hidden buttons. This happens when there are too
many buttons to fit in the width of the window. :
Indicates that there are hidden buttons. This happens when there are too
many buttons to fit in the width of the window.
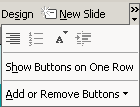
 Down arrow Down arrow
 :
Clicking :
Clicking
 the down arrow at the right end of the toolbar opens a
menu with a palette of the hidden buttons and either a command to show
all of the buttons in one row or a command to show two rows of buttons. the down arrow at the right end of the toolbar opens a
menu with a palette of the hidden buttons and either a command to show
all of the buttons in one row or a command to show two rows of buttons.
 Confusion:
Which buttons are hidden when there is not enough room for all of them? Confusion:
Which buttons are hidden when there is not enough room for all of them?
The least used
buttons are hidden. As you continue using buttons, which buttons are displayed will
change!
   
~~ 1 Cor. 10:31 ...whatever you do, do it all for the
glory of God. ~~
Last updated:
30 Apr 2012 |

