 |
Step-by-Step: Edit Wizard Letter |
 |
|
What you will learn: |
to replace temporary text
to create a columns effect with tab
stops
to use borders to create a row effect
|
Start with:
 ,
letter-AAA.doc
Replace Temporary Text
The Letter Wizard includes just one
line of temporary text for the body of the letter. You certainly
need to replace it!
Temporary Text is similar to:
Type your letter here. To add, remove, or change
letter elements, choose Letter Wizard from the Tools menu.
- Review the popup Tips for Typing with Body Text Paragraph
Style.
- To print a copy of the
replacement text (shown below) for you to read from while typing, click HERE. A new
browser window will open. From the menu of that browser window select |
.
- Select the temporary text for the body of
the letter that starts Type your
letter... When you type, your new words replace the selected text by overtyping it. Do
not delete the temporary text. You might lose the paragraph
settings.
- Type the text in the illustration shown
below. Some of the lines won't make much sense right now. You will be
turning them into a table.

- Correct any typing errors. You may see some green or
red underlines where Word suspects spelling or grammar problems. Do not worry
about those yet, unless your fingers mis-typed the text!
 Save as letter-AAA2.doc in the word project2 folder
of your Class disk.
 How to handle a full disk
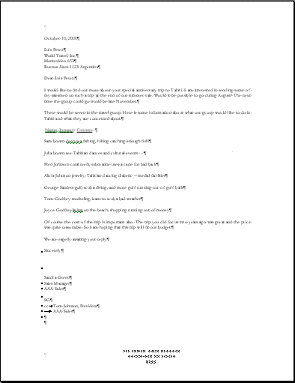
Letter after entering body
text
Columns: Manual Tab Stops
Part of this letter is a real mess!
The middle section (lines 15 - 22) needs to be in three columns to
make any sense. You can arrange such short phrases into columns using tab stops. The steps below will show you how to create your own tab stops and line up the text with them. Tab stops will keep items in line going across the page. Columns can only keep things together vertically.
- If the horizontal ruler is
not displayed, select from the menu, | .
- Select
from line 15 that starts with Name through line 22 which
starts with Joyce Godfrey .
-
 If necessary,
select, on the left of the ruler, the tab type
 , left aligned, by
clicking on the
icon in the little rectangle until the left tab shows.
 The default tab stops are set every half-inch.
You can change the default spacing using the Tabs dialog from the Format
menu.
-
 Click at the 2" and 3.5" ruler marks. This
inserts manual tab stops for the selected paragraphs only. It automatically clears the default tabs to the left of the
manual tab stops.
 Click at the beginning of line 15 (which starts with
Name ) and use the key combo CTRL +
right arrow to move your cursor in front of the word Interest.
- Press the
TAB key. The text shifts over to the first tab stop.
- Use the key combo CTRL + right arrow
to move your cursor in front
of the word Concern.
- Press the TAB key.
The text jumps to the second tab stop.
- Continue, moving the text on the other lines
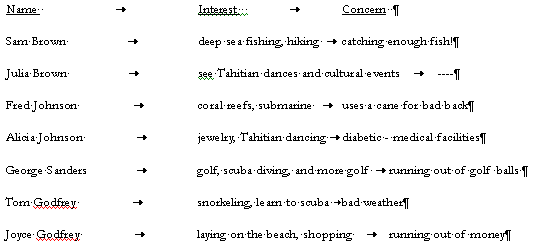
into columns by using the TAB key and arrow keys until all lines are arranged as shown below. Can
you see how these phrases are related to the labels in line 15?
 Save.
[carta-AAA2.doc]
 How to handle a full disk
These columns are still not lined up nicely. The
space between columns 1 and 2 is too wide and there isn't any space between columns 2 and
3, which makes column 3 uneven. Our first guess on where to put the tab stops
was not that great.
- Select
the lines again.
- On the ruler, drag the tab at the 2" mark back over to 1.5".
 If
you drag the tab off the ruler, you will erase it. Just make a new one.
- Drag the
second tab (at the 3.5" mark on the ruler) to the right to 4".
- Click on
 the Show Marks button to turn
off the display of marks to see how the letter looks. Much better looking! Now you have columns you can
read!!
 If you still see some of the marks,
you need to change the settings in the Option dialog. From the menu select
| | tab and make sure
that all the boxes in the Formatting marks section are cleared.
- Show the marks again.
 Save.
[carta-AAA2.doc]
 How to handle a full disk
Border Rows
The tabbed columns are rather hard to read all the way across. Some lines
would help and would set this information off from the rest of the letter. You
will use the Tables and Border tool bar to do this.
 Using the Format menu's Borders and Shading will give VERY different results.
- Select
the lines 15 through 22 again.
-
 On the Formatting bar click
 the Tables and Borders button to open its toolbar.
This bar is designed for use with tables but can also help us with
text.
- Select the solid line, line width of 1 pt, and line
color black, as shown in the illustration of the
toolbar.
-
 Click the arrow in the Borders button to open
the list of choices.
- Click on
 All Borders.
 You have to
set all the characteristics before you apply the border!
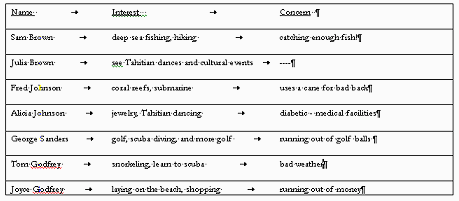
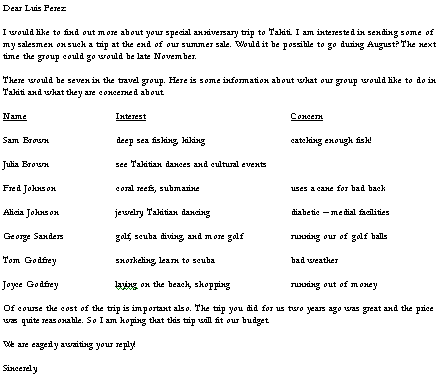
Lines are drawn around the text and between each paragraph.
The last row is not as tall as the others. This is
because the Body Text paragraph style is adding blank space after each
line, but the outside border didn't recognize such spacing. You can fix
this with a Line Break, which starts a new line of text but does not
create a new paragraph.
-
Place your cursor at the end the last row, after the word money .
-

 Insert a line break
with the key combo SHIFT + ENTER. The line spacing looks good but we've
found that justification glitch again! This
phrase is stretched out way too much.
-
 Click on
 the Left Align button.
Now the phrase is spaced
out neatly.
- Close the Tables and Borders toolbar by
clicking the Close button in its upper right corner.
- Click on Show/Hide Marks to hide the marks and look at your
letter at Zoom = Whole page.
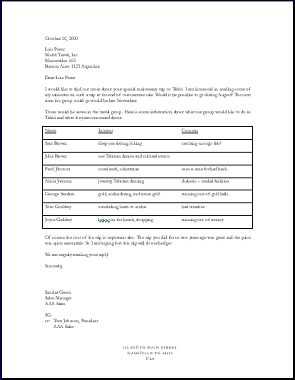
It's looking pretty good!
 Save. [
letter-AAA2.doc]
 How to handle a full disk
