|
Word Standard Toolbar

(Illustration is
from Word 2000)
|
 |
New |
Creates a new blank document using the default template. The | command on the menu gives you a choice of templates. (Templates will be explained a little later!)
|
 |
Open |
Brings up the Open dialog box for you to choose a document to open. Recently opened files are listed at the bottom of the menu.
Using the menu
may be faster for documents that you have opened recently.
|
 |
Save |
Saves the current document back where it came from. If the document has never been saved before, you will get a dialog box to choose a folder or filename.
 This can get you into trouble if you are editing an old document for a new purpose and don't want to lose the old one. You must use the menu command | to get the dialog box you need to save with a different filename. Otherwise you will overwrite the old document. This can get you into trouble if you are editing an old document for a new purpose and don't want to lose the old one. You must use the menu command | to get the dialog box you need to save with a different filename. Otherwise you will overwrite the old document.
|
 |
Permission
 |
Word 2003 adds a button for managing permissions for this document.
|
 |
E-mail
|
Allows you to email the document you are working on without having to open
your email software separately. The addressing text boxes appear right in the
Word window. The button toggles to show or hide these text boxes.
|
 |
Search
 |
 Shows and hides the Search task pane at the right of the document.
In this
pane you can search your document or your computer or your web sites. Shows and hides the Search task pane at the right of the document.
In this
pane you can search your document or your computer or your web sites.
|
 |
Print |
Will automatically print the whole document without giving you a chance to preview or make changes to page settings.
 The tool tip for this button shows which printer will
be used. The tool tip for this button shows which printer will
be used.
Don't use this
button unless you are very sure you are ready to print the whole
document.
|
 |
Print Preview |
Shows what your document will look like when it is printed.
 You should always preview before you print. By checking carefully before you actually print, you can avoid mistakes and save a lot of time and paper. You should always preview before you print. By checking carefully before you actually print, you can avoid mistakes and save a lot of time and paper.
|
 |
Spelling and Grammar |
Checks the spelling and the grammar of the selected text or of the whole document. Possible spelling errors are marked with a wavy red underscore. Wavy green underscores mark possible grammar errors. Word's dictionary doesn't know every word in the world. You can add words you want Word to know to the custom dictionary, in the file CUSTOM.DIC. This list of the words that you've added can be edited with a text editor like Notepad to remove words you added by mistake.
|
 |
Research
|
Word 2003 adds a button that opens the Research task pane, where you can
search reference books, like an encyclopedia and a thesaurus.
|

Cut, Copy, Paste |
Work the same as they did in the Windows lessons.
Cut (scissors button) removes the selected text to the
Clipboard.
Copy (two pages button) places a copy of
selected text on the Clipboard.
Paste
(clipboard and paper button) places a copy of what was on the
Clipboard at the cursor location.
 Word
2002 can use the Microsoft Office Clipboard, which holds up to 24
items. Very nice! The Microsoft Office Clipboard only works with
Microsoft Office programs. The Windows Clipboard is part of the
operating system and is available to all programs, but only holds 1
item at a time. Word
2002 can use the Microsoft Office Clipboard, which holds up to 24
items. Very nice! The Microsoft Office Clipboard only works with
Microsoft Office programs. The Windows Clipboard is part of the
operating system and is available to all programs, but only holds 1
item at a time.
Your copied or cut material may not be
stored on the Office Clipboard unless the Task Pane is open to the
Clipboard. There is a setting in the Options at the bottom of
Clipboard pane that will let the Office Clipboard collect your cuts
and copies automatically without the Clipboard Task Pane being
open.
|
 |
Format Painter |
Copies the formatting of the selected text and then applies it to other text that you drag across. Double-click the button and you can apply the formatting many different places.
|

Undo & Redo |
Word keeps a list of your editing actions and a list of the ones you have reversed. The Undo button reverses the last action in the list. The Redo button reverses your last reversal.
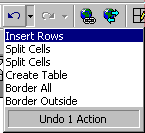 The
arrows drop lists of actions. If you select an action on the list,
all the actions to that point are undone (or redone). This can save
a lot of clicking, if you can tell how far back you need to go. You
can undo the actions one at a time by clicking on the button
directly. The
arrows drop lists of actions. If you select an action on the list,
all the actions to that point are undone (or redone). This can save
a lot of clicking, if you can tell how far back you need to go. You
can undo the actions one at a time by clicking on the button
directly.
The arrow
on the button is gray when there are no actions in the list. The number of actions remembered depends on how much memory is available, with a maximum of 100. [In Word 95, when no actions are in the list, clicking on the button only plays the ding.wav
sound, Win95's default sound.]
|
 |
Tables and Borders |

Opens a toolbar for drawing and modifying tables. You can actually draw a table, if you need one with complex rows and columns. Using the Table button, described below, is easier for simple tables. The toolbar also lets you set borders and shadings (background color) for the whole page, a paragraph, a picture, a frame, a text box, a table, a table cell, or selected text. You can change shadings from this toolbar, but changing borders of things other than tables may be easier with the Borders and Shadings dialog on the Format menu.
[In Word 95 you can't apply Borders or Shading to just a few words, only to whole paragraphs. For color behind words or phrases, use Highlight in Word 95.]
|
 |
Table |
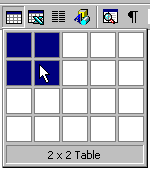 Inserts a table at the cursor location. You set the number of rows and columns by dragging on the grid that drops down. Once you have a table, the button changes to Inserts a table at the cursor location. You set the number of rows and columns by dragging on the grid that drops down. Once you have a table, the button changes to
 Insert Row, which will add a new row above the current row to the table. Insert Row, which will add a new row above the current row to the table.
[In Word 95 the button does not change, but it does function this way.]
|
 |
Excel |
Inserts an Excel spreadsheet. You select the number of rows and columns the same as for a table. You must have Excel installed for this to work, of course.
|
 |
Columns |
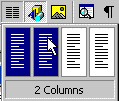 Lets you divide the page into several vertical columns, like a newspaper. Drag across the number of columns you want. Lets you divide the page into several vertical columns, like a newspaper. Drag across the number of columns you want.
|
 |
Drawing |
 Opens a bar of drawing tools with which you
can create graphics from within Word. These tools create vector
drawings, which use shapes instead of individual dots. These lessons
don't use the Drawing bar much. Opens a bar of drawing tools with which you
can create graphics from within Word. These tools create vector
drawings, which use shapes instead of individual dots. These lessons
don't use the Drawing bar much.
 There is only so much one can do
in one course! (Ask the Office Assistant or use Help to learn more,
if you are interested.) You will work with There is only so much one can do
in one course! (Ask the Office Assistant or use Help to learn more,
if you are interested.) You will work with  WordArt
however. WordArt
however.
[Word 95 has a similar Drawing bar with
fewer features and no drop lists.]
|
 |
Document Map |
Opens a pane to the left of the document window with a hypertext outline of the document. When you click on an outline topic, the document scrolls to that point. You must apply heading paragraph styles to your text for this to work. The Document Map is shown by default for the Online Layout view, but it can be used with other views, too.
|
 |
Show Marks |
Toggles the display to show or not show marks for things like paragraph and page breaks, tabs, and spaces. Seeing these marks can be very helpful, especially when your document is not behaving as you intended. But marks also are distracting and make it hard to tell what the whole page really looks like.
|
 Zoom Zoom |
 Offers you choices for the display of your document. You can enlarge it to see details or to read small type. You can shrink it to see the whole page, or even two pages at a time. Most of your work will probably be done at 100%. Two other factors are important - monitor size (14", 15", 17", bigger?) and screen resolution (640 x 480, 800 x 600, 1024 x 768, larger?) Offers you choices for the display of your document. You can enlarge it to see details or to read small type. You can shrink it to see the whole page, or even two pages at a time. Most of your work will probably be done at 100%. Two other factors are important - monitor size (14", 15", 17", bigger?) and screen resolution (640 x 480, 800 x 600, 1024 x 768, larger?)
|
 |
Help |
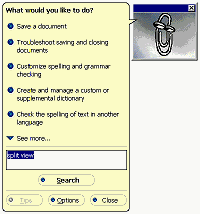 By
default, this button opens a small window with
the default Office Assistant character, an animated paper clip named Clippit. A character, called an "actor", can assist you by offering
tips about what you are doing, by guessing what question you might
want to ask, and by providing a Search text box for your question.
You can use natural language to search, but using just keywords may
be faster and more accurate. Right click on the Office Assistant
window and choose to see what other characters are installed. By
default, this button opens a small window with
the default Office Assistant character, an animated paper clip named Clippit. A character, called an "actor", can assist you by offering
tips about what you are doing, by guessing what question you might
want to ask, and by providing a Search text box for your question.
You can use natural language to search, but using just keywords may
be faster and more accurate. Right click on the Office Assistant
window and choose to see what other characters are installed.
You may hear peculiar noises from the Office Assistant from time to time as you work. It will also wiggle around. Some people find it highly annoying and some are amused. You can always turn it off after you become familiar with how Word works.

The Office Assistant shows a light bulb when
there is a tip about what you are doing. Click on the light bulb to
see the tip. You'll only see a tip once unless you reset the tips in
Office Assistant's Options (on the search window above). There are
also some choices about what tips you want to see.
[The Office Assistant replaces the
 Tip Wizard and Tip Wizard and
 Help button used in Word 95.] Help button used in Word 95.]
|
   
~~ 1 Cor. 10:31 ...whatever you do, do
it all for the glory of God. ~~
Last updated:
30 Apr 2012 |