|
You will be using the New Style and Modify Style dialogs. These look the same! There are quite a number of features.
 |
Step-by-Step: Modify a Style |
 |
|
What you will learn: |
to apply a heading style with a key
combo
to modify a style with the Formatting bar
to modify a style
with the Style dialog |
Start with:   , a
blank document , a
blank document
Create Document
- Open a blank document.
- Type several lines of text in this blank
document. Include at least 3 paragraphs. They don't have to be long! They can even be nonsense
letters. (You will print this later, so don't get too
carried away.)
-
Open the
Style list on the Formatting bar to see
what the default choices are. The style names are formatted with
the style, so you have an instant preview.
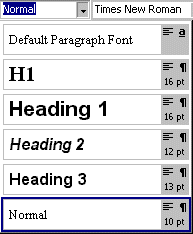
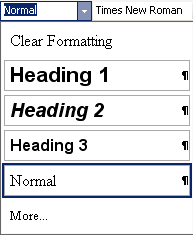
Default styles: Different in different versions
 If you see other styles in
your list, then someone has modified the standard
template Normal.dot on your computer. That is
handy if you always
want to use certain styles. On the other hand, if other
people use your computer, they may be confused with your styles. If you see other styles in
your list, then someone has modified the standard
template Normal.dot on your computer. That is
handy if you always
want to use certain styles. On the other hand, if other
people use your computer, they may be confused with your styles.
Apply Style: Style Box/Key combo
- Place the cursor in
paragraph 1.
- From the Style Text Box select Heading
1.
 You can also use the
key combo CTRL + ALT + 1. You can also use the
key combo CTRL + ALT + 1.
- Move the cursor to paragraph 2.
Select the style Heading 2 from the Style box.
 You can also use the key combo CTRL + ALT + 2. You can also use the key combo CTRL + ALT + 2.
-
 Move the
cursor to your third paragraph and apply
Heading 1 with the key combo CTRL + ALT + 1. Move the
cursor to your third paragraph and apply
Heading 1 with the key combo CTRL + ALT + 1.
 Save as styles.doc to the word project
3 folder
of your Class disk. Save as styles.doc to the word project
3 folder
of your Class disk.
 How to handle a full disk
Update a Style to Match Selection
If you applied a style to a paragraph and then
changed the formatting of the paragraph, you can make Word change the
definition of the style to
match your new formatting. It's not quite obvious in Word 97/2000, but it's easy once you learn
how.
In the steps below you will add some formatting and then update Heading 1
to use what you added. There are different methods for Word 97/2000 and
for Word 2002/2003.

 Style Box:
- Select your first paragraph,
which you styled with Heading 1.
-
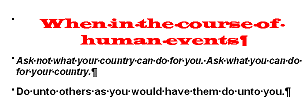 Use the Formatting bar to
change the formatting
to: Use the Formatting bar to
change the formatting
to:
Font: Wide Latin
Size: 20
Color:
Red
Alignment:
Center
-
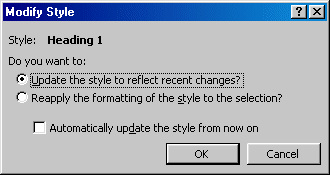 With the cursor
still in the first paragraph, click in the
Style box on the Formatting bar
which shows Heading 1, and
press ENTER. A dialog appears that gives
you two choices - to update the style to match what you just did or to
reapply the existing style formatting and
throw out your changes. With the cursor
still in the first paragraph, click in the
Style box on the Formatting bar
which shows Heading 1, and
press ENTER. A dialog appears that gives
you two choices - to update the style to match what you just did or to
reapply the existing style formatting and
throw out your changes.
- Select Update the style to reflect recent changes
and click on OK. What changed?
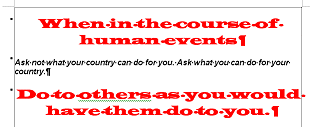 Your third paragraph also used the Heading 1
style. Its formatting changed, too, when you changed the style. Your third paragraph also used the Heading 1
style. Its formatting changed, too, when you changed the style.
-
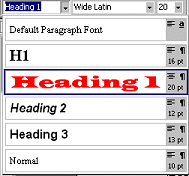 Open the Styles list
again. Heading 1 now matches your changes! Isn't this cool!? All paragraphs
in the document that use this style are automatically changed
when you changed the style's definition. Open the Styles list
again. Heading 1 now matches your changes! Isn't this cool!? All paragraphs
in the document that use this style are automatically changed
when you changed the style's definition.
  Styles and Formatting Pane: Styles and Formatting Pane:
- If necessary, open the Task Pane to Styles and Formatting by
clicking
 the Styles and Formatting button at the left of the Formatting toolbar.
- Select your first paragraph,
which you styled with Heading 1.
-
 Use the Formatting bar to
change the formatting
to: Use the Formatting bar to
change the formatting
to:
Font: Wide Latin
Size: 20
Color:
Red
Alignment:
Center
 As
you make changes, a new item appears in the Style box As
you make changes, a new item appears in the Style box
 and also in the Styles and Formatting pane, with your new formatting
described and displayed.
-
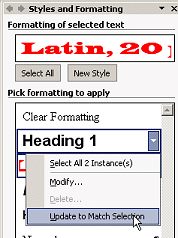 With the cursor
still in the first paragraph, right click on the
original Heading 1 item in the task pane.
(Not the one with your changes!) With the cursor
still in the first paragraph, right click on the
original Heading 1 item in the task pane.
(Not the one with your changes!)
 Notice
that the popup menu tells you how many instances there are of this style in the
document and you can select all of them at once. Could be helpful! Notice
that the popup menu tells you how many instances there are of this style in the
document and you can select all of them at once. Could be helpful!
- From the popup menu select .
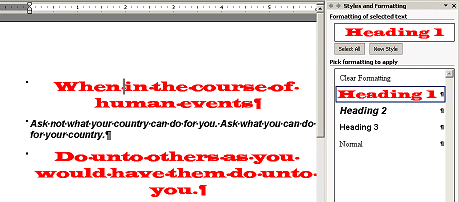
The
Heading 1 item changes and so does the 3rd paragraph in your document, which also was styled with
Heading 1. In fact, all paragraphs that use Heading 1 style would change. The style for the formatting that you applied yourself vanished.
Modify a Style:
Sometimes you would rather change the style definition without having to
find a paragraph that uses the style and format it first. You can do that
through a dialog, somewhat different between Word 97/2000 and Word 2002/2003.

 Style &
Modify Style Dialogs Style &
Modify Style Dialogs
-
Open the Style
dialog. |
-
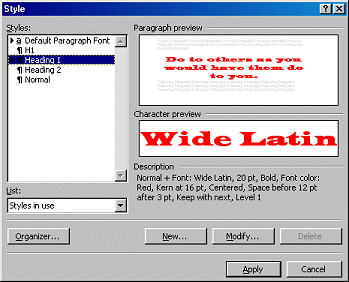 Look at the list of styles at the left of
the dialog. The List box at the bottom says that these are the
Styles in use. Look at the list of styles at the left of
the dialog. The List box at the bottom says that these are the
Styles in use.
Hmmm. This list
is
a little different from the Styles drop list. It does not show Heading 3.
Sometimes this list
will show styles that you cannot find
when you check every paragraph. Another place to get a little bit confused!
-
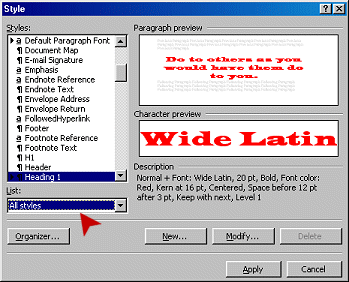 At the bottom of the dialog, in the List text box, select All Styles . A much longer list of styles
appears! The Normal.dot template is really packed with standard
styles. At the bottom of the dialog, in the List text box, select All Styles . A much longer list of styles
appears! The Normal.dot template is really packed with standard
styles.
- Select Heading 1 and click
the Modify... button. The Modify Style dialog
appears. [The parts are described above in the blue section.]
-
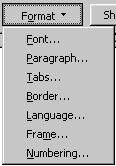 Click the Format... button at the bottom of the Modify Style dialog. A menu
of formatting dialogs appears. From here you can set every characteristic for
the style. These are the same dialogs that you can open from
the Word menu to format text directly. Open several of them and remind
yourself of how many choices you have! Click the Format... button at the bottom of the Modify Style dialog. A menu
of formatting dialogs appears. From here you can set every characteristic for
the style. These are the same dialogs that you can open from
the Word menu to format text directly. Open several of them and remind
yourself of how many choices you have!
- Make the following
changes:
Font... dialog = font
Britannic Bold
size 18
color
Sea Green
Shadow
Paragraph... dialog =
left indent
1" (or 2.5 cm)
right indent 1" (or
2.5 cm)
before 6 pts
after 6
pts.
Border... dialog =
Border Shadow
Width 1 pt.
Shading Light
Green
-
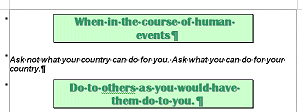 Click on
OK to close the Modify Style dialog and on
Apply to close the Style dialog.
Both paragraphs that used the Heading 1 style are changed.
Nifty! Click on
OK to close the Modify Style dialog and on
Apply to close the Style dialog.
Both paragraphs that used the Heading 1 style are changed.
Nifty!
  Modify
Style Dialog Modify
Style Dialog
- In the Task Pane, right click on the style Heading 1.
- From the popup menu, select The Modify Style dialog appears. (It looks just like the New
Style dialog!)
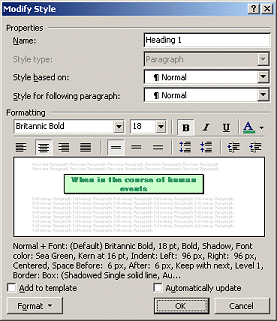 There
are a number of toolbar buttons here for common formatting choices. For
the rest, you can click on the Format... button and then select from the
menu, just like the normal Word menu. There
are a number of toolbar buttons here for common formatting choices. For
the rest, you can click on the Format... button and then select from the
menu, just like the normal Word menu.
- Make the following
changes:
Formatting buttons =
font
Britannic Bold
size 18
color
Sea Green
Font... dialog=
Shadow
Paragraph... dialog =
left indent
1" (or 2.5 cm)
right indent 1" (or
2.5 cm)
before 6 pts
after 6
pts.
Border... dialog =
Border Shadow
Shading Light
Green
-
 Click
on OK. Your changes are applied to the Heading 1 paragraphs in your
document. Click
on OK. Your changes are applied to the Heading 1 paragraphs in your
document.
Finish
- Header: Create a
header for the document with your name, 2 spaces, and the date on the
left and Word project 3 on the right.
 Save to your Class disk as styles2.doc . Save to your Class disk as styles2.doc .
 How to handle a full disk
 Print. Print.
Now you should be ready to use some of your new skills
on your brochure.
|


The New Style and Modify Style dialogs are the same. There are some differences between versions of Word.
Word 97/2000
Word 2002
Name: You can create your own names. Just type in the name. Try to keep your names descriptive, but short.
Style type: Paragraph or Character

 Word
2002/2003 also has table and list styles.
This box is grayed out when you are modifying a style so that you cannot change the type. When creating a new style, you will, of course, need to pick a type.
Based on: a style in the template to base this style on. Your modified or new style will have all the characteristics of the one you choose here, unless you change them or choose (no style) at the top of the list. Choose a style that is already a close match to what you want. Save as many steps as possible!
 When you
change a style, all styles based on
it are also changed. This can be extremely useful or
extremely
confusing!!
Style for following paragraph: It can be handy to have a particular paragraph style follow this one. For example, after a title style, you might want to always have a subtitle style next. Or, after a certain heading style, you might always have a bulleted list.
Formatting buttons:
 Word
2002/2003 has Formatting toolbar buttons right in the dialog for the most
common formatting choices.
Shortcut keys button: