|
Step-by-Step: Brochure Flap - Format Text |
|
|
What you will learn: |
to modify a paragraph style
to create a
new paragraph style
to create a character style
to create a
block quote style
to insert an
image in a text box
|
Start with: 
 ,
brochure-tahiti4.doc from a
previous lesson,
tahiti.doc from the
resources files
,
brochure-tahiti4.doc from a
previous lesson,
tahiti.doc from the
resources files
Now that you have practiced with styles
, you can do some neat formatting
easily.
-
Open brochure-tahiti4.doc from
your Class disk.
Modify a Heading Style
- Position the cursor
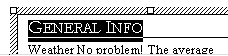
in the line containing the text General Info .
- Apply the style Heading 2 from the Style box. You
can't modify a style unless you first apply it.
- Select the first line.
- Open
the Font
dialog:
Font = Garamond
Style = Regular
Size = 14
Smallcaps
- Click on OK.
- Open the Paragraph dialog:
Spacing Before =
0
Spacing After = 3 pt.,
Line Spacing exactly 12 pt.
- Click on OK.
- Open the Borders dialog:
Apply Âľ pt. solid line to just the bottom
of the paragraph.
- Click on OK.
-
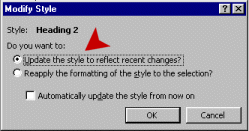

 Click in the Style box on the Formatting toolbar to highlight Heading 2. Press ENTER. Click on OK to accept the changes to the style.
A dialog appears asking if you want to update the style to match recent changes. This is the default choice.
Notice the checkbox. If you planned to make other changes to this style, you could check the box. If checked, all changes later made to text with this style will be applied to all paragraphs using the style! Leave it unchecked this time. You are finished with this style.

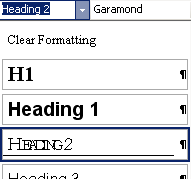
 If
necessary, click the Styles and Formatting button to open the Task Pane to
Styles and Formatting.
If
necessary, click the Styles and Formatting button to open the Task Pane to
Styles and Formatting.
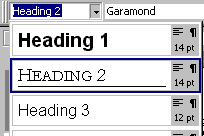
Right click the Heading 2 style in the Task
Pane. From the popup menu select . The Heading 2 style is changed.
-
Click the arrow in the Style box on the Formatting toolbar to
see the headings again.
Heading 2 now uses the formatting that you applied to General Info . You just modified a paragraph style!
- Press
the ESC key to close the Styles list.
-
Save as brochure-tahiti5.doc .
 How to handle a full disk
Create a Paragraph Style
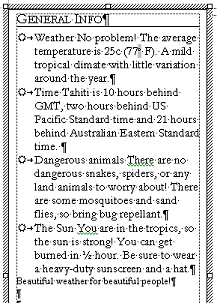
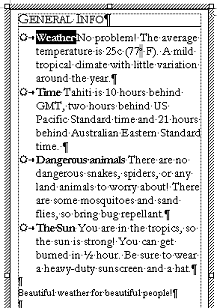
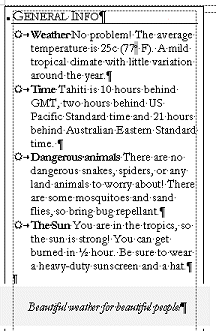
The paragraphs below the heading in Text Box 1 are a list. You will create a new style for this list.
- Drag to select the paragraphs below the heading except for the last one Beautiful weather… .
- Set the Font to Garamond and the Size to 12 using the toolbar.
- Right click on the list and select Bullets and Numbering from the popup menu.
- Select a scheme to customize and then click on the Customize button.
 Click on the Bullets button and select Font = Wingdings, and click on the sun shape
(between the airplane and the water drop) to be the
bullet.
Click on the Bullets button and select Font = Wingdings, and click on the sun shape
(between the airplane and the water drop) to be the
bullet.
- Click on OK to close the Symbols dialog.
- Set Bullet indent = 0 and Text indent =
.25" (.63 cm).
Set
Tab indent to 0 also.
Only a small indent can be used since the text box is rather narrow.
- Click on OK to close the dialog.
-
 While
the text is still selected:
While
the text is still selected:
Click in the Style box on the Formatting toolbar and type bullet-sun . Press the ENTER key
to create a style with this name and the characteristics of the selected
text.
Click the New Style button in the Task Pane. The New Style dialog,
type bullet-sun .
-
Click the OK button.
Your new style appears in the Task Pane.
Text must be selected for this to work!
-
Make sure that only 4 paragraphs have bullets, as in the illustration.
-
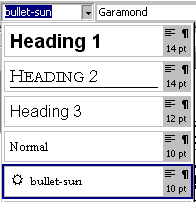 Click on the arrow in the Style box to display the list again. Your new paragraph style bullet-sun is on display.
-
Save. [brochure-tahiti5.doc]
How to handle a full disk
Create a Character Style
Sometimes you want a word or phrase in a paragraph to have different styling from the rest of the paragraph. Vocabulary words and key phrases are often emphasized this way. Using a character style makes it easy to be consistent throughout your document. Plus, you update all the places where the style is used at once when you modify the style. A real time-saver!
The simplest change is to make the characters bold or italic. You can create subtle but effective styles in other ways by changing the spacing, scaling, or position of the characters.
The first phrase in each bulleted item in Text Box 1 is actually a topic title. You will create a character style for these topics.
-
 Select the word Weather in line 2. Notice that
the status bar is not showing line numbers for your text in a text box.
Select the word Weather in line 2. Notice that
the status bar is not showing line numbers for your text in a text box.
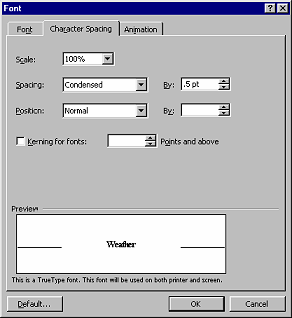
- Open the Font dialog from the Format menu. Select Bold.
- Click on the tab Character Spacing.
- Change Spacing to Condensed. Did you see the change in the Preview box. The default setting is by 1 pt. Change this to
0.5 pt.
- Click on OK to close the Font dialog.
Next you will save these settings as a character style. If you used the technique you just used to create the bullet-sun style, you'd get a paragraph style, not a character style.
For Word 97/2000 you must use the Style dialog instead. Word 2002/2003 makes
this easier!
Character
Style
-
 With Weather still selected, on the menu, select |
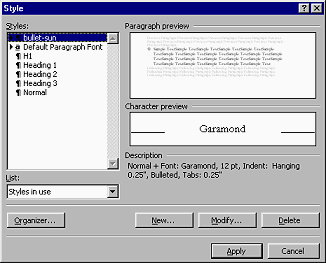
The Style dialog opens. On the left is a list of styles in use. The highlighted style is the one in use where the cursor is in your document.
If this is not the list displayed, choose it in the List drop list.
- Click on the button New...
-
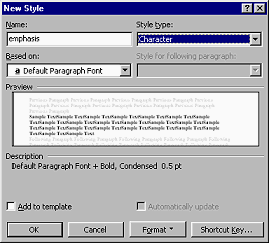 In the Name box type emphasis . (Must be just like this. Do not capitalize.)
- Choose Character in the Style type box. Notice that
the characteristics you just set are listed in the Description area.
- Click on OK and then on Apply.
Character
Style
- With Weather still selected, click on the New Style button in the
Task Pane.
- In the New Style dialog, in the Name box type emphasis . (Must be just like this. Do not capitalize.)
- Select Character in the box for Style Type.
- Click on OK
Apply Character Style
-
 Select the following phrases in the other paragraphs and use the Style box to apply the emphasis style to each of them:
Time , Dangerous
animals , The Sun
Of course, you could have used the Format Painter to apply the characteristics of Weather to the other phrases.
But, by using a character style, you can change the styling of all the
phrases at the same time, by changing the emphasis style itself.
-
Save. [brochure-tahiti5.doc]
How to handle a full disk
Create a Block Quote Style
You will format the final line in Text Box 1 as a block quote. This term refers to text which is indented on both sides, as is done when quoting a section of another document or a poem.
This block quote will have a shaded background. Normally shading applies to the paragraph only. It would look better to have some shading further away than just the top of the tallest letter!
You will use a border method that tricks Word into doing just what you want. By setting a border, you can then set the distance the border is from the text. That setting makes the shading expand until it meets the border. Sneaky! Using a white border
on white paper adds white space around the block quote text. We are getting very smart!
- Place the cursor at the beginning of the last line - Beautiful weather... . Press the ENTER key to create a new blank line above the paragraph.
- Select the entire last line Beautiful weather for beautiful people!
- Use the Font dialog to format as:
Garamond
Italic
13 pt
Condensed by .25 pt
- In the Paragraph dialog:
Alignment = Centered
Line spacing before = 0
Line spacing after = 12 pt
Line spacing at least 12 pt.
- Open Borders and
Shading....:
On the Border tab, set a Box border in white at 3 pt. applied to Paragraph.
- Click on the Options button and set the Distance from text to 12 pt for all 4 sides.
 If you go back and make changes to the settings, you will have to reset the Options distances.
- On the Shading tab, set 5% gray shading to paragraph.
- Click on OK to close the dialog.
-
 With the last
paragraph still selected, using a method used above, create a style
named Block quote .
With the last
paragraph still selected, using a method used above, create a style
named Block quote .
- Drop the
Style list to see your new style on display.
- Save.
How to handle a full disk
Insert and Border an Image
- Move the
cursor to the line below the block quote.
- Select | | on the
menu.
- From the resource files, select the image map-Pacific.gif . The full path to the file is
c:\My Documents\complit101\words\tahiti\map-Pacific.gif.
- Click on the image in the document to select it.
- From the menu select | | .
- Select the Box border with black Âľpt solid line; apply to Picture.
- Click on OK to apply the border.
Remove Lines from Text Boxes
- Change Zoom to .
- Click on the Text Box 1's border.
- Hold the SHIFT key down and click on the border of Text Box 2 and Text Box 3.
This results in all three being selected at the same time. Don't get an
image's border instead!
- Right click on a text box border and select .
- On the tab for Colors and lines, under Line, select Color = No line. Click OK.
- Switch to Print Preview to see how page 1 looks.
- Add a header with your name and the date on the left. On the right type Word Project 3
The header is too close to the paper's edge.
- While viewing the header, drag the top of the white space on the vertical ruler down to make
the Header space about half as tall.
- Check
Print Preview again to verify that the header will print.
-
If all is correct,
save as brochure-tahiti5.doc in the word project3
folder of your Class disk.
How to handle a full disk
 Print page 1 only !