|
Slide Pane
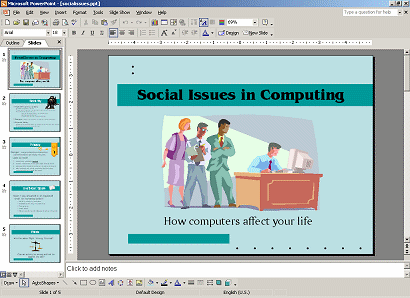
A large version of the selected slide appears in the Slide Pane. You will
do most of your editing and format changes directly on the slide.
What's On A Slide?
Most slides have
placeholders to hold your text. A placeholder is a
special kind of textbox. Only text that is in a placeholder will show up in
the outline in the Navigation Pane. PowerPoint creates placeholders when you
apply a slide layout or a
design template to a slide.
Example Slide Layouts with Placeholders:
What can you do directly on a slide?
- Enter and edit text.
- Insert a picture, chart, table, textbox, or other object.
- Resize or move an object or placeholder.
- Add an AutoShape, with or without its own text.
 |
Step-by-Step: Slide Pane |
 |
What you will learn: |
to select, resize, and move placeholders
to edit text
to save with Save As
|
Start with: , socialissues.ppt
from your Class disk , socialissues.ppt
from your Class disk
Slide Pane: Title Placeholder
AutoFit will change the size of the Title only by 1 size as you resize the
placeholder, from 44 pts. to 40 pts. If the text won't fit in the placeholder,
it will lay outside the placeholder. An odd effect!
-
If
necessary, open the presentation socialissues.ppt
from the Recent Files list.

-
 Select
placeholder: Select
placeholder:
- Click on the title, "Social Issues in Computing". The
placeholder border is displayed with handles at the corners and centers
of the sides for resizing.
What kind of border do you see?
  Border with diagonals = edit the text Border with diagonals = edit the text
Border with dots = move or resize placeholder
- Click the border of the placeholder. The border changes to dots.
Now the placeholder is ready for you to move or resize it.
-
Resize placeholder:
- Move your mouse pointer over one of the handles on the left
side of the placeholder. The pointer
shape changes to one of the Resize shapes
    . .
- Drag inward to make the placeholder smaller. Notice
how the text wrapping and text size change as the placeholder's shape
and size change. The text can go down only 1 step, from 44 pt. to 40
pt., since this is a Title placeholder. As the placeholder gets
smaller, the text will actually be outside the placeholder!
- Drag in various directions with different handles and observe
the changes.
- Move placeholder:
Move your mouse pointer over the placeholder's border. The pointer
changes to the Move shape .
Drag to change the position of the placeholder. .
Drag to change the position of the placeholder.
- Undo all your changes by clicking the Undo button until it is
grayed out.
 Can't Undo enough steps:
If you set the number of Undo steps to remember too low (Tools | Options |
Edit), you may not be able to get back to where you started! For this
lesson, close the presentation and re-open it. Can't Undo enough steps:
If you set the number of Undo steps to remember too low (Tools | Options |
Edit), you may not be able to get back to where you started! For this
lesson, close the presentation and re-open it.
Slide Pane: Text Placeholder
AutoFit will change the text size to make it fit in the placeholder.
-
 Click
in the subtitle text to make the borders of its placeholder appear. Click
in the subtitle text to make the borders of its placeholder appear.
- Move your mouse pointer over the middle handle on the left side
of the placeholder. The pointer turns into a double-headed Resize arrow.
-
 Drag
to the right. As you drag, a dashed line shows where the border
will be if you drop. Drag
to the right. As you drag, a dashed line shows where the border
will be if you drop.
- When the new size is very small, drop.
The text size is changed
so that all the text still shows in the placeholder at its new small size.
- Undo your change.
Slide Pane: Edit Text
It is quite easy to enter and edit text.
-
Click in the title placeholder. The border turns back to
diagonals, ready for your editing.
-
 Delete
the word Social. Delete
the word Social.
Save As
 From
the File menu select . (Be sure your
Class disk is still in the drive.) From
the File menu select . (Be sure your
Class disk is still in the drive.)
- Change the name of the presentation to
issues.ppt and Save to your Class disk.
 Problem:
Deleted Placeholder Problem:
Deleted Placeholder
You deleted a placeholder from a slide and now you want
it back but it is too late to use Undo.
Solution 1- if you want outline text:
Create a replacement slide
with the same slide layout that the slide had originally and then copy and paste
any objects or images to the new slide. Delete the mangled slide
once your new one is complete.
Solution 2- if you do not want outline text:
If you do not need the text to be in the outline, add a plain textbox to
your slide with the Textbox button on the Drawing bar.
|

