
Jan's Working with Presentations
Basics: Interface: Views:
Normal - Navigation Pane - Thumbnails
The Navigation Pane at the left of the PowerPoint window shows thumbnails of the slides by default.
Normal view with Slide Thumbnails

 Navigation Tabs
In PowerPoint 2007 and 2010, you can switch between Outline and Slides by clicking the tab at the top of the Navigation Pane. The tabs will show either words or icons, depending on the size of the window.
|
|
|
![]()
![]() PowerPoint 2013, 2016: No tabs in the Navigation pane. You can switch to Outline view using a button on the View ribbon tab.
PowerPoint 2013, 2016: No tabs in the Navigation pane. You can switch to Outline view using a button on the View ribbon tab.
Slide Thumbnails in Navigation Pane
What can you do with slide thumbnails?
- Select a slide, which will then display in the Slide Pane.
- Change the order of the slides by dragging a thumbnail.
- Select multiple slides to copy, move, or delete.
- Run slide animations
from icon
 .
.
What can you not do with slide thumbnails?
(Use Outline or Slide Pane instead.)
- Edit or format text on slides.
- Change the order of bullet points on slides.
- Move text to a different slide.
| |
Step-by-Step: Slide Thumbnails |
|
| What you will learn: | to change which slide is shown in the Slide Pane to run animation to change order of slides to switch to Outline view to save |
Start with:![]() , issues-Lastname-Firstname.pptx from your Class disk
, issues-Lastname-Firstname.pptx from your Class disk
Slides: Switch Slide Shown in Slide Pane
-
 If necessary, open issues-Lastname-Firstname.pptx again.
(It should be in a Recent Files list.)
-
PowerPoint 2007, 2010:
If necessary, click on the Slides tab in the Navigation Pane to show the thumbnails of slides.
- Click on each of the slide thumbnails in turn.
The Slide Pane changes to match. Easy navigation!
- Click on the Slide #1 again.
Slides: Run Animation
-
 Click on the animation icon below the number 1 beside the thumbnail of Slide #1.
In the Slide Pane to the right, the custom animation plays - Subtitle moves onto the screen from below.
-
Repeat for each slide:
Click on the animation icon and observe the motion in the Slide Pane.In this presentation, all of the animations are different so you can see different types. That is actually bad design!
Slides: Change Slide Order: Drag
-
 Click on the thumbnail of Slide #3: Privacy.
A highlight surrounds the thumbnail and the slide is shown in the Slide Pane. - Drag the thumbnail up.
PowerPoint 2007, 2010: A line between thumbnails shows where
the slide will be positioned if you drop.

 PowerPoint 2013, 2016: The thumbnail moves and the others rearrange as you drag. Cool animation!
-
Drop Slide #3: Privacy between slides 1 and 2.
Position line shows where
thumbnail will be if dropped
Privacy is now Slide #2
instead of #3
The slides are now in a new order. Privacy is now slide #2. - Undo your change.
Switch to Outline
- Show the outline:
PowerPoint 2007, 2010: In the Navigation Pane, click on the Outline tab
 PowerPoint 2013, 2016: On the View ribbon tab, click on the Outline View button.
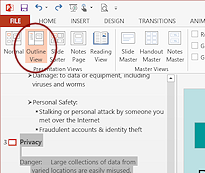
The view in the pane changes to show the outline of the presentation.
The left pane widens to show more of the outline text. The current slide may be highlighted in the outline.
In the next lesson you will learn what you can do with this outline view.
Save
- Undo to return the slide Privacy to the slide #3 slot again.
-
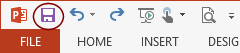
 In
the Quick Access Toolbar
at the top left of the PowerPoint window, click on
In
the Quick Access Toolbar
at the top left of the PowerPoint window, click on 

 the Save
button.
the Save
button.

The presentation is saved with the same name, to the same location. This lesson did not have you make any changes unless you had to correct an error.
[issues-Lastname-Firstname.pptx]
|
|
| © 1997-2017 Jan Smith All Rights Reserved |
Site Map What's New |
Privacy Policy Terms of Service Copyright Acknowledgements |
~~ 1 Cor. 10:31 ...whatever you do, do it all for the glory of God. ~~
Last updated: March 22, 2017