
Jan's Working with Presentations
Basics: Interface: Views:
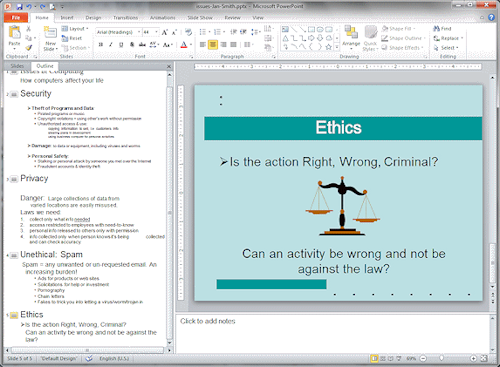
Normal - Navigation Pane - Outline
The Navigation Pane at the left of the PowerPoint window shows thumbnails of the Slides or the Outline.
|
Normal view with Thumbnails |
Normal view with Outline |

Outline in Navigation Pane
What can you do with the outline?
- Select a slide, which will then display in the Slide Pane.
- Change the order of the slides by dragging the slide's icon
 .
. - Select multiple slides to copy, move, or delete.
- Edit and format slide text.
- Change the order of bullet points.
- Move text between slides.
What can't you do with the outline?
(Use Slides Thumbnails instead)
- Run animations and transitions.

 Navigation Tabs
In PowerPoint 2007 and 2010, you can switch between Outline and Slides by clicking the tab at the top of the Navigation Pane. The tabs will show either words or icons, depending on the size of the window.
|
|
|
| |
Step-by-Step: Outline |
|
| What you will learn: | to change which slide is shown in the Slide Pane to expand and collapse the outline to show and hide formatting in the outline to edit in the outline to change slide order |
Start with:![]() , issues-Lastname-Firstname.pptx from your Class disk
, issues-Lastname-Firstname.pptx from your Class disk
Outline: Switch Slide, Collapse and Expand
-
If necessary, open issues-Lastname-Firstname.pptx again
-
Show Outline:
PowerPoint 2007, 2010: Click on the Outline tab in the Navigation Pane.

 PowerPoint 2013, 2016: On the View ribbon tab, click on the Outline View button.
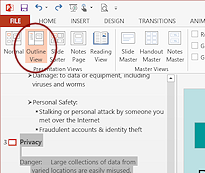
The outline displays, usually with all levels expanded. The panes resize to show more of the left pane that shows the outline.
 Experiment: Outline Pane
- Show different slides in the Slide Pane by clicking in the outline on:
- Slide icon

- Slide title
- Slide text
- Slide icon
- Expand and collapse the outline by:
- Double click a slide icon in the outline
 Right click a slide icon or text in the outline and then click on Collapse All or Expand All
- Right click a slide icon or text in the outline and then click on Collapse or Expand
- Show different slides in the Slide Pane by clicking in the outline on:
Outline: Show Formatting
The look of the text in the outline is not related to the formatting on the slides. All outline text is black by default. PowerPoint picks the font sizes so that all of the outline is readable.
You can chose to show the outline text with the text formatted as in the slides.
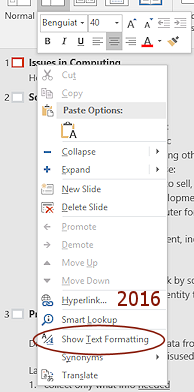
![]() Show Formatting: Toggles the outline's formatting
between using most of the formatting used on the slides.
The font color will still be black!
Show Formatting: Toggles the outline's formatting
between using most of the formatting used on the slides.
The font color will still be black!
-
 Right
click on the outline.
Right
click on the outline.
The context menu appears.
-
Look at
 the Show Text Formatting command.
Does the command's icon have a colored background or border

 ?
Then that feature is currently ON.
?
Then that feature is currently ON.
If it is not on, click the command, Show Text Formatting, to turn this feature on.This is an example of a toggle button or menu item: Click to turn the feature on. The menu closes. Open the menu again and click on the command to turn it off.
 Do you see
any formatting in the outline? Slide 1 has a different font from the
rest of the slide titles.
Do you see
any formatting in the outline? Slide 1 has a different font from the
rest of the slide titles.Sometimes the formatting used on the slide itself makes the outline hard to read or unnecessarily large. The default outline formatting is always readable!
- Experiment: Fonts in Outline
- Show the slide of your choice in the Slide Pane.
- Be sure Show Text Formatting is on.
- Select the title and change the font.
Is your choice easy to read in the Outline? Does the title in the outline appear on the screen as the same size it does in the Slide Pane? - Resize PowerPoint's window larger and also smaller.
What happens to the title in the Slide Pane and in the Outline? - Try several different fonts and font sizes and font colors.
- Use Undo to return your title to its original state, or close without saving and reopen.
[issues-Lastname-Firstname.pptx]
Outline: Edit Directly in Outline
The last slide, Ethics, will be used to open a discussion period with the audience. You need to change the title to reflect this. You will make a few other editing changes, also.
-
 Save
As issues2-Lastname-Firstname.pptx in
the powerpoint project1 folder on your
Class disk.
Save
As issues2-Lastname-Firstname.pptx in
the powerpoint project1 folder on your
Class disk.In these lessons you will be saving your work under different names. This makes it easier to turn in work to your teacher along the way and to recover from a disaster!
-
 Scroll, if necessary, until you can see Slide #5: Ethics in the Outline tab.
- Click on the outline for Slide #5: Ethics.
The slide appears in the Slide Pane.
-
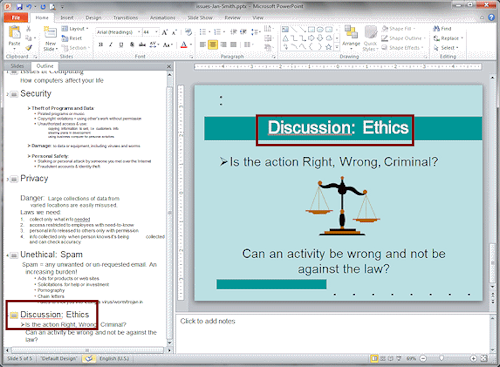 In the outline (NOT on the slide), click in front of the slide title
"Ethics" and type so that the full title is: Discussion: Ethics
In the outline (NOT on the slide), click in front of the slide title
"Ethics" and type so that the full title is: Discussion: EthicsThe slide changes as you type in the outline.
-
 Select
a whole line:
Select
a whole line:
Click in the outline to the left of the bulleted line "Is the action Right, Wrong, Criminal?"
The whole line is selected.
-
 Delete
line:
Delete
line:
Press the DELETE key.
The line vanishes and the other line of text moves up in the outline and on the slide in the placeholder.There is an extra space to the left of "Can" since the bullet symbol is gone.
-
 Delete
space:
Delete
space:
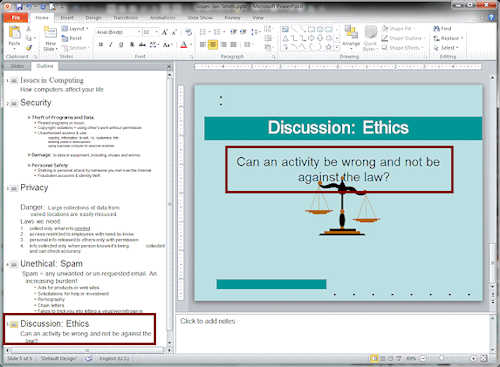
Press the DELETE key to delete the leading space.
 Looks good in the outline now. But part of the text is under the image.
You cannot fix this from the outline.
Looks good in the outline now. But part of the text is under the image.
You cannot fix this from the outline. -
 Click
on the slide in the text "Can an activity...".
Click
on the slide in the text "Can an activity...".The placeholder border appears with dashed borders. The text is underneath the image, making it harder to read.
-
 Move
placeholder: Move your mouse pointer over the border of the placeholder
and drag upwards.
Move
placeholder: Move your mouse pointer over the border of the placeholder
and drag upwards.The border changes to dots. A dashed line shows where the placeholder will be if you drop.
-
 Drop when the dashed line is at the edge of the colored bar with the title.
The placeholder moves up and the text and image no longer get in each other's way.
-
Click in the blank area at the bottom of the outline to hide the placeholder border again.
The slide's looks a bit unbalanced (pardon the expression!) but it's OK for now.
-
Save.
[issues2-Lastname-Firstname.pptx]
Outline: Change Text Order with Drag
You can drag text in the outline to a new location on the same slide or on a different slide. If the slides are not neighbors, you might find cut and paste easier.
-
 Scroll, if necessary, to see Slide #3: Privacy in the Outline.
- Select item #4, "info collected only ..." by clicking at the
left of the text.
-
 Drag upward and drop at the beginning of item #2.
 The item is moved and the list is renumbered.
- Save.
[issues2-Lastname-Firstname.pptx]
Outline: Change Slide Order with Drag
You can change the order of slides in the outline as well as from the Slides thumbnails. Usually this is easier if you collapse the outline first. Dropping a slide in the middle of another slide's outline can make a mess of your perfectly logical outline!
A gray drop line shows where what you are dragging will be dropped.
 With
the outline still expanded, click on the icon for Slide #3: Privacy. All of the outline text for
that slide is selected.
With
the outline still expanded, click on the icon for Slide #3: Privacy. All of the outline text for
that slide is selected.Drag up until the drop line is in the slide Security, just above the line "Damage: to data or equipment, including viruses and worms."
-
 Drop.
Drop.
Whoops. The outline points on the Security slide below the drop point are now on the Privacy slide! Error!! - Undo your move.
Dragging while all the points are showing can mess up your slides!
-
 Collapse the outline with the Collapse All command on the right click menu.
-
 Drag the slide icon for Privacy up above Security and drop. Ah! The slides are
in a new order.
Drag the slide icon for Privacy up above Security and drop. Ah! The slides are
in a new order.
- Expand the outline again by clicking
 the Expand All command on
the right click menu.
Excellent! The text on each slide remained in place.
the Expand All command on
the right click menu.
Excellent! The text on each slide remained in place.
- Undo your move.
- Save.
[issues2-Lastname-Firstname.pptx]
|
|
| © 1997-2017 Jan Smith All Rights Reserved |
Site Map What's New |
Privacy Policy Terms of Service Copyright Acknowledgements |
~~ 1 Cor. 10:31 ...whatever you do, do it all for the glory of God. ~~
Last updated: March 22, 2017