
Jan's Working with Presentations
Basics: Interface: Views: Print Preview
You have a number of choices to make if you want to print your presentation. Happily, you can preview before printing.
Print Preview in PowerPoint is a bit different from the preview in other programs. You must choose a print layout from several possibilities.
![]() PowerPoint 2007: Print Preview shows in the
editing window with a toolbar at the top for your options.
PowerPoint 2007: Print Preview shows in the
editing window with a toolbar at the top for your options.
![]()
![]()
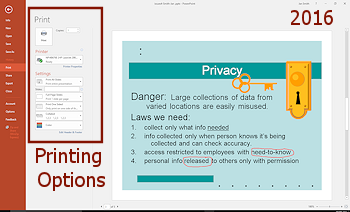
![]() PowerPoint 2010, 2013, 2016: Print Preview is part of the
BackStage View on the File ribbon tab. The preview is at the right with
controls for your options in the middle panel.
PowerPoint 2010, 2013, 2016: Print Preview is part of the
BackStage View on the File ribbon tab. The preview is at the right with
controls for your options in the middle panel.
Print Layout Examples
Slides |
Handouts- 1 slide per page |
Handouts - 2 slides per page |
Handouts- 3 slides per page |
Handouts- 4 slides per page |
Handouts- 6 slides per page |
Handouts- 9 slides per page |
Notes
Pages |
Outline |
What can you do in Print Preview?
-
Pick a print layout.
-
Pick paper orientation
-
Choose Options:
-
Print in color, gray scale, or black and white.
-
Create header/footer just for printing.
-
Scale slide images to fit paper.
-
Frame slides with a border, or not.
-
Print hidden slides.
-
Include comment pages and ink markup.
-
Print slides going across the page or down the page (for layouts with 4 or more slides).
-
-
Check printouts for readability after you made choices and before you print!
![]() Warning: Default is to print each slide as a full page image!
Warning: Default is to print each slide as a full page image!
It is more important in PowerPoint than in other programs to ALWAYS check Print Preview before printing. It wastes a lot of paper and ink or toner to print each slide as a full page. This layout is rarely useful and should NOT be the default. (Are you listening, Microsoft?)
| |
Step-by-Step: Print Preview |
|
| What you will learn: | to switch to Print Preview to select a print layout |
Start with:![]() , issues4-Lastname-Firstname.pptx from your Class disk
, issues4-Lastname-Firstname.pptx from your Class disk
Switch to Print Preview
- If necessary, open issues4-Lastname-Firstname.pptx to Normal view.
- Select the first slide.
-
Click the Print Preview button


 on the Quick Access Toolbar.
Print Preview opens with the default print layout, one slide per page, taking up a whole page.
 Problem:
Print Preview button is not on the Quick Access Toolbar
Problem:
Print Preview button is not on the Quick Access Toolbar
This button is not on the QAT by default, but we added it earlier in the lessons.
Solution: Click the arrow at the right of the Quick Access Toolbar and click on Print Preview and Print to add the button.
Print Preview: Print Layout
For no obvious reason, the default layout prints each slide on a full sheet of paper. What a waste of ink and paper and time! You will want to select something different!
-
Open a list of layouts:
 PowerPoint 2007: Click on the arrow at the right end of the Print what: control
on the toolbar at the top, which says Slides.
PowerPoint 2007: Click on the arrow at the right end of the Print what: control
on the toolbar at the top, which says Slides.Click on Handouts (6 slides Per Page)


 PowerPoint 2010, 2013, 2016:
In the middle pane, click on the arrow at the right end of the control that shows Full Page Slides.
A list of print layouts displays.Click on Handouts (6 Slides Horizontal).

The preview changes. This layout is a good combination to save paper and ink but have a slide that is large enough to read on paper.
 Experiment: Print Preview
- Select each of the layout choices to see how they are different.
- Try out each of the other options in print preview.
You will not actually print just yet. There are a lot of choices that might be important. You will learn more about controlling your printouts in the lessons in the Printing section. You will print part of this presentation in that lesson.
Return to Normal view:
 PowerPoint 2007: Click the Close Print Preview button on the toolbar.
PowerPoint 2010: Click the Home tab. PowerPoint 2013, 2016: Click the Back arrow at the top left of the window.
You made no changes that need to be saved this time.
|
|
| © 1997-2017 Jan Smith All Rights Reserved |
Site Map What's New |
Privacy Policy Terms of Service Copyright Acknowledgements |
~~ 1 Cor. 10:31 ...whatever you do, do it all for the glory of God. ~~
Last updated: March 22, 2017