Controlling a Slide Show
When you are using your slides to illustrate a speech, you probably want
the slides to change only when you tell them to! You DO want the slide to
match what you are saying, right?
With Remote Control
Your projector should have a remote control, which will let you move
around as you speak and still control the presentation. Practice with it
beforehand!
With Keyboard
While a slide show is running, you can use keyboard shortcuts to control
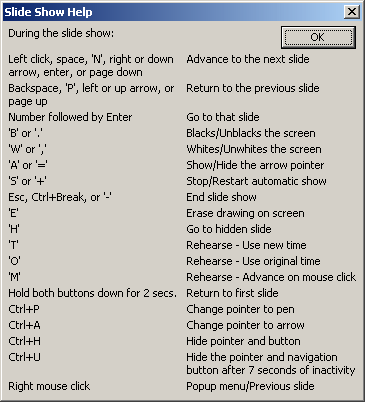
the presentation. Pressing the F1 key brings up the Slide
Show Help, shown below. This shows all the ways to control the show with the
mouse and keyboard. Of course, you don't want to show this list to your
audience!
With the Mouse
  There
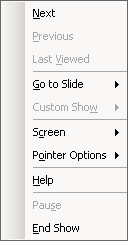
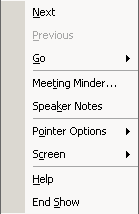
is an onscreen menu for controlling your presentation when you don't know
the shortcuts. When you move the mouse around on the screen, controls
appear, or, you can right click anywhere on the screen to make the menu appear. The menu includes commands for navigating to specific slides, for showing
the Notes, for
changing the mouse pointer to one that you can draw with, for blanking out
the screen, and for ending the show. There
is an onscreen menu for controlling your presentation when you don't know
the shortcuts. When you move the mouse around on the screen, controls
appear, or, you can right click anywhere on the screen to make the menu appear. The menu includes commands for navigating to specific slides, for showing
the Notes, for
changing the mouse pointer to one that you can draw with, for blanking out
the screen, and for ending the show.
Onscreen Controls:
  Clicking the onscreen arrow
 makes the menu appear. The icon to the left of the arrow
 is just a transparent PowerPoint 2002 icon. It does not do anything.
 
 Makes the menu appear.
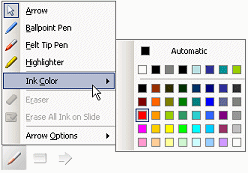  Opens a menu of choices for the pointer
  Move forward and backward through the slides.
Getting Back to the Browser from Slide Show
The Slide Show View will cover the whole screen. You will not be able to see
the Windows Taskbar to switch to a different window. You can use ALT + TAB to
get to the other windows on your computer, like this one with your directions!
There will be two icons for PowerPoint and at least one for Internet
Explorer-

 PowerPoint slide show PowerPoint slide show

 PowerPoint editing window
 Internet Explorer Internet Explorer
 Quick switch: A quick ALT + TAB toggles between the current window and the last one you
viewed. Quick switch: A quick ALT + TAB toggles between the current window and the last one you
viewed.
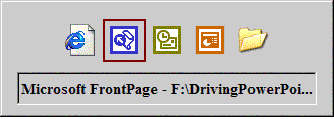  List of
open windows: List of
open windows:
Hold the ALT key down, press the TAB
key once, and keep holding down the ALT key. A list of icons for
the open windows will stay in view as long as you keep the ALT key pressed down.
Now when you press the TAB key, the selection will move through the list of icons. When
you get to the icon for the window that you want to see, release the ALT key and that window will appear.
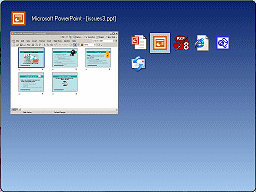 In WinXP
this list looks lot different if you have the WinXP PowerToys installed. You
get a small preview of the currently selected application. Very helpful when
you have several windows open for the same program. In WinXP
this list looks lot different if you have the WinXP PowerToys installed. You
get a small preview of the currently selected application. Very helpful when
you have several windows open for the same program.
WinXP
PowerToys

 |
Step-by-Step: Slide Show |
 |
What you will learn: |
to switch to Slide Show view
to run a presentation as a slide show
to use the mouse to manage the show
to use the keyboard to manage the show
to use the onscreen menu
to view and write notes during the show
to write on screen during the show
to stop a slide show
|
Start with: ,
issues.ppt
from your Class disk ,
issues.ppt
from your Class disk
Switch to Slide Show View
- With issues.ppt open in PowerPoint, click
on the first slide to select it.
-
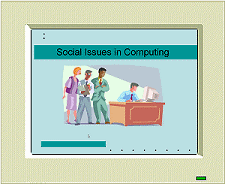 Click
on Click
on  the
Slide Show button on the Views bar. The presentations opens full screen,
starting with the selected slide. the
Slide Show button on the Views bar. The presentations opens full screen,
starting with the selected slide.
Nothing will happen until you tell it to!
- Use ALT + TAB to switch back and forth between the Slide Show
and your other open window(s) a few times for practice.
Slide Show View: Run with Mouse
It will take a series of mouse clicks to work through this presentation.
The slides are set up as examples of different kinds of animations. It is NOT a good idea to do this except as an example!
- In the Slide Show, click on the slide. The subtitle flies into view from the
bottom.
- Click again. Slide #2: Security
appears, but shows only the title for a moment. Then the rest of the text
is revealed automatically with different animations, one part at a time.
- Click again. Slide #3: Privacy appears
with just the title. This time the other parts won't appear until you
click.
- Click on the slide to reveal each part of Privacy. (6 clicks)
 Evaluate: Which way will
work better to accompany a speech? Automatic reveals or clicking to
show the next part? Evaluate: Which way will
work better to accompany a speech? Automatic reveals or clicking to
show the next part?
- Click again to show the next slide,
Unethical: Spam.
- Click and all of the text for this slide is revealed at once.
 Evaluate: Will revealing all text at once work well when accompanying
a speech? Evaluate: Will revealing all text at once work well when accompanying
a speech?
- Click to show the next slide: Discussion:
Ethics.
- Click to show the last line of text.
- Click again and the end-of-show black screen appears.
- Click once more to get back to PowerPoint's editing
interface. Whew!
Slide Show View: Control with Keyboard
You can use the keyboard to advance through the slides or to back up or to
jump around.
When the slides are a distraction, you can turn the screen black or white
with a key combo.
| Action |
Key(s) |
| Show first slide |
Home |
| Show last slide |
End |
| Advance one step |
Page Up
Up arrow
Right arrow
N (for Next)
space
ENTER |
| Back up one step |
Page Down
Down arrow
Left arrow
P (for Previous)
BACKSPACE |
| Jump to slide |
# of slide and press ENTER |
| Whites/unwhites screen |
W
, (comma) |
| Blacks/unblacks screen |
B
. (period) |
| Stop presentation and return to
PowerPoint |
ESC
CTRL + BREAK
- (hyphen) |
- From the menu select |, another way to run your presentation full screen.
 Practice using the various navigation keys from the table above.
- Starting and stopping the slideshow.
- Jumping to first slide, last slide, particular number slide.
- Advancing.
- Backing up.
- Whiting out and blacking out the screen.
- Close the Slide Show and return to PowerPoint.
Slide Show View: OnScreen Controls
If you would rather use a mouse, or you cannot remember the keyboard
shortcuts, there is an onscreen menu.
- From the menu select |. (Yet another way to run a
presentation!)
OR
 Press the F5 key. A really short shortcut!
- Move your mouse around on the screen.
The onscreen controls appear.
 or or

-
  Click
on the up arrow or the menu button and a menu appears. Click
on the up arrow or the menu button and a menu appears.
- Experiment by trying out the various navigation commands.
The Go/Go to Slide menu lists the slides by title.
-
 Switch,
if necessary, to the Security slide. Switch,
if necessary, to the Security slide.
-
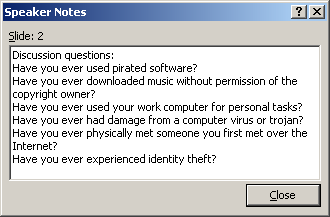
Open the onscreen menu again and
click on A
window opens that shows the notes you added earlier in the Notes Page
View.
-
Above the last item in the Speaker Notes, type a new question:
Have you ever physically met someone you first met
over the Internet?
Slide Show View: Write Onscreen
While you are speaking, you may sometimes need to point to something on
the screen. You could use a laser pointer, but it is hard to hold the light
steady and sometimes the light does not show well. It would be handy to be
able to draw an arrow or a circle or some such on the slide itself. You can!
And it erases cleanly so your slide is not changed.
You will need to change your mouse pointer to a Pen and pick a Pen color
that will show well on the slide.
- Open the Slide Show to the Privacy
slide.
-
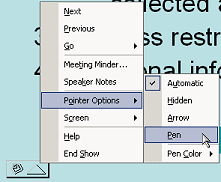  Open
the onscreen menu and select and then . The
mouse pointer changes to Open
the onscreen menu and select and then . The
mouse pointer changes to
 a pen
shape. (Looks more like a pencil to me!) a pen
shape. (Looks more like a pencil to me!)
 Click the Pen button
 and select a Pen type - ballpoint, felt, or highlighter.
- Drag around on the slide. Whoa! Your pen make marks as long as
you hold the left mouse button down.
The default black color is the same as the text. Your audience won't get
much benefit with this color.
-
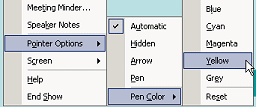  Open the onscreen menu and select:|| Open the onscreen menu and select:||
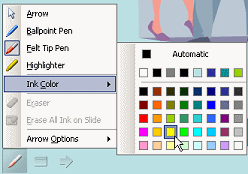  Click the Pointer button, select Ink Color. Click on
Yellow in the color palette.
-
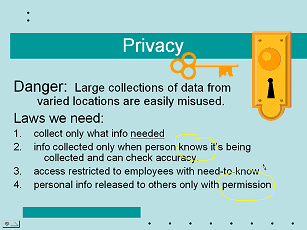 Draw a
circle around the word knows in item #2 and the word permission in line #4. Draw a
circle around the word knows in item #2 and the word permission in line #4.
When you leave this slide your marks are erased. But what if you want to
erase them but stay on this slide?
-
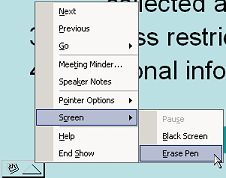  Open
the onscreen menu and select
| . Your marks are erased,
but the pointer is still a pen shape. Open
the onscreen menu and select
| . Your marks are erased,
but the pointer is still a pen shape.
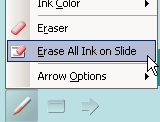  Open the Pointer menu and select
Erase all ink on slide.
-
Experiment with different colors and with trying to draw different
shapes or emphasize specific words or phrases. It gets easier with
practice!
-
With the pointer still in the Pen shape, click on the slide
to change to the next slide.
Whoops! Nothing happens. While the pointer is
in this shape, all it can do is draw! Never fear there is a way.
-
Press the space bar. The next slide appears. TaDa!
-
Change the pointer shape back to the arrow using the onscreen menu:
 || ||
 Click Pointer button and select Arrow.
-
Close the Slide Show using the onscreen menu command
.
-
Switch to Normal view, if necessary.
Save
You added some notes so you need to save your presentation.
 Click Click
 the Save button
on the toolbar to save the presentation with the same name and the same
location. [issues.ppt] (Be sure your
Class disk is still in the drive.) the Save button
on the toolbar to save the presentation with the same name and the same
location. [issues.ppt] (Be sure your
Class disk is still in the drive.)
 How to handle a full Class disk
|

