|
Step-by-Step: Edit and Convert Image
|
|
| What you will learn: |
what FrontPage does with images in non-web formats
to change image format to GIF
to make a color transparent |
Start with:
 ,
hector12.htm, resource files
,
hector12.htm, resource files
You will insert a TGA format image with a gray
background. Then you will make the background transparent.
[Look carefully at the illustrations. Some are of your
page in FrontPage and some are of the page in IE.]
Insert Image in Non-web Format
- Open the page hector12.htm from the
web hector on your Class disk.
-
Save the page as hector16.htm to the
web hector on your Class disk.
- Place the cursor at the beginning of the page (CTRL + HOME).
-
Insert the image hchavez.tga that is on
your Class disk in the web
hector. Note that this is not a gif or
jpg format.
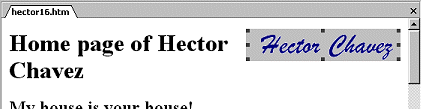
- Switch to HTML view and look at the IMG tag.
<h1><img border="0"
src="hchavez.tga"
width="206"
height="43">Home
The SRC is using the original filename.
- Switch to Normal view.
-
 Right
click on the new image and select .
Right
click on the new image and select .
- Set the Alignment to Right. Click on OK to close the
dialog.
-
Save. [hector16.htm]
-
 Switch
to Preview. Whoops! The image is not showing at all. That is because
Internet Explorer does not understand files in tga
format. FrontPage did not convert this image when you saved the page.
Double whoops!
Switch
to Preview. Whoops! The image is not showing at all. That is because
Internet Explorer does not understand files in tga
format. FrontPage did not convert this image when you saved the page.
Double whoops!
You need an image in a different format.
 ALWAYS check how your
page looks in Preview and even in a regular browser window to be sure all
is well.
ALWAYS check how your
page looks in Preview and even in a regular browser window to be sure all
is well.
Change Format to GIF
FrontPage can convert any image it accepts to either GIF or JPEG
format.
- Switch back to Normal view.
- Right click on the image and choose and click on the General tab.
-
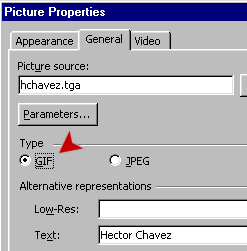 Choose
below the filename textbox GIF.
Choose
below the filename textbox GIF.
- In the textbox for Alternate Representations: Text, type
Hector Chavez . This is the text that will
show on the web page in place of the actual image before the image is
loaded.
- Click on OK to close the dialog.
 Did
the image pop back over to the left? In FrontPage 2002, when you open
the Picture Properties dialog, the alignment is reset to None. You
needed to select Right before you closed the dialog. This is a
very annoying 'feature'.
Did
the image pop back over to the left? In FrontPage 2002, when you open
the Picture Properties dialog, the alignment is reset to None. You
needed to select Right before you closed the dialog. This is a
very annoying 'feature'.
 Open Picture Properties with the key combo ALT + ENTER while the
image is selected.
Open Picture Properties with the key combo ALT + ENTER while the
image is selected.
[Learn this key combo. It is much easier than the right click menu!]
- If necessary, set the alignment to Right.
-
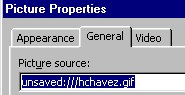 Click
on the General tab and look at the Picture source:
unsaved:///hchavez.gif . Your new image has
not been saved yet. That won't happen until you save the page.
Click
on the General tab and look at the Picture source:
unsaved:///hchavez.gif . Your new image has
not been saved yet. That won't happen until you save the page.
- Close the Picture Properties dialog.
- Save
the page. [hector16.htm]
The Save Embedded Files dialog shows hchavez.gif
with the action Save. If your floppy already has a file with this name,
the dialog will show Overwrite instead of Save.
There are some choices you could make in Picture Options, but the
defaults are fine this time.
- Click on OK.
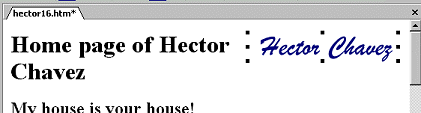
Transparent GIFs
The GIF image of Hector's signature has a gray
background, which is a problem unless the page itself has a gray
background. One of the features of GIF images is that you can pick one
color to be transparent. Such an image lets the background show through
instead of the selected color.
-
 With
hector16.htm is still in view, click on
the image of Hector's signature to select it. The Pictures toolbar
appears, either as a floating toolbar or else as docked at an edge of
the window.
With
hector16.htm is still in view, click on
the image of Hector's signature to select it. The Pictures toolbar
appears, either as a floating toolbar or else as docked at an edge of
the window.
- Click on
 the Transparent Color wand on the Pictures toolbar and move it over the
image. The pointer changed shape to the eraser end of a pencil.
the Transparent Color wand on the Pictures toolbar and move it over the
image. The pointer changed shape to the eraser end of a pencil.
-
 Click
on the gray background of the image. The gray disappears!
Click
on the gray background of the image. The gray disappears!
-
 Save. [hector16.htm] The Save Embedded
Files dialog appears again, with Overwrite for
hchavez.gif. This is correct since you want to change a feature
of the image (transparent color). So, choose OK.
Save. [hector16.htm] The Save Embedded
Files dialog appears again, with Overwrite for
hchavez.gif. This is correct since you want to change a feature
of the image (transparent color). So, choose OK.
- Close hector16.htm
Problem: Changes Don't Show
Sometimes FrontPage does not refresh the display correctly after you
change the source of an image. Your new image uses the old dimensions.
Could be a mess! Even if you click
 the
Refresh button, FrontPage may use the image in the cache instead of
looking for a fresh version. Usually the Preview will show the
correct image and page layout, but even that view can be incorrect.
<sigh!>
the
Refresh button, FrontPage may use the image in the cache instead of
looking for a fresh version. Usually the Preview will show the
correct image and page layout, but even that view can be incorrect.
<sigh!>
Solution Steps:
- Switch to Preview. If it looks right there, don't worry
about Normal view being off.
- Wrong in Preview: Switch back to Normal and open Picture
Properties. Be sure that the Specify Size box is not checked. Look at
the Preview again.
- If it is still wrong, save the page and open it with an actual
browser. | If it is right in the browser, all is
well.
- If it is still wrong, go back to HTML view and delete the
dimensions from the actual code. Save the page again. This should make
FrontPage reset the dimensions to the actual height and width of the
current image. Check in the browser again!
Problem: Changes Outside FrontPage
If you rename or move a file or make changes to it with another program
while FrontPage has the web open, FrontPage may not know what you
did. It is common to edit images, for example, while the web is open
in FrontPage. So awkward otherwise.
Solution: Refresh the Folder List by selecting a file in it
and clicking
the
Refresh button. Then select the open page on the right that contains the
image and refresh it, too.
You
can press the F5 key instead of clicking the Refresh button.
 Edit/Convert Image