You already used the Transparent Color button, in the
previous lesson. Now you can use and experiment with the other buttons on
the Pictures Bar.
Depending on your choice, adding an effect to a picture
with the Pictures Bar tools may add extra images to your site and extra code
to your pages. If the amount of web space used is an issue, you will do
better to create the graphics yourself. Or, let FrontPage create the graphic
and then you replace the old image with the new one.

|
Step-by-Step: Pictures Bar Effects
|
|
| What you will learn: |
to use the buttons on the Pictures Bar -
Add Text
Auto Thumbnail
Position, Bring Forward, Send Backward,
Rotate Left, Rotate Right, Mirror, Flip
Change contrast and lightness
Crop
Transparent Color (previous lesson)
Change color to gray scale or fade
Bevel
Resample
Restore |
Start with:
 , web
hector, a blank document in FrontPage
, web
hector, a blank document in FrontPage
 It's
time to experiment! (Another word for "have fun"!!) What do all those
buttons do? In the next steps you will play around with your images.
It's
time to experiment! (Another word for "have fun"!!) What do all those
buttons do? In the next steps you will play around with your images.
- Open a new blank page.
- Insert the large photo of Carla and Hector,
carla.jpg.
 Crop:
Crop:
To crop an image means to cut off part of it,
reducing its size.
- Click on the image of Carla to select it.
- Click on
the
Crop button. A square of dashed lines appears. This outlines the
part of the image that will be left if you crop now.
- Move the mouse pointer over the photo. The pointer changes to
 the Precision
Select shape.
the Precision
Select shape.
- Drag to draw a new square around Carla's head.
-
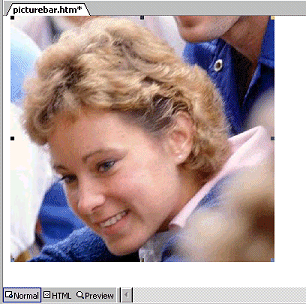 Click
on the
Crop button again. All that is left is Carla. Bye bye, Hector!
Click
on the
Crop button again. All that is left is Carla. Bye bye, Hector!
- Save
the page as picturebar.htm to your
hector web.
When the Save Embedded Files dialog appears, change the name of
the image to carla-cropped.jpg. If you don't
change the name, you will overwrite the original file!
 Resample:
To actually reduce the file size of a resized image you must resample
the image.
 Once saved, you
can not enlarge a resampled image back to the original size. Information
has been thrown out and cannot be recovered. Keep a separate copy of the
original.
Once saved, you
can not enlarge a resampled image back to the original size. Information
has been thrown out and cannot be recovered. Keep a separate copy of the
original.
-
 Select
the photo and open the Picture Properties.
Select
the photo and open the Picture Properties.
- Resize the image by changing the width to 150 pixels, with
the Keep aspect ratio box checked. The correct height is
automatically calculated. Close the dialog.
The image is resized smaller.
- Click
the
Resample button on the Pictures bar. A new version of the image is
created at this smaller size.
- Save.
[picturebar.htm] In the Save Embedded Files dialog, rename
the image as carla-resampled.jpg so that you
won't overwrite the cropped image.
Experiment: Effects Buttons


- Select the photo and click on one of these buttons to
see the effect. Restore the image to its last saved state by clicking
the Restore button.
- Check out all these buttons. When you're done, be sure the image is restored to
it's resampled condition.
 Add Text (to photo itself):
You can add some text and change the font, its color, and its size
using the Formatting bar. You cannot color the background behind the text.
For some images, text will be hard to read no matter where you put it or
what color you use.
- Select the cropped photo of Carla. The Pictures bar appears.
- Click on
the Add Text button. A message warns you that the image must be
converted to GIF format to add text to it. Click on OK.
- Drag on the photo to create a textbox.
- Type Carla . The text will appear
in black Times New Roman. It's hard to read on the darker parts of the
picture.
-
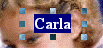 Click
in the textbox and drag across the word Carla.
Click
in the textbox and drag across the word Carla.
- From the formatting bar, open the Font Color palette and
select White.
-
 Drag
the textbox to the upper right corner. Click off the photo to
deselect the textbox. Is it easier to read now?
Drag
the textbox to the upper right corner. Click off the photo to
deselect the textbox. Is it easier to read now?
- Save.
[picturebar.htm] In the Save Embedded Files dialog, rename the
picture as carla-text.gif.
When FrontPage saves this picture, it creates yet another picture in a
new folder _derived. The new picture has Carla
and the text in one image,
picturebar.htm_txt_carla-text.gif. FrontPage leaves the picture
carla-text.gif where you put it, but the SRC is
changed to point to the new combined picture.
Example of added WEBBOT code
When FrontPage applies a special effect to an image, it usually inserts
some special code in the HTML. As an example, let's look at the code that
was applied to Carla's picture. It looks like quite a mess!
<span style="position:
absolute; left: 158; top: 8">
<img border="0"
src="_derived/picturebar.htm_txt_carla-text.gif"
width="150"
height="139"></span>
Here are the new parts:
- SPAN tag with STYLE attribute:
<span style="position: absolute; left: 158;
top: 8">
Contains the instructions for the absolute positioning of the picture on
the page using CSS. The distances are in pixels and are measured from
the left and top of the page.
- WEBBOT tag:
Contains instructions to FrontPage about creating
the combined picture - Carla with the text. It is in a comment tag and a
browser will ignore it.
- SRC attribute of the IMG tag:
src="_derived/picturebar.htm_txt_carla-text.gif"
Changed to the new image that FrontPage created in the new
folder _derived. This image combines the text
and the original image into a single new image.
 Positioning
FrontPage can create the CSS style you need to position an image in a
specific spot on the page, called absolute position.
This allows several images to overlap each other. You can manage the
stacking of the images with Bring Forward and Send Back.
In some browsers
absolute positioning may fail to do what you expect. If you use this
feature, be sure to check the page in all the browsers you expect your
viewers to be using.
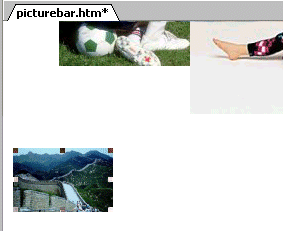
- Insert ricardo2.jpg and
rosa2.jpg on your page [picturebar.htm] somewhere.
- Select ricardo2.jpg and click
 the
Position Absolutely button. Do you see a difference? Probably not
yet.
the
Position Absolutely button. Do you see a difference? Probably not
yet.
- Drag ricardo2.jpg. Aha! The image
is floating across the page. Drop the image near the center of the page.
-
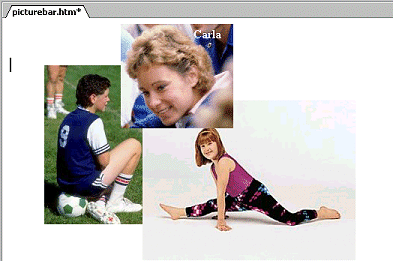 Repeat
for Rosa's photo and Carla's, letting them overlap Ricardo's photo.
Repeat
for Rosa's photo and Carla's, letting them overlap Ricardo's photo.
- Experiment with
 the Bring Forward and
 Send Backward buttons to see how you can change the layering.
 Auto Thumbnail
When you have a really large image, you may want to show a small
version first and have a link to a large version. That gives the viewer
the choice. The Thumbnail button automates the process of creating a
thumbnail and making it a link to the original, large image.
- From the menu select |
|
The default is select the width to be 100 pixels, with a border 2
pixels wide. This will put an ugly hyperlink border around the
thumbnail.
-
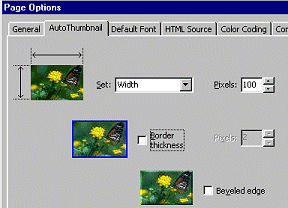 Uncheck
the Border thickness box and set the width at 100 pixels, if
necessary.
Uncheck
the Border thickness box and set the width at 100 pixels, if
necessary.
- Click on OK to close the dialog.
- From the top of the page, create enough blank lines to move
the cursor below the photos that were positioned absolutely.
- Insert the large image of the Great Wall of China,
china.jpg below the other photos.
-
 With
china.jpg selected, click
the Auto Thumbnail button. The image is resized to 100 pixels wide.
With
china.jpg selected, click
the Auto Thumbnail button. The image is resized to 100 pixels wide.
- Save.
[picturebar.htm] In the Save Embedded Files dialog, FrontPage has a
suggested name for the new image it created,
china_small.jpg.
- Click on OK to accept the suggested name.
- Switch to HTML view and look at the code for the
image. It has an anchor tag surrounding it. The hyperlink is to the
large image.
<p><a href="china.jpg">
<img border="0" src="china_small.jpg"
xthumbnail-orig-image="china.jpg" width="100"
height="64"></a></p>
- Verify the link: Switch to Preview and click on the
thumbnail. The large image should load. Switch back to Normal view.
 HotSpots
Earlier you learned how to make a whole image into a hyperlink. With
the Pictures bar you can create a hyperlink on just part of an image,
called a hotspot.
You can draw a rectangle or ellipse or create a polygon shape. Each
hotspot on the image can link to a different target. Your hotspots should
not overlap, of course.
- Click on the photo of Ricardo to make the Pictures bar
appear.
- Click on
 the Rectangle hotspot button.
- Drag a rectangle around Ricardo's head in the photo. The
Insert Hyperlink dialog appears.
- Type in the Address box ricardo.htm,
a page that you will create later. An outline shows where the hotspot
is.
- Click on
 the Ellipse hotspot button.
-
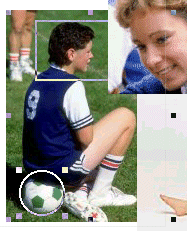 Starting
at the center of the soccer ball, drag a circular hotspot
over the ball.
Starting
at the center of the soccer ball, drag a circular hotspot
over the ball.
- In the Address box of the Insert Hyperlink dialog, type
http://www.fifa.com , which is the
address to the international governing body of soccer (know in most of
the world as futbol).
- Back in Normal view, click off the image to deselect it. The
outlines vanish.
- Switch to Preview. The hotspots are invisible.
- Move your mouse pointer over the image. The pointer changes
to
 the hand shape when it is over a hotspot. Cool!
-
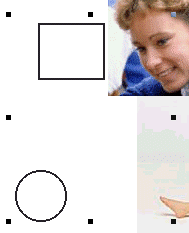 Switch
to Normal view and click on
Switch
to Normal view and click on
 the Highlight Hotspots button. The image vanishes and black shapes show
where the hotspots are.
the Highlight Hotspots button. The image vanishes and black shapes show
where the hotspots are.
- Click off the image to get back to normal.
Now you have experimented with effects available on the Pictures bar.
Just remember that some of them add code and files to your web.
 Pictures Bar