 |
You often need to include some
information about your document at the top (the header) or the bottom (the
footer) of each printed sheet. Spreadsheets often need several paper pages to
print. It is important to put the right information in the header or footer so you
can tell which pages go together.
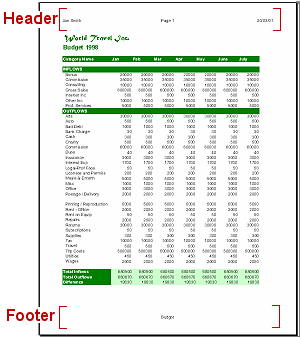
Header and footer text lives
inside the top and bottom margins.
|
|
Where you are:
JegsWorks >
Lessons >
Numbers
Before
you start...
Project 1: Excel Intro
Project 2: Excel Basics
Getting Started

 Regional
Settings Regional
Settings
Appearance
Page
Margins
Header/Footer
Sheet
Options
Enter/Edit/Clear 
Arrange
AutoFill
Finish
Summary
Quiz
Exercises
Project 3: Format & Arrange
Project 4: Groups & Formulas
Project 5: Design
Search
Glossary
Appendix
|
|
There is a handy dialog to make this process as easy as
possible. But, the process is somewhat different than you may be used to in
other programs.
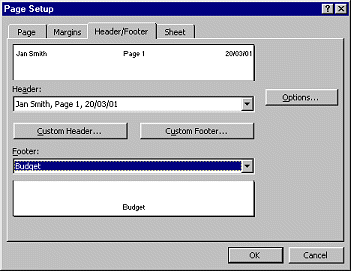
Using one of the standard header/footer layouts
In Excel the header and footer are divided into 3 sections:
Left, Center, Right. You must format these three sections separately.
 No
wrap error: The sections of the header do not wrap, so if what you type is too long, it will print on top of the next header section's text. In the illustration below the Left section is using the font Arial
Black while the Center and Right sections use Arial. The text runs right over the Center section. No wrapping occurs.
Tip: The preview in the Header dialog that shows your custom text on a page is smaller than the normal paper page. So if everything fits in the preview, you should be clear of overlaps on the real page, too. No
wrap error: The sections of the header do not wrap, so if what you type is too long, it will print on top of the next header section's text. In the illustration below the Left section is using the font Arial
Black while the Center and Right sections use Arial. The text runs right over the Center section. No wrapping occurs.
Tip: The preview in the Header dialog that shows your custom text on a page is smaller than the normal paper page. So if everything fits in the preview, you should be clear of overlaps on the real page, too.

Separate
Header/footer for each Sheet: You must actively set the header and footer for each sheet. Excel will use the header and footer on each piece of paper that it takes to print that sheet. If you wish to use the same header/footer for several sheets,
you can select all the sheets first and then create the header/footer. Just
don't forget to unselect the sheets when you are done or all your keystrokes
will apply to every selected sheet. You can overwrite a lot of data this
way!!!
 |
Step-by-Step: Setup Header & Footer |
|
What you will learn: |
to create a header or footer for printing
to create a custom header
to print from toolbar
|
Start with:
 (a blank
workbook) (a blank
workbook)
Setup Header
-
 If
necessary, open the page Setup dialog . [File | Page Setup...] If
necessary, open the page Setup dialog . [File | Page Setup...]
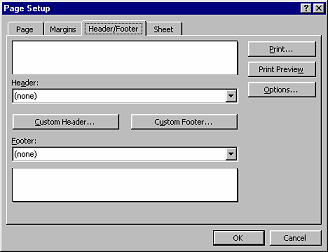
- Click on the Header/Footer tab.
The dialog shows separate text boxes for header and footer. Each one has a
drop list of suggestions.
-
 Open the drop list on the Header text box and scroll it to see the pre-defined headers. Your list will look somewhat different from the illustration. Open the drop list on the Header text box and scroll it to see the pre-defined headers. Your list will look somewhat different from the illustration.
The choices include things like page and sheet numbers, file name, and date.
Other suggestions include the name of the person and company or school to which
the software is licensed. Those are set when the software is installed. The
person's name for this document can be changed in File | Properties | Summary |
Author.
-
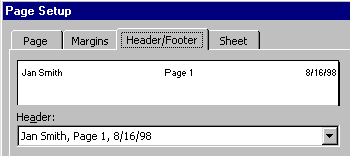 Select several of the choices in the drop list to see how they will display. Include one that has three parts, divided by commas. The Header box shows how your choice will print on the page - left, center, right. Select several of the choices in the drop list to see how they will display. Include one that has three parts, divided by commas. The Header box shows how your choice will print on the page - left, center, right.
- Click the Custom Header… button. A dialog box opens with 3 sections. This is more awkward than the way Word
handles headers. Here you must enter and format each section separately. The Left section is Aligned Left. The Center section is Centered. The Right section is Aligned Right. You cannot change these alignments.
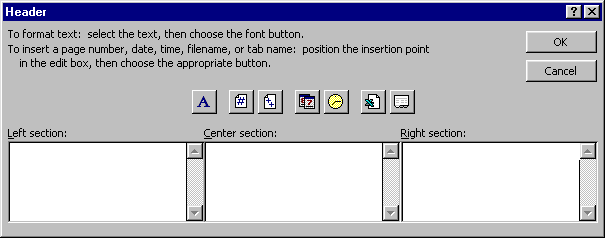
When none of the pre-defined headers suit you, you can type in any text you want in any section.
The buttons help with the information people often want to include.
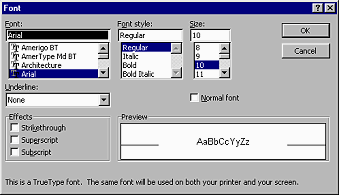  The Font button opens the Font dialog. You must format each section separately. You can format just part of a section's text, if you wish.
You do not have quite all of the choices here that the Font dialog has in Word. Some of the Effects are missing and you cannot use a Font
Color in your header or footer. Disappointing!
 The check box Normal font will return the header to the default workbook font, usually Arial 10 pts.
You can set this Normal font in Tools | Options | General | Standard font. The check box Normal font will return the header to the default workbook font, usually Arial 10 pts.
You can set this Normal font in Tools | Options | General | Standard font.

 You can't insert a graphic in an Excel97/2000 header or footer. You can't insert a graphic in an Excel97/2000 header or footer.

  You CAN
insert a (small) graphic in the header or footer in Excel 2002/2003. You CAN
insert a (small) graphic in the header or footer in Excel 2002/2003.

Use  the Insert picture button.
Use  the Format picture button to get a dialog to change the size etc. of the
picture.
the Format picture button to get a dialog to change the size etc. of the
picture.
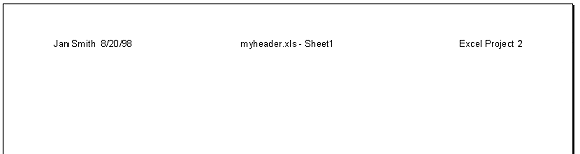
- Use the buttons to create your own Custom Header with the following sections:
Left = Your name, two spaces, the date
Center = File name, space, hyphen, space, Sheet name
Right = Excel Project 2
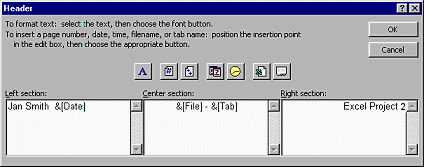

Header in 3 sections
Use this style of header on each sheet for your projects and exercises. Change the right section as is appropriate for later projects and for exercises.
- Click on OK to close the Header dialog.
Print
-
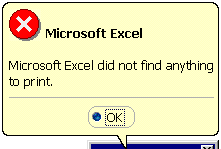 Click on Click on
 the Print Preview button.
Since you have not entered anything in the worksheet yet, an error message appears. the Print Preview button.
Since you have not entered anything in the worksheet yet, an error message appears.
- Click on OK to close the error message.
- Select cell A1 and press the spacebar once and then press
ENTER. This will put a blank space into the cell. Excel considers this as "something to print."
- Click on
 the Save button on the Standard toolbar. Since this is a new file, the Save As dialog appears. the Save button on the Standard toolbar. Since this is a new file, the Save As dialog appears.
 Save your file to
your Class
disk in the excel
project2 folder you created earlier, with the name
myheader.xls. Save your file to
your Class
disk in the excel
project2 folder you created earlier, with the name
myheader.xls.
 How to handle a full disk How to handle a full disk
- Open Print Preview again. You should see a blank document with your custom header showing.
 Print by clicking Print by clicking
 the Print button. You will learn more about controlling your printing later. The button works fine for this little job. the Print button. You will learn more about controlling your printing later. The button works fine for this little job.
   
~~ 1 Cor. 10:31 ...whatever you do, do
it all for the glory of God. ~~
Last updated:
02 May 2012 |
