 |
You enter data
when you type text or numbers into an empty cell. If a cell already has data,
your typing overwrites the existing data. You edit data when you make changes to
existing data. You clear data when the cell's
contents are erased, but the cell itself is not deleted. With this
lesson you start creating a spreadsheet yourself. This sheet will be used
throughout the lessons, as you learn more and more about spreadsheets. After
a bit of practice, you will enter data for the document that you will be
building on for the rest of the lessons in this project. The
Story so far
If you worked through the Working with Words lessons, you have
already met World Travel Inc. You will be creating a
spreadsheet for this fictional company. World Travel Inc. sent out a promotional
flyer for their 10th anniversary, offering special prices on some special trips for their best
customers. The special trips are to Tahiti, New Zealand, and a
round-the-world cruise. The travel agency can also create trips to other
destinations. You will create a spreadsheet to keep track of the sales from this
flyer.

|
|
Where you are:
JegsWorks >
Lessons >
Numbers
Before
you start...
Project 1: Excel Intro Project 2: Excel Basics
Getting Started

 Regional
Settings Regional
Settings
Appearance
Page
Margins
Header/Footer
Sheet
Options
Enter/Edit/Clear 
Arrange
AutoFill
Finish
Summary
Quiz
Exercises
Project 3: Format & Arrange
Project 4: Groups & Formulas
Project 5: Design
Search
Glossary
Appendix
|
|
 |
Step-by-Step: Enter/Edit/Clear |
|
What you will learn: |
to enter data into a cell
to edit existing data in a cell
to clear data from a cell
|
Start with:  (a blank
workbook) (a blank
workbook)
Select: Cell
- Select cell A1 at the upper left by clicking it. (It should be already selected when you open a new workbook.)
The status bar shows
 the word Ready
and the cell has a darker, wider border than other cells. You are ready
to enter data! the word Ready
and the cell has a darker, wider border than other cells. You are ready
to enter data!
Data Entry: Type
-
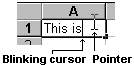 Type This is a cell
while A1 is selected. Do not press ENTER yet. The Status bar shows Type This is a cell
while A1 is selected. Do not press ENTER yet. The Status bar shows
 Enter.
When you start typing, the pointer changes to the I-beam and a blinking cursor appears in the cell to show where the next character will appear. The characters
appear in the
standard font (also called Normal), which you selected in Options dialog (
| | ).
Erase Data (before ENTER)
- Press the ESC key to cancel your typing. All changes to cell A1
vanish. This works only if you haven't pressed ENTER yet.
- Retype the text and press ENTER. The selection moves to the next cell
down and your typing is accepted into the cell. The Status Bar now shows
Ready.
Erase Data (after ENTER)
Several methods work to erase, or clear, a cell after the data has been entered into the cell.
Clear Contents
-
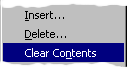 Right click on cell A1, and from the popup menu select (This command is also on the
Menu bar as | | ) Right click on cell A1, and from the popup menu select (This command is also on the
Menu bar as | | )
The data in the cell is erased. Any formatting will remain and will be applied to new data
that you enter later.
- Undo.
-
DELETE
- With cell A1 selected, press the DELETE key. Again the cell contents are
erased. This works when you have many cells selected, too.
Drag
-
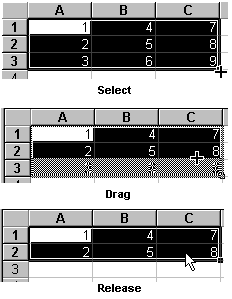 Type numbers in the cells A1, A2 A3, B1, B2, B3, C1, C2, C3 as shown at the right. Type numbers in the cells A1, A2 A3, B1, B2, B3, C1, C2, C3 as shown at the right.
- Select range A1:C3. The selected range has a small black
square
 in the lower right corner.
- Drag the small black square back up into the selected region. The rows
and/or columns you drag back over turn gray.
- Release the mouse button. The cells that you backed over are empty. This
action is quite a surprise and can be hard to figure out if you were not warned
about it.
- Drag up again to clear all the numbers from the cells.
Data Entry: Down a column
Now you will start creating your World Travel Inc. sheet. The fun begins!!
-
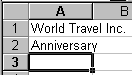
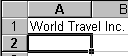 Type World Travel Inc. in cell A1. Type World Travel Inc. in cell A1.
- Press ENTER to return to Ready mode and have your typing entered into the cell. The selected cell shifts to cell A2. (What
cell is selected next when you press ENTER is set in | | .)
  Notice that the text in cell A1 overlaps
its neighbor, cell B1. This happens only when the neighboring cell is empty. When B1 is not empty, its contents will hide the excess in cell A1. Notice that the text in cell A1 overlaps
its neighbor, cell B1. This happens only when the neighboring cell is empty. When B1 is not empty, its contents will hide the excess in cell A1.
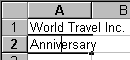
- In cell A2, type Anniversary and press ENTER. The selected cell shifts to A3.
Edit data
It is likely that while entering data you will make a mistake that you don't see until later.
Or perhaps you will change your mind about what you wrote. ESC or Undo won't help in
after the data has been entered. Now you will learn how to
edit data without having to retype the whole cell.
- Press the up arrow key to move the selection back to A2. The status bar shows
Ready.
 If you start typing now, you will overtype what is in the cell. If you start typing now, you will overtype what is in the cell.
-
 Double-click cell A2. (Or you could click in the Formula bar.) The
Status bar now shows Double-click cell A2. (Or you could click in the Formula bar.) The
Status bar now shows
 Edit and the blinking cursor is in the text.
- Press the END key to move the cursor to the end of the text.
-
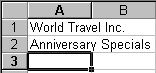 Type a blank space and then Specials and press ENTER. Type a blank space and then Specials and press ENTER.
- Press the down arrow once to select cell A4.
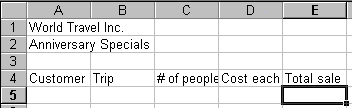
Data Entry: Across a row
- Type Customer
in cell A4.
- Press the TAB key or the right arrow to move one cell to the right. Your typing is entered and the selection is moved to cell B4.
- Type Trip
- Use TAB to move over one cell right to C4.
- Type # of people .
- Press TAB to move one cell right to D4.
- Type Cost each.
- Press TAB to move one cell right to E4.
- Type Total sale
-
 Press ENTER. The selection moves down to
Row 5. Which cell in row 5 will depend on exactly which keys you used to move
across the row! Press ENTER. The selection moves down to
Row 5. Which cell in row 5 will depend on exactly which keys you used to move
across the row!
- Press HOME to move to the beginning of the row. Now you can start
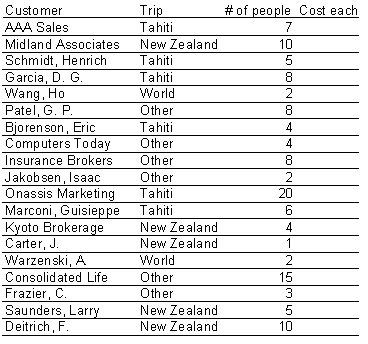
entering the customers and the trips they have purchased. The data is listed
in the order that the trips were bought.
- In Row 5 enter the first customer and trip, in the appropriate cells:
AAA Sales Tahiti
7
- Press the down
arrow to move down to Row 6.
- Press HOME to move to the beginning of the row. Some of the text you typed is hidden by the next cell. You will fix this a little later.
- In Row 6 enter the following in the appropriate cells:
Midland Associates New Zealand 10
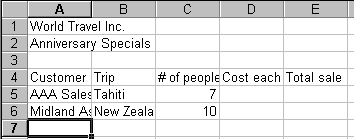
- Press ENTER (and then HOME if necessary) to move to the beginning of the row.
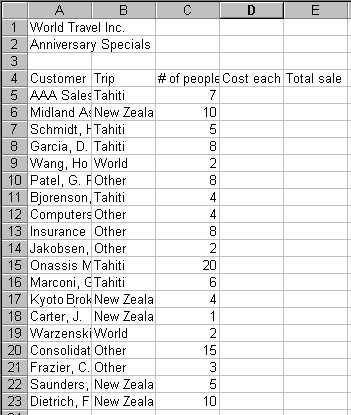
- Continue entering data into cells, using the data shown in the table
below. The horizontal lines are shown just to help you enter the data accurately.
AutoComplete:
 Excel remembers what you type in each column and will offer to complete an entry if you start to type it later in the same column. The completion of the word or phrase is highlighted in the cell.
You can accept this value by pressing
ENTER or by using TAB or an arrow key to leave the cell. This can speed up your work when certain values occur repeatedly, like in the Trips column in this worksheet. Just keep typing if Excel's suggestion is not what you want. Excel remembers what you type in each column and will offer to complete an entry if you start to type it later in the same column. The completion of the word or phrase is highlighted in the cell.
You can accept this value by pressing
ENTER or by using TAB or an arrow key to leave the cell. This can speed up your work when certain values occur repeatedly, like in the Trips column in this worksheet. Just keep typing if Excel's suggestion is not what you want.
Save
- If you have not done so yet, label a
removable disk as Class.
Write your name and class info on the label of the disk. You don't want
another student to wander off with all your work!
If you have completed other Working with... sections, you should already have a disk like this.
You may want to start a new disk or delete any files on the disk. A floppy disk can get full before you know it!
- Insert
your disk into the disk drive.
- Create a folder named excel project2
, if you do not have this folder already. Details on how to
create a folder are in Working with Windows:
Files & Folders
- Click on
 the
Save button. Since your document is new, the Save As dialog appears. the
Save button. Since your document is new, the Save As dialog appears.
 How to handle a full disk How to handle a full disk
- In the Save As dialog, save the document to your Class disk in the folder
excel
project2 with the name trips.xls .
As you go through these
lessons, your disk can get full, especially a floppy disk! Keep a spare blank disk handy.
trips.xls after
Step-by-Step: Enter/Edit/Clear
   
~~ 1 Cor. 10:31 ...whatever you do, do
it all for the glory of God. ~~
Last updated:
02 May 2012 |
