 |
Spreadsheets can be really big.
One way to print just exactly the cells that you want is
with the Sheet
tab in the Page Setup Dialog.
To print only part of a sheet, you set a Print Area. Only cells in this Print Area will actually print, no matter what you see on your screen.
You would want to use the Page Break Preview to manage printing several pages,
but this dialog is good for smaller jobs.
The Print Area could be the whole sheet, a range, a single cell, or even several ranges scattered over the sheet. Each
separate range would print on a separate page.
If you move the cells in the Print Area, the cell references for Print Area will change to show the new
location(s). Handy dandy!
|
 |

Where you are:
JegsWorks >
Lessons >
Numbers
Before
you start...
Project 1: Excel Intro
Project 2: Excel Basics
Getting Started

 Regional
Settings Regional
Settings
 Appearance Appearance
 Page Page
 Margins Margins
 Header/Footer Header/Footer
 Sheet Sheet
 Options Options
 Enter/Edit/Clear Enter/Edit/Clear 
Arrange
AutoFill
Finish
Summary
Quiz
Exercises
Project 3: Format & Arrange
Project 4: Groups & Formulas
Project 5: Design
Search
Glossary
Appendix
|
|
 |
Step-by-Step: Setup Sheet |
 |
What you will learn: |
to set the print area from Page Setup dialog
to print the spreadsheet
|
Start with:
 (budget.xls from the resource files)
Open Page Setup | Sheet tab
- Open from your resource files
your old friend budget.xls.
- If necessary, select the sheet Budget and then open the
Print Preview. [File | Print Preview or click
 the Print Preview button on the toolbar.] How many pages will it take to print
this sheet?
- Close the Print Preview.
- Open the Page Setup dialog from the menu. [File | Page
Setup...]
- Click on the Sheet tab.
This dialog sets options for how the selected worksheet will print.
All checkboxes and text boxes should be blank at this time.
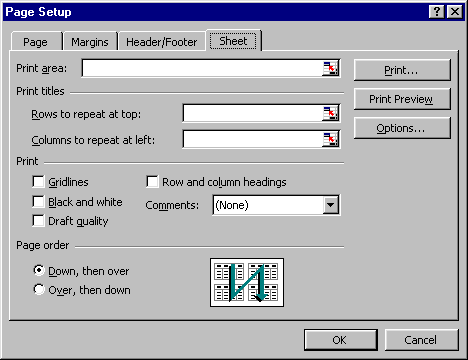
 If you opened
the Page Setup dialog from the Print Preview, some of your choices are not
available! If you opened
the Page Setup dialog from the Print Preview, some of your choices are not
available!
Print Area: Keyboard
The Print Area is the cells which will be printed.
- Type in the Print Area text box the range a1:d4 .
-
 Click
on Click
on
 the
Print Preview button. Not much will print! Only the cells in the
range that you typed, a1:d4, which is just the titles and some labels.
- Click on
 the Close button on the Preview window tool bar. Print Preview closes and you
are back in Normal view. The dialog closed, too. Your Print Area is
still a1:d4 and has a dashed border around it in Normal view now.
Print Area: Mouse
When you don't know the cell references, you can show Excel
which cells you want to print by clicking or dragging in the sheet itself.
-
Open the Page Setup dialog again to the Sheet tab.
-
Click on
 the
the  Collapse Dialog
button at the right end of the Print Area text box. The dialog collapses to show just the text
box. The button changes to Collapse Dialog
button at the right end of the Print Area text box. The dialog collapses to show just the text
box. The button changes to
 the Restore Dialog button. The collapsed dialog will stay on top while you work in the spreadsheet itself.

The Collapse Dialog button
 appears in all Excel dialog text boxes in which you can enter cell references.
You will use it again!
-
In budget.xls on the sheet Budget, drag from cell A1 to cell D13.
This selects the Inflows for the first quarter of the year and the sheet titles. The absolute
references appear in the text box. On the worksheet, the Print Area is
surrounded by a dashed line.
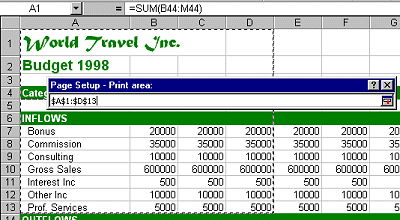
Selected area with cell references in Print Area text box.
- Click
 the Restore Dialog button at the end of the text box to return the collapsed dialog to its original larger size.
 Losing changes: If you close
the dialog with the Losing changes: If you close
the dialog with the  Close button, all your
changes in that dialog will be lost! You should always restore the dialog first and then click on the
OK button to
exit. (Unless, of course, you want to forget all about what you just did!) Close button, all your
changes in that dialog will be lost! You should always restore the dialog first and then click on the
OK button to
exit. (Unless, of course, you want to forget all about what you just did!)
- Click on
 the Print Preview button. Only the
cells you selected show as printing.
 You can
select non-adjacent cells and ranges. Their range cell references in the Print area text box
will be separated with a comma, like $E$3:$F$6, $G$15:$I:$89. Each range will
print on a separate page. You can
select non-adjacent cells and ranges. Their range cell references in the Print area text box
will be separated with a comma, like $E$3:$F$6, $G$15:$I:$89. Each range will
print on a separate page.
 The Print Area can also be set by first selecting on the sheet the ranges that you want to print and then choosing File | Print Area | Set Print Area. The Print Area can also be set by first selecting on the sheet the ranges that you want to print and then choosing File | Print Area | Set Print Area.
- Click the Close button to close the Print Preview.
Clear Print Area
If you don't want to restrict printing to your Print Area all the
time, you need to clear out those cell references. There is an easy way!
-
 From the menu select | | . You did it! From the menu select | | . You did it!
- Click on
 the Print Preview button to see that the whole sheet will print next
time.
Other sections of the Sheet tab
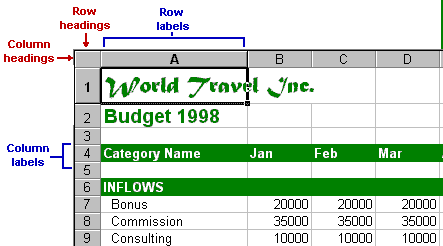
Labels are the text that you typed into cells to explain what the rows and
columns are about. If the Print Area won't fit
on a single piece of paper, you will have one or more columns of
data off on a page by itself. With no labels, this data won't make much
sense.
In the Budget sheet shown below, the column labels are in
row 4 (months of the year) and the
row labels are in column A (category names).
 Print Titles
section: Print Titles
section:
The Page Setup dialog lets you choose to repeat rows and columns so that the
labels will be on every page that it
takes to print the sheet.
 Print section: Print section:
Lets you choose some other print characteristics.
- Gridlines are the gray lines that separate the cells. Checking the box
will make them print.
- Row and column headings
are the row numbers and the column letters. Checking the box makes them
print. Remember - Headings are not the same as the labels you may have
created.
- Black and white will print the sheet without colors.
- Draft quality is a faster but not as crisp print quality.
- Comments are little notes that you can attach to cells. They
can be printed all together at the end of the sheet, or within the sheet,
or not at all.
Page Order section:
 The
default is Down, then over. This describes how Excel will
print the sections of a worksheet when it doesn't fit on one paper page -
from the top of the worksheet down the left, then move over and start at
the top again. The
default is Down, then over. This describes how Excel will
print the sections of a worksheet when it doesn't fit on one paper page -
from the top of the worksheet down the left, then move over and start at
the top again.
The other option, Over, then down, prints the cells across the top of the sheet first and then moves down to print the next set of rows.
   
~~ 1 Cor. 10:31 ...whatever you do, do
it all for the glory of God. ~~
Last updated:
02 May 2012 |

![]()