|
The pages you create with
FrontPage are usually meant to be seen over the Internet. Normally you first
create and edit a web on your own computer and then
publish it with FrontPage to a web server.
FrontPage copies the pages, images, and all the other
files that you used plus the files and folders that FrontPage created
itself. The code for some of FrontPage's special features, like themes,
shared borders, and included pages, may not be written to the page until you
publish. Until then, there is just a webbot comment about the feature on the
page.
If your web server does not have FrontPage extensions
installed, many of the advanced features that FrontPage creates so easily
will not work.
The information in the various FrontPage reports can help
you prepare for publishing.
Reporting Bar
|
|
Where you are:
JegsWorks >
Lessons > Web
Before you start...
Project 1: Browser Basics
Project 2: HTML Basics
HTML Code
About HTML
What You Need
Code by Hand
WYSIWYG
FrontPage/FPX
Images in HTML

 FrontPage
OR FPX
FrontPage
OR FPX
 Insert
Image Insert
Image
More
Images
Inline
Images
Replace
Image
Image
Link
Align & Space
Align
Images
Image
Issues
Save
Page
Edit/Convert
Image
Pictures
Bar
Publish
Web
Formatting
Tables
Print
Convert
Summary
Quiz
Exercises
Search
Glossary
Appendix |
|
Before You Publish
Before you let the world see what you have written, you
should make sure everything is in good working order.
-
Broken links: Use the Broken Links report
to find and correct broken hyperlinks and images.
- Clean up unused files: Use the Unlinked Files report to
find unused images and pages. Delete them or move them to a folder outside
the web. Do not delete permanently them until your SURE you won't need
them again. Also, you may have temporary or practice documents that you
don't want to keep.
 Images or files that
are called only by a script will show up as "unlinked". Images or files that
are called only by a script will show up as "unlinked".
- Publish Status: Check the Publish Status report to make
sure the correct files are marked "Don't Publish". You may have some pages
that aren't ready for publishing yet.
-
Components: If your web is on your local
server, check the features that depend on FrontPage extensions, like
hit counters and Search pages. (You will not be able to check the
emailing of form results on a local server.)
-
Spell check
-
Proof-read: Check for grammar errors, copy and
paste errors, typos, errors of fact.
-
Navigate: Test all links with a browser. Do they
go where you wanted? Just because a link is not broken does not mean it
goes where you wanted it to go!
-
Appearance: View all pages in a browser
and verify that they look right and that the title in the Title bar
is appropriate.
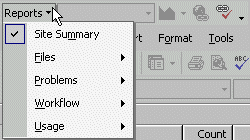
Reporting Bar

To access the various reports that FrontPage can create,
you can click
 the
Reports button on the View bar. The first time in a session that you use
this button, FrontPage will create the Site Summary, which has links to the
most frequently used reports. It may take a few minutes if you have a lot of
pages. After you choose a report, to get back to the Site Summary you must
use the Reports drop list on the Reporting Bar. This toolbar appeared when
you clicked the Reports button. the
Reports button on the View bar. The first time in a session that you use
this button, FrontPage will create the Site Summary, which has links to the
most frequently used reports. It may take a few minutes if you have a lot of
pages. After you choose a report, to get back to the Site Summary you must
use the Reports drop list on the Reporting Bar. This toolbar appeared when
you clicked the Reports button.
What Does Publishing Do?
When you publish a web, FrontPage does a number of
things:
-
Copies whole web: Re-creates all the folders and
copies all the files in the web (pages, images, scripts,
stylesheets, etc.)
-
Links: Makes any changes needed so that all the
hyperlinks and paths work in the new location.
-
FrontPage features: Writes HTML code to the page
for features like themes, shared borders, and included files. Before
publishing in the code for the page there is only a webbot comment that
defines the feature.

|
Step-by-Step: Publish Web
|
|
| What you will learn: |
to use the Broken Links report
to use the Unlinked Files report
to use the Publish Status report
to delete and move unwanted files
to prevent publishing of a file
to publish a web to a new location |
Start with:
 , web
hector with hector16.htm , web
hector with hector16.htm
To prepare for publishing to a web server, you need to
make sure that all is just right with your web.
Open with Recent Webs
-
Open FrontPage and from the menu select
| and then select your web hector .
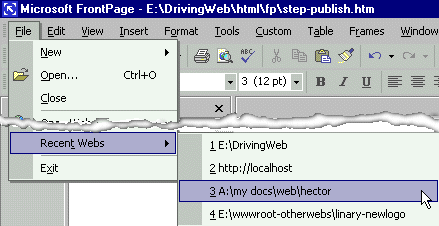
If your web is not in the list of recent webs, then
too many other webs have been opened since you last opened
hector. You will have to use the Open command
and navigate to the web.
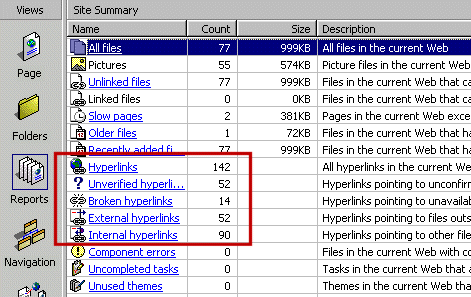
Report: Broken Links
 In the
Site Summary you will initially see a large number of "Unverified
hyperlinks". You must let FrontPage verify all the links before the
list of Broken Links will be accurate. In the
Site Summary you will initially see a large number of "Unverified
hyperlinks". You must let FrontPage verify all the links before the
list of Broken Links will be accurate.
-
Click on
the Reports button. The Reporting bar appears.
Reporting Toolbar
In the right pane you will see
Building the Site Summary report... There is no progress bar to
let you know how the "building" is progressing. FrontPage may spend
several seconds creating its reports. The larger the web, the longer it
will take. Several of the reports are about links.
-
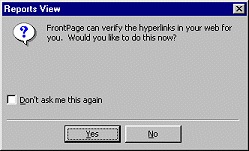 Click
on the Unverified hyperlinks report. FrontPage pops up a message
box to ask if you want it to check all the hyperlinks. Click
on the Unverified hyperlinks report. FrontPage pops up a message
box to ask if you want it to check all the hyperlinks.
- Click on OK. FrontPage begins to check all the links.
This can take quite a long time, especially if there are a lot of URLs
to web sites to check. Scroll the list and notice what pages the
broken links are in.
 A green check marks a link that worked.
 A broken link from a chain marks a link that did not work.
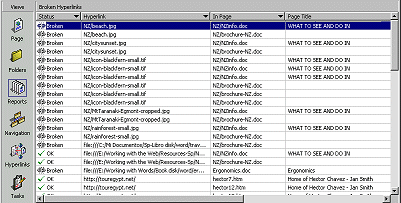
Hmmm. There are a bunch of broken links in documents that you have not
even worked with yet! What are these documents?? These are from the
resource files that you copied into
the web earlier. You don't need to be publishing all of these now.
There are also several versions of Hector's page. You will move the
older ones out of the web shortly.
A broken link to
another web site may not actually be broken. It may just mean that the
site's server was too busy to reply to FrontPage's attempt to contact
it. Or, the page at the URL may automatically redirect the browser to a
different page. It is wise to test such 'broken' links in a browser
yourself before deleting or changing them.
Report: Unlinked Files
First you find the unlinked files. Then you decide what to do about
them. You have four choices of what to do with unlinked files.
- Delete
- Move to a folder outside the web (with Explorer)
- Mark as 'Don't Publish' (with FrontPage.)
- Leave alone.
Be
careful about deleting! If your pages use scripts to open pages or change
images, FrontPage will not know that those files are being used.
They will show up as unlinked files even though they are important to your
site.
Since you have no scripts in your small site for
Hector, any unlinked files are candidates for deleting or moving out to
another folder.
-
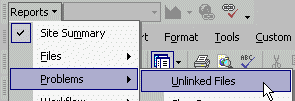 Click
on the Reports button on the Reporting bar and select
| . Click
on the Reports button on the Reporting bar and select
| .
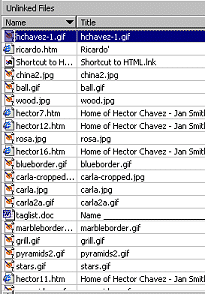 Wow!
What a lot of unfamiliar images and documents. Wow!
What a lot of unfamiliar images and documents.
It's decision time! You will use all four choices above to clean up your
web.
Delete from List
You won't need some of these unlinked
files any more. You can delete them using the list of unlinked files.
- Click on the column label Name. The
column is resorted in alphabetical order.
- Select by holding the CTRL key down while you click on the
following images, which are in non-web formats:
hchavez.tga
hchvez.wmf
pyramids.png
pyramids.tif
pyramids.wmf
pyramids.wpg
- Right click on the selection and, from the popup menu,
select .
- In the confirmation box, choose Yes to All.
The images are deleted from your disk. That was easy!
Move: Explorer
You might need your previous versions
of Hector's page later if you mess up. It is wiser to just move them for
now instead of deleting them.
You must go out to an Explorer window
in order to move files and folders to a location outside the web.
-
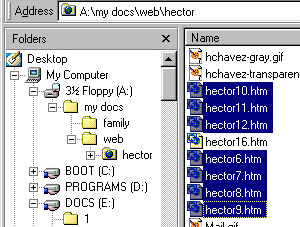 Open
an Explorer window and display the contents of the web
hector. Open
an Explorer window and display the contents of the web
hector.
- Select all the versions of Hector's page except
the latest one, hector16.htm.
- Move the selected files by dragging them to the folder
web on your disk, one level up from
hector. Your earliest versions of the page are
already there. If you are asked to confirm replacing
hector6.htm, click on OK.
-
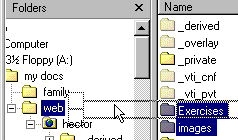 Now
move the folders Exercises and NZ from hector
up to web. Now
move the folders Exercises and NZ from hector
up to web.
- Switch back to FrontPage where the Unlinked Files list is
still showing. Are the pages you moved are still showing in the list.
FrontPage is not aware yet of what you did outside of FrontPage.
- Click on
 the Folders button in the Views bar. It will take FrontPage a few
seconds to bring up the list of files and folders from Drive A. Are the
files you moved listed?
the Folders button in the Views bar. It will take FrontPage a few
seconds to bring up the list of files and folders from Drive A. Are the
files you moved listed?
No, they are gone. But wait! You had not looked at the Folder view
before. What about a view that you have seen before? Sometimes there the
views don't match.
- Click on
 the
Page button in the Views bar. Are the files and folders you moved listed
still in the Folder List? If they are, it is because FrontPage has a
cache of data that is not always up-to-date when you make changes
outside FrontPage. You must make FrontPage refresh its information.
<sigh> the
Page button in the Views bar. Are the files and folders you moved listed
still in the Folder List? If they are, it is because FrontPage has a
cache of data that is not always up-to-date when you make changes
outside FrontPage. You must make FrontPage refresh its information.
<sigh>
- If necessary, click on a file in the Folder List and
press the F5 key to Refresh the display. Are the files and
folders listed? They should be gone now, safely in the
web folder.
- Click on the Reports button again. The Unlinked Files report
comes back. The files you moved aren't in the list now. FrontPage was
forced to look at the web again and revise the report.
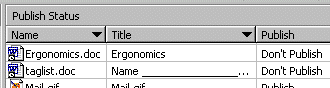
Report: Publish Status
There are two Word documents left in this web from the resource files.
They will not be needed in Hector's web site. You can mark them as "Don't
Publish".
The "Don't
Publish" feature can be handy but it is also dangerous. It is easy to
forget to change the setting back to "Publish" when you really do want the
file published with the rest of the web. Always check for "Don't Publish"
files before you publish.
-
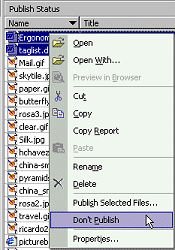 In
the Unlinked Files report, click on the column label
Type to sort the files by file type. The Word documents are now at
the top, with extension .doc. In
the Unlinked Files report, click on the column label
Type to sort the files by file type. The Word documents are now at
the top, with extension .doc.
- Select the two Word documents.
- Right click and click on .
This menu choice will have a checkmark by it if the selection is already
set to not publish.

-
 From
the Reporting bar, open the Publish Status report.
| | From
the Reporting bar, open the Publish Status report.
| |
- Again sort the list, this time by clicking on the column
label Publish. The files marked "Don't Publish" are at the top.
Don't Publish icon
 :
The icon :
The icon
 for
the Word doc may have changed first to for
the Word doc may have changed first to
 by adding a symbol at the bottom left to show that the file will not be
published. It's a tiny change, but is very helpful, once you get used to
looking for it. It seems to be a clock set to 3:00. (I have no idea
why!) Later the file will show
the document icon with a white X on a red circle. Much clearer.
by adding a symbol at the bottom left to show that the file will not be
published. It's a tiny change, but is very helpful, once you get used to
looking for it. It seems to be a clock set to 3:00. (I have no idea
why!) Later the file will show
the document icon with a white X on a red circle. Much clearer.
Final Checks
The last steps in preparing to publish are similar to what you would do
to check any document before printing or sharing it with others.
- Run Spell Check.
- Read carefully and look for grammar errors, typos, repeated
words, and substitutions that spell check will not catch (like "in" for
"is").
- Open Internet Explorer and view the pages in the web.
Check for correct appearance on the page at various window sizes.
- Test all the links to see that they go where they are
supposed to go.
Publish to Hard Disk (Backup Copy)
Publishing to a disk is a good way to make a backup copy of your web.
The process is the same as to a web server except you will not have to
login with username and password.
-
 Save
and close any pages that are open in FrontPage. Save
and close any pages that are open in FrontPage.
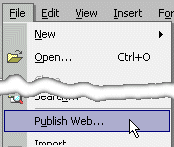
- From the menu select |
Do not use the Publish button on the toolbar because FrontPage
would start publishing to the last location it used - without offering
you the chance to change it!
 In
FrontPage 2002 you get a dialog with In
FrontPage 2002 you get a dialog with
 a green checkmark beside each file that will be published. Beside a file
that will not be published is
a green checkmark beside each file that will be published. Beside a file
that will not be published is
 a red circle with a white X. To change the Publish Status of a file,
right click on it and click on
.
a red circle with a white X. To change the Publish Status of a file,
right click on it and click on
.
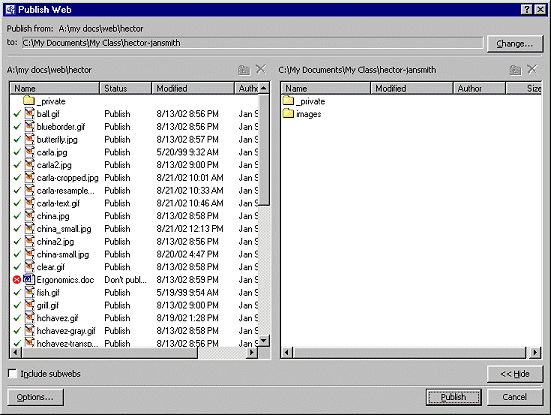
- Click on the Change button. The Publish Destination
dialog appears.
- Click on Browse and navigate to
C:\My Documents\My Class.
- Create a new folder using
 the New Folder button. Name it hector-yourname,
but replace "yourname" with your own name.
the New Folder button. Name it hector-yourname,
but replace "yourname" with your own name.
- Click on the Open button to close the dialog and return to
the Publish Web dialog.
-
 Click
on the Options button. Click
on the Options button.
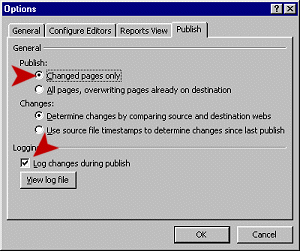
- Choose "Changed pages only". This
is a good setting for most situations. FrontPage will compare the file
lists in the two locations and only upload new or changed ones. This
saves a lot of uploading time when you are just making corrections.
The choice "All pages, overwriting..." can
save time when the site is fairly small because it just uploads
everything without comparing. There is no delay for comparing file
lists.
- Check the box Log changes during publish.
- Click on OK to close the Options dialog.
- Click on Publish to publish your web to the hard disk.
You will see a warning message saying that the web does not exist and
would you like to create one.

- Click on OK. You will see a progress bar and the names
of the files as they are copied. It will take a while to copy the
web from a floppy disk.
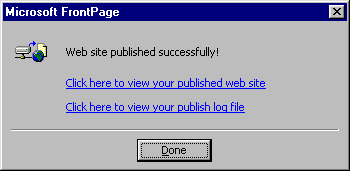 When
the process is finished, you will see a message that your site was
published successfully. There is a link to the log file and one to the
web site. When
the process is finished, you will see a message that your site was
published successfully. There is a link to the log file and one to the
web site.
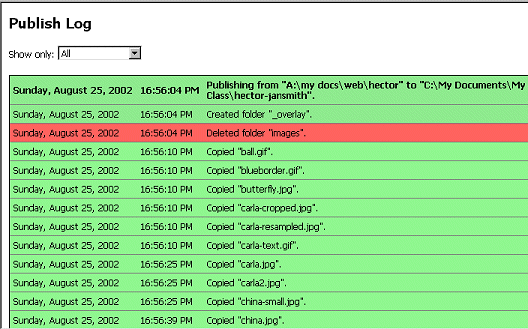
- Click on the link to the log file. Scroll the list to
see what all you published.
The next time you publish this information will be replaced. If you
want to keep a copy for later, use the browser's
| command.
Publish to a Web Server
Publishing to a web server has the same steps as to the hard disk, plus
the login process.
If you publish to a web server, you must know:
- the address to use
- the username
- the password
- the type of upload (usually HTTP or FTP)
|
 Publish Web