|
Step-by-Step: Replace Image in FrontPage
|
|
| What you will learn: |
to replace an image using a dialog
to add ALT text using a dialog
to replace an image by changing SRC in the code
to add ALT text in code
to resample an image in FrontPage |
Start with:
 ,
hector9.htm, resource files
,
hector9.htm, resource files
To reduce the loading time you should use images that
are already the size you need. With a graphics program you can reduce the
size of an image and save it as a new file. In your web
folder you will find alternate images that have already been resized.
Each image should have ALT text which tells what the
image is or what its function is. You can include descriptions of the
image if that is important.
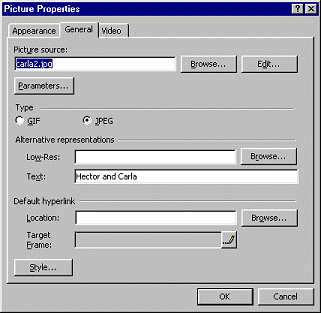
Replace Image: Dialog
In the Image Properties dialog you can change the Image
Source.
-
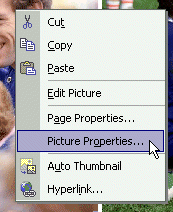 Right
click on the photo of Hector and Carla.
Right
click on the photo of Hector and Carla.
- From the popup menu select .
-
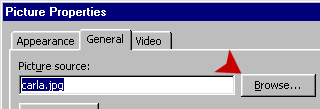 Click
on the General tab. and then the Browse... button beside the
textbox Picture Source. The Picture Properties dialog opens.
Click
on the General tab. and then the Browse... button beside the
textbox Picture Source. The Picture Properties dialog opens.
- If necessary, browse to the web
hector.
-
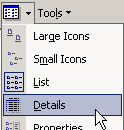 On
the dialog toolbar, click on the arrow beside the Views button to
open the list and select Details to show more information about
these files. If necessary, click on the Name heading to sort the
files into alphabetic order.
On
the dialog toolbar, click on the arrow beside the Views button to
open the list and select Details to show more information about
these files. If necessary, click on the Name heading to sort the
files into alphabetic order.
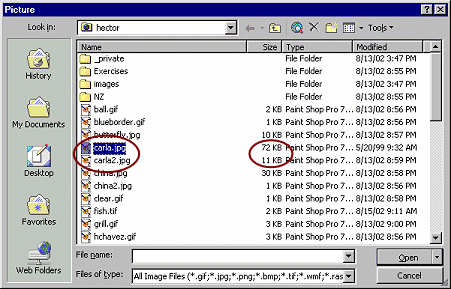
- Compare the sizes of carla.jpg and
carla2.jpg and also other similar pairs of
images in this folder.
- Select carla2.jpg and click the
Open button. Then click on OK to close the Image dialog. In the
Picture Properties dialog, Picture Source: is now
carla2.jpg
ALT Text: Dialog
- In the Text: textbox, type Hector
and Carla . This is the ALT text that will show in the browser
until the image loads. Text reader software will read these words.
-
 Click
on OK. The image replaces the previous one on the page.
Click
on OK. The image replaces the previous one on the page.
- Look at the estimated loading time on the Status bar. (This
time assumes using a 28.8 modem.) It is now down to 77 seconds from 110
seconds! Quite a difference! This shows why you should always use an
image that is the actual size you need.
Replace Image: Code
To change an image you can open HTML view and change the SRC attribute
of the IMG tag.
- Open the HTML view.
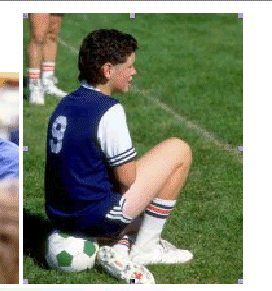
- Scroll to the second IMG tag, Ricardo's picture.
- Change the file name from ricardo.jpg
to ricardo2.jpg .
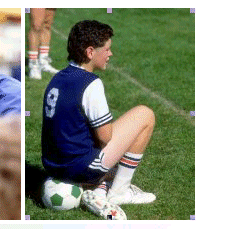
-
 Switch
back to Normal view. Is Ricardo's picture is now fuzzy? It
probably is.
Switch
back to Normal view. Is Ricardo's picture is now fuzzy? It
probably is.
You changed the source but you did not change the dimensions of the
image to match the new size. Unless you happened to resize the original
image to just the right height and width, the browser will be resizing
the image.
- Switch back to HTML view and delete the height and
width attributes with their values. But, remember their values!
-
 Switch
back to Normal view. Ah! Ricardo's picture looks better now.
Switch
back to Normal view. Ah! Ricardo's picture looks better now.
- Switch back to HTML. FrontPage has cleverly figured
out what the height and width are and wrote that in the IMG tag.

ALT Text: Code
- While in HTML vies, type alt="Ricardo"
inside the IMG tag for ricardo2.jpg . Be
careful to leave a space between each of the attribute/value
combinations.

- Close the HTML view.
- Check the load time. It is down to 36 seconds! Three more
images to go!
Replace : Drag and Drop
-
 From
the Folder List, drag rosa2.jpg and
drop it beside the existing picture of Rosa. The sizes are close but
rosa2 is smaller.
From
the Folder List, drag rosa2.jpg and
drop it beside the existing picture of Rosa. The sizes are close but
rosa2 is smaller.
- Delete the original picture of Rosa.
Replace Image: Resample from Pictures bar
- Select the little picture of the Great Wall of China on your
web page. The Pictures toolbar appears.
- Click
 the Resample button. FrontPage accepts the current size and throws away
any information not needed for this smaller size. The image will be
saved when you save the page.
the Resample button. FrontPage accepts the current size and throws away
any information not needed for this smaller size. The image will be
saved when you save the page.
 When you save the
page, you will see the Save Embedded Files dialog. If you click on OK,
FrontPage will overwrite the existing large picture of the Great
Wall with the small version. You can easily lose an original that you
need elsewhere at a different size! Changing the name is a good idea.
When you save the
page, you will see the Save Embedded Files dialog. If you click on OK,
FrontPage will overwrite the existing large picture of the Great
Wall with the small version. You can easily lose an original that you
need elsewhere at a different size! Changing the name is a good idea.
- Click on OK.
- Add appropriate ALT text in Picture Properties.
Finish
- Use the method of your choice to replace
pyramids.tif with pyramids2.gif (notice
the change from tif to gif!).
- Add appropriate ALT text and make sure the code shows the new
dimensions. Check the loading time.
The loading time has dropped to 18 seconds! An acceptable time. Of
course, you are not actually finished with the page yet!
-
Save as hector10.htm. When you
see the Save Embedded Files dialog, change the name of
china.jpg to china-small.jpg
and click on OK.
 Replace Image